жӮЁеҘҪпјҢзҷ»еҪ•еҗҺжүҚиғҪдёӢи®ўеҚ•е“ҰпјҒ
дёҠдёҖзҜҮж–Үз« жҲ‘们讲иҝ°дәҶйЎөйқўеҲқе§ӢеҠ иҪҪж•°жҚ®зҡ„дёҖдәӣдёңиҘҝпјҢжң¬зҜҮжҲ‘们жқҘи®ІдёҖдёӢжҹҘиҜўжҢүй’®е’ҢеҲҶйЎөжҢүй’®гҖӮеңЁеҫҲд№…д»ҘеүҚжҲ‘еҶҷиҝҮдёҖзҜҮASP.NET MVC4еҲҮиҝ‘е®һжҲҳзҡ„ж–Үз« пјҢжңүе…ідәҺеҲҶйЎөзҡ„д»Јз ҒпјҢжң¬зҜҮжҲ‘们дёҚйҮҮз”Ёеҫ®иҪҜзҡ„AJAXжЎҶжһ¶гҖӮ
е…ҲзңӢдёҖдёӢжҹҘиҜўж•ҲжһңпјҢеңЁзӮ№еҮ»GetжҢүй’®д№ӢеҗҺпјҢдјҡиҝӣиЎҢAJAXиҜ·жұӮгҖӮ

jsд»Јз ҒеҰӮдёӢ
jQuery(document).ready(function () {
setRowBackColor();
$("#btnsearch").click(function () {
$("#selsamelist").empty();
$("#seldifflist").empty();
searchByCondition(1);
});
})
function searchByCondition(pageIndex) {
$.ajax({
url: "/Home/GetSearchResult?pam=" + new Date().toTimeString(),
type: "POST",
datatype: "Html",
data: {
param: JSON.stringify({
IsMarried: $("#ddlMarried").val(),
StartDate: $("#txtdatestart").val(),
EndDate: $("#txtdateend").val(),
UserName: $.trim($("#txtusername").val()),
PageIndex: pageIndex,
PageSize: $("#hfdPageSize").val()
})
},
beforeSend: function () {
$("#divloding").show();
},
complete: function () {
$("#divloding").hide();
},
success: function (data) {
$("#divresult").html(data);
setRowBackColor();
},
error: function () {
alert("жҹҘиҜўеӨұиҙҘ!");
}
});
}еңЁйЎөйқўеҠ иҪҪе®ҢжҲҗеҗҺпјҢжҲ‘们з»ҷGetжҢүй’®жіЁеҶҢдәҶдёҖдёӘclickдәӢ件пјҢиҜ·жұӮactionиҺ·еҸ–ж•°жҚ®гҖӮеңЁиҜ·жұӮд№ӢеүҚпјҢжҲ‘们еұ•зӨәдёҖдёӘжӯЈеңЁиҺ·еҸ–ж•°жҚ®зҡ„divпјҢиҜ·жұӮз»“жқҹд»ҘеҗҺжҲ‘们йҡҗи—ҸиҝҷдёӘdivгҖӮеҪ“жҹҘиҜўжҲҗеҠҹе®ҢжҲҗд»ҘеҗҺпјҢжҲ‘们е°ҶжңҚеҠЎз«Ҝиҝ”еӣһзҡ„йЎөйқўеҠ иҪҪеҲ°divresultгҖӮжҲ‘们жқҘзңӢдёҖдёӢиҝҷдёӘactionгҖӮ
[HttpPost]
        public PartialViewResult GetSearchResult()
        {
            string requestJson = Request["param"];
            JObject jObj = (JObject)JsonConvert.DeserializeObject(requestJson);
            string isMarried = jObj.Value<string>("IsMarried");
            string userName = jObj.Value<string>("UserName");
            string strStartDate = jObj.Value<string>("StartDate");
            string strEndDate = jObj.Value<string>("EndDate");
            int pageIndex = jObj.Value<int>("PageIndex");
            int pageSize = jObj.Value<int>("PageSize");
            int startPageIndex = jObj.Value<int>("StartPageIndex");

            DateTime startDate = DateTime.MinValue;
            DateTime endDate = DateTime.MinValue;
            DateTime.TryParse(strStartDate, out startDate);
            DateTime.TryParse(strEndDate, out endDate);

            UserInfoRequest request = new UserInfoRequest()
            {
                IsMarried = isMarried == "-1" ? string.Empty : isMarried,
                UserName = userName,
                StartDate = startDate == DateTime.MinValue ? null : (DateTime?)startDate,
                EndDate = endDate == DateTime.MinValue ? null : (DateTime?)endDate,
                PageIndex = pageIndex,
                PageSize = pageSize
            };

            DataResponse<UserDBEntity> dataResponse = GRLCBiz.GetInstance().GetUserInfoEntityList(request);
            UserInfoViewModel userInfoViewModel = new UserInfoViewModel();
            userInfoViewModel.DataResponse = dataResponse;
            userInfoViewModel.DataResponse.PageSize = ConstValues.CONN_DefaultPageSize;
            userInfoViewModel.DataResponse.StartPageIndex = startPageIndex;
            return PartialView("~/Views/Partial/UserInfoPartial.cshtml", userInfoViewModel);
}йҰ–е…ҲеңЁactionдёӯпјҢиҺ·еҸ–е®ўжҲ·з«Ҝдј йҖ’иҝҮжқҘзҡ„jsonж јејҸзҡ„иҜ·жұӮеҸӮж•°пјҢжҲ‘们еҲ©з”ЁNewtonsoft.Json.dllжқҘи§Јжһҗе®ўжҲ·з«Ҝдј йҖ’иҝҮжқҘзҡ„jsonеҜ№иұЎгҖӮ然еҗҺжһ„йҖ requestпјҢжңҖеҗҺи°ғз”ЁGetUserInfoEntityListиҺ·еҸ–ж•°жҚ®гҖӮеңЁдёҠиҠӮдёӯжҲ‘们еңЁи®ІеҲ°DALеұӮиҺ·еҸ–ж•°жҚ®зҡ„ж—¶еҖҷпјҢжңүдёҖдёӘDBScriptManagerзұ»пјҢиҝҷдёӘзұ»е°ұжҳҜдё“й—Ёз”ЁжқҘиҜ»еҸ–DBScriptXMLе·ҘзЁӢдёӢзҡ„xmlж–Ү件дёӯзҡ„sqlи„ҡжң¬зҡ„гҖӮ
public class DBScriptManager
    {
        public static string GetScript(Type remotingClassType, string key)
        {
            string folder = ConstValues.CON_DbScriptXmlFolder;
            string xmlFile = Path.Combine(AppDomain.CurrentDomain.BaseDirectory, folder);
            xmlFile = Path.Combine(xmlFile, remotingClassType.FullName + ".xml");

            string xPathExpression = "/Scripts/Script[@Key='" + key.Trim() + "']/text()";
            return ExecuteXPath(xmlFile, xPathExpression);
        }
        .......
}иҝҷдёӘзұ»е…¶е®һе°ұжҳҜж №жҚ®web.configй…ҚзҪ®зҡ„xmlж–Ү件зҡ„ж–Ү件еӨ№и·Ҝеҫ„еҠ дёҠж–Ү件и·Ҝеҫ„(class fullname+.xml)жүҫеҲ°xmlж–Ү件еҗҺпјҢиҝӣиЎҢи§Јжһҗеҫ—еҲ°sql scriptгҖӮжүҖд»ҘеӨ§е®¶зңӢеҲ°xmlж–Ү件зҡ„е‘ҪеҗҚжҳҜDALеұӮдёӢйқўзҡ„зұ»зҡ„fullNameгҖӮ
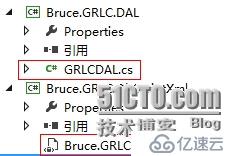
иҝҷж ·зҡ„е®ҡд№үдҫҝдәҺдёҖдёҖеҜ№еә”пјҢеҜ№дәҺз»ҙжҠӨжқҘиҜҙд№ҹжҜ”иҫғж–№дҫҝгҖӮеҸҰеӨ–дҪҝз”Ёxmlж–Ү件зҡ„дјҳеҠҝеңЁдәҺе®ғжҳ“дәҺдҝ®ж”№пјҢеҰӮжһңи„ҡжң¬еҶҷеңЁSPдёӯжҲ–иҖ…д»Јз ҒдёӯпјҢе°ұдёҚжҳҜйӮЈд№Ҳе®№жҳ“еҺ»дҝ®ж”№гҖӮеӣ дёәеӨ§еӨҡж•°жғ…еҶөдёӢsqlжңҚеҠЎеҷЁжҳҜдёҚе…Ғи®ёд№ұеҠЁзҡ„пјҢд»Јз Ғд№ҹжҳҜйңҖиҰҒйҮҚж–°зј–иҜ‘жүҚиғҪдёҠзәҝзҡ„гҖӮеҪ“然дәҶпјҢеӨҚжқӮзҡ„дёҡеҠЎеӨ„зҗҶиҝҳжҳҜиҰҒж”ҫеҲ°SPдёӯпјҢеӣ дёәSPеҶ…йғЁзҡ„дёҖдәӣжү§иЎҢдјҳеҢ–жңәеҲ¶жҳҜе…¶д»–ж–№ејҸжүҖдёҚе…·еӨҮзҡ„гҖӮ
OK,жҹҘиҜўи®Іе®ҢдәҶпјҢжҲ‘们зңӢдёҖдёӢеҲҶйЎөпјҢйҰ–е…ҲжҲ‘еңЁwebConfigдёӯе®ҡд№үдәҶдёҖдёӘиҠӮзӮ№пјҢз”ЁдәҺи°ғж•ҙжҳҫзӨәйЎөз Ғзҡ„ж•°йҮҸгҖӮ

OKпјҢжҲ‘们е®ҡд№үзҡ„еҖјдёә6гҖӮзңӢдёҖдёӢеҲҶйЎөpartial viewзҡ„д»Јз Ғ
@using Bruce.GRLC.Model.Response;
@using Bruce.GRLC.Utility;
@using Bruce.GRLC.Model.Entity;
@model DataResponse<UserDBEntity>
<ul class="pagination pagination-lg">
@if (Model != null)
{
@Html.HiddenFor(m => m.PageSize, new { id = "hfdPageSize" })
<li><a href="#">«</a></li>
if (Model.StartPageIndex > ConstValues.CONN_PagerDisplayCount)
{
<li><a href="#" id="linkPaginationprev" onclick="linkPaginationClick(@Model.StartPageIndex,@Model.PageSize,@Model.TotalCount,0)">expand</a></li>
}
for (int i = Model.StartPageIndex; i <= Model.TotalPages; i++)
{
<li id="li_@i"><a href="#" id="link_@i" onclick="searchByCondition(@i,@Model.StartPageIndex)">@i</a></li>
if (i > 0 && i % ConstValues.CONN_PagerDisplayCount == 0)
{
break;
}
}
if (Model.StartPageIndex < Model.TotalPages - ConstValues.CONN_PagerDisplayCount)
{
<li><a href="#" id="linkPaginationnext" onclick="linkPaginationClick(@Model.StartPageIndex,@Model.PageSize,@Model.TotalCount,1)">expand</a></li>
}
<li><a href="#">»</a></li>
}
</ul>иҝҳжҳҜдҪҝз”ЁBootStrapжҸҗдҫӣзҡ„ж ·ејҸпјҢзӣ®еүҚеҸӘжңүдёӨйЎөзҡ„ж•°жҚ®пјҢе…¶е®һдёҠйқўзҡ„иҝҷж®өд»Јз ҒжҳҜжғіе®һзҺ°еҰӮжһңй…ҚзҪ®зҡ„йЎөз Ғж•°жҳҜ6пјҢеҪ“жҲ‘еңЁ1-6йЎөж—¶пјҢжҳҫзӨәеұ•зӨәдёӢдёҖжү№йЎөз Ғзҡ„й“ҫжҺҘпјҢеҪ“жҲ‘еңЁ7-12йЎөж—¶пјҢжҲ‘е°ұжҳҫзӨәеүҚдёҖжү№е’ҢдёӢдёҖжү№зҡ„й“ҫжҺҘгҖӮ
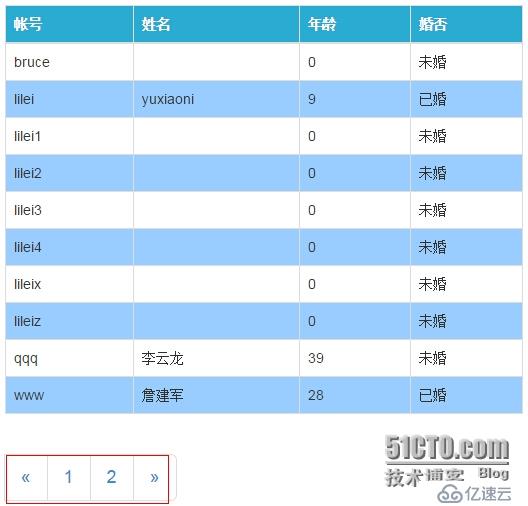
зҺ°еңЁзҡ„йЎөз ҒжңүзӮ№е°‘пјҢзЁҚзӯүпјҢжҲ‘з»ҷж•°жҚ®еә“жҸ’е…ҘдёҖжү№ж•°жҚ®гҖӮ
DECLARE @Index INT = 1
WHILE(@Index<=100)
BEGIN
	INSERT INTO dbo.[User]
	(
		UseNo,
		pwd,
		IsAdmin
	)
	SELECT
		'Bruce' + CAST(@Index AS CHAR(3)),
		pwd,
		'0'
	FROM dbo.[User] WITH(NOLOCK)
	WHERE UseNo = 'lilei'

	SET @Index = @Index + 1
END
жҸ’е…Ҙе®ҢжҲҗпјҢжҲ‘们зңӢдёҖдёӢж•Ҳжһң
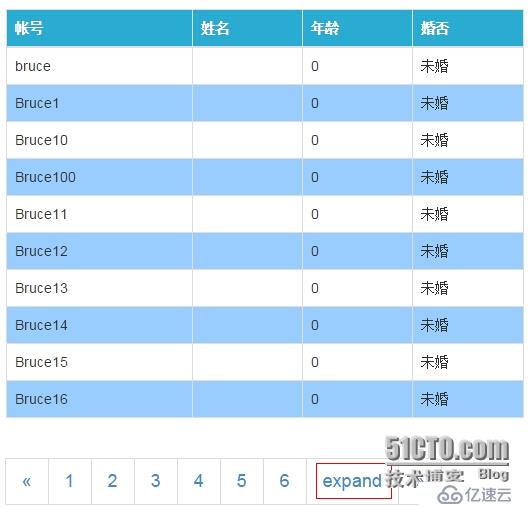
жҲ‘们зңӢеҲ°expandжҢүй’®еҮәжқҘдәҶпјҢжҲ‘зӮ№еҮ»е®ғпјҢеә”иҜҘеҮәжқҘ7-12йЎөгҖӮ

okпјҢеҫҲеҘҪпјҢеӣ дёәзӣ®еүҚеҸӘжңү12йЎөзҡ„ж•°жҚ®пјҢжүҖд»ҘжҲ‘们иҝҳж— жі•зңӢеҲ°12йЎөд»ҘеҗҺзҡ„expandй“ҫжҺҘпјҢдёҚиҰҒзҙ§пјҢжҲ‘们еҶҚжҸ’е…ҘдёҖжү№ж•°жҚ®пјҢеҲ·ж–°пјҢж•ҲжһңеҰӮдёӢ

зңӢеҲ°дәҶеҗ§пјҢеүҚеҗҺйғҪжңүдёҖдёӘexpandй“ҫжҺҘгҖӮOKпјҢйЎөйқўд»Јз Ғе®һзҺ°зҡ„иҜқпјҢжҜ”иҫғз®ҖеҚ•пјҢеӨ§е®¶д»”з»ҶзңӢе°ұжҳҺзҷҪдәҶгҖӮжҺҘдёӢжқҘжҲ‘们зңӢдёҖдёӢиҝҷдёӘйЎөз Ғexpandзҡ„jsж–№жі•гҖӮ
function linkPaginationClick(pageindex, pagesize, totalcount, type) {
    var urlParam = pageindex + "_" + pagesize + "_" + totalcount + "_" + type;
    $.ajax({
        url: "/Home/GetNewPaginationView/" + urlParam + "?pam=" + new Date().toTimeString(),
        type: "GET",
        datatype: "Html",
        success: function (data) {
            $("#divpagination").html(data);
        }
    });
}е°ҶpageIndexпјҢpagesize,totalcountе’Ңtype(ж ҮзӨәжҳҜеҗ‘еүҚexpandпјҢиҝҳжҳҜеҗ‘еҗҺexpand)дј йҖ’еҲ°жңҚеҠЎз«ҜпјҢеңЁжңҚеҠЎз«Ҝи®Ўз®—еҘҪд№ӢеҗҺиҝ”еӣһдёҖдёӘpartialйЎөз Ғз»ҷе®ўжҲ·з«ҜгҖӮ
еҘҪдәҶпјҢжҲ‘们зңӢдёҖдёӢactionзҡ„д»Јз ҒгҖӮ
[HttpGet]
        public PartialViewResult GetNewPaginationView(string id)
        {
            string[] paramArray = id.Split(new char[] { '_' }, StringSplitOptions.RemoveEmptyEntries);
            DataResponse<UserDBEntity> dataResponse = new DataResponse<UserDBEntity>();
            dataResponse.TotalCount = int.Parse(paramArray[2]);
            dataResponse.PageSize = int.Parse(paramArray[1]);

            string type = paramArray[3];
            if (type == "0")
            {
                dataResponse.StartPageIndex = int.Parse(paramArray[0]) - ConstValues.CONN_PagerDisplayCount;
            }
            else
            {
                dataResponse.StartPageIndex = int.Parse(paramArray[0]) + ConstValues.CONN_PagerDisplayCount;
            }

            return PartialView("~/Views/Partial/PaginationPartial.cshtml", dataResponse);
}еҪ“жҲ‘们еҲӨж–ӯжҳҜеҗ‘еүҚexpandзҡ„ж—¶еҖҷпјҢжҲ‘们е°ұжҠҠиө·е§ӢйЎөз ҒеҮҸеҺ»й…ҚзҪ®зҡ„йңҖиҰҒжҳҫзӨәзҡ„йЎөж•°гҖӮеҸҚд№ӢпјҢеҲҷеҠ дёҠгҖӮеңЁиҝҷйҮҢпјҢе…¶е®һеҸҜд»ҘеңЁе®ўжҲ·з«Ҝе®һзҺ°иҝҷдёӘдёңиҘҝпјҢеңЁжңҚеҠЎз«Ҝе®һзҺ°жҳҜдёҖз§ҚжөӘиҙ№пјҢзЁҚеҗҺжҲ‘дјҡе°Ҷе…¶ж”№жҲҗе®ўжҲ·з«Ҝе®һзҺ°гҖӮ
OKпјҢжңҖеҗҺжҲ‘们зңӢдёҖдёӢзӮ№еҮ»йЎөз Ғзҡ„ajaxиҜ·жұӮгҖӮ
function searchByCondition(pageIndex, startPageIndex) {
$.ajax({
url: "/Home/GetSearchResult?pam=" + new Date().toTimeString(),
type: "POST",
datatype: "Html",
data: {
param: JSON.stringify({
IsMarried: $("#ddlMarried").val(),
StartDate: $("#txtdatestart").val(),
EndDate: $("#txtdateend").val(),
UserName: $.trim($("#txtusername").val()),
PageIndex: pageIndex,
PageSize: $("#hfdPageSize").val(),
StartPageIndex: startPageIndex
})
},
beforeSend: function () {
$("#divloding").show();
},
complete: function () {
$("#divloding").hide();
},
success: function (data) {
$("#divresult").html(data);
$("#li_" + pageIndex).addClass("active");
setRowBackColor();
},
error: function () {
alert("жҹҘиҜўеӨұиҙҘ!");
}
});
}е°ҶйЎөз Ғдј иҝӣжқҘе°ұиЎҢдәҶпјҢе’ҢжҹҘиҜўи°ғз”ЁеҗҢдёҖдёӘactionгҖӮжңүж—¶еҖҷз”ЁжҲ·жғізҹҘйҒ“жҲ‘еңЁе“ӘдёҖйЎөпјҢжҲ‘们е°ұйңҖиҰҒз»ҷй“ҫжҺҘеҠ дёҠж ·ејҸгҖӮ
$("#li_" + pageIndex).addClass("active");з»ҷеҪ“еүҚзҡ„йЎөз ҒеҠ дёҠи“қиүІиғҢжҷҜгҖӮ
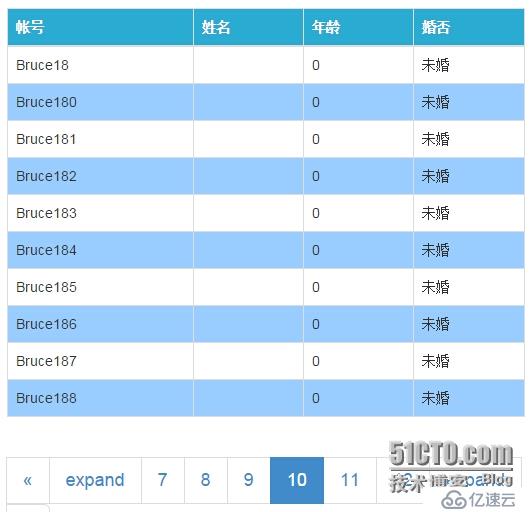
OKдәҶпјҢжҲ‘们зңӢи§Ғ第10йЎөзҡ„иғҢжҷҜеҸҳжҲҗи“қиүІдәҶгҖӮжңҖеҗҺжҲ‘们зңӢдёҖдёӢиҫ“е…ҘжҹҘиҜўжқЎд»¶жҹҘиҜўпјҢе°ұжҢүз…§еҮәз”ҹж—ҘжңҹжҹҘиҜўеҗ§
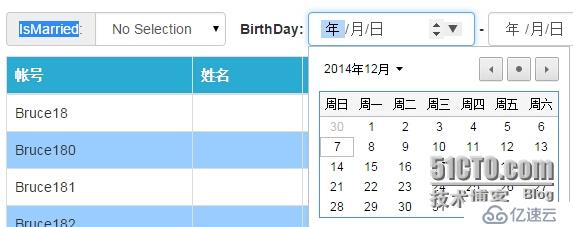
ж—ҘжңҹйҖүжӢ©дҪҝз”Ёзҡ„жҳҜHtml5зҡ„ж–°ж Үзӯҫ<Input type="date">гҖӮ
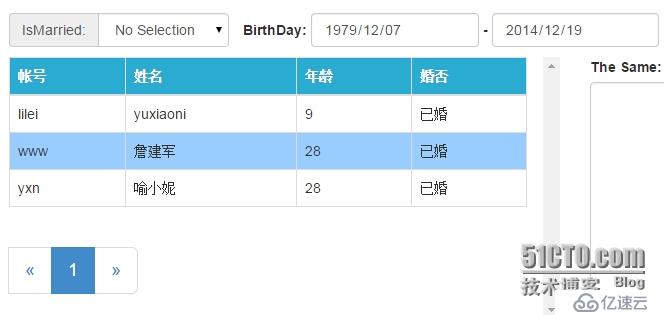
OKпјҢжң¬иҠӮеҲ°жӯӨз»“жқҹпјҢдёӢиҠӮжҲ‘们жқҘи®ІCompareеҠҹиғҪгҖӮ
е…ҚиҙЈеЈ°жҳҺпјҡжң¬з«ҷеҸ‘еёғзҡ„еҶ…е®№пјҲеӣҫзүҮгҖҒи§Ҷйў‘е’Ңж–Үеӯ—пјүд»ҘеҺҹеҲӣгҖҒиҪ¬иҪҪе’ҢеҲҶдә«дёәдё»пјҢж–Үз« и§ӮзӮ№дёҚд»ЈиЎЁжң¬зҪ‘з«ҷз«ӢеңәпјҢеҰӮжһңж¶үеҸҠдҫөжқғиҜ·иҒ”зі»з«ҷй•ҝйӮ®з®ұпјҡis@yisu.comиҝӣиЎҢдёҫжҠҘпјҢ并жҸҗдҫӣзӣёе…іиҜҒжҚ®пјҢдёҖз»ҸжҹҘе®һпјҢе°Ҷз«ӢеҲ»еҲ йҷӨж¶үе«ҢдҫөжқғеҶ…е®№гҖӮ
жӮЁеҘҪпјҢзҷ»еҪ•еҗҺжүҚиғҪдёӢи®ўеҚ•е“ҰпјҒ