жӮЁеҘҪпјҢзҷ»еҪ•еҗҺжүҚиғҪдёӢи®ўеҚ•е“ҰпјҒ
еҜҶз Ғзҷ»еҪ•
зҷ»еҪ•жіЁеҶҢ
зӮ№еҮ» зҷ»еҪ•жіЁеҶҢ еҚіиЎЁзӨәеҗҢж„ҸгҖҠдәҝйҖҹдә‘з”ЁжҲ·жңҚеҠЎжқЎж¬ҫгҖӢ
"еҰӮжһңжҲ‘жҜ”еҲ«дәәзңӢеҫ—иҝң,йӮЈжҳҜеӣ дёәжҲ‘з«ҷеңЁе·Ёдәәзҡ„иӮ©иҶҖдёҠ"
иҝҷжҳҜеҠ еҲ©еҲ©зҡ„第дёҖзҜҮж–Үз«
зі»з»ҹзҺҜеўғпјҡCentOS6.6жЎҢйқўзүҲ
е·Ҙе…·пјҡVNCеҸҠXshell
жөҒзЁӢпјҡ
еҲӣе»әд»“еә“дҪҚзҪ®вҖ”вҖ”еҲқе§ӢеҢ–д»“еә“вҖ”вҖ”й…ҚзҪ®з”ЁжҲ·еҗҚеҸҠйӮ®з®ұвҖ”вҖ”дёӢиҪҪз®ҖеҺҶжЁЎжқҝвҖ”вҖ”зј–иҫ‘з®ҖеҺҶвҖ”вҖ”GitHubдёҠеҲӣе»әд»“еә“вҖ”вҖ”дёҠдј жң¬ең°д»Јз ҒеҲ°иҝңзЁӢд»“еә“вҖ”вҖ”дҪҝз”Ёжүҳз®ЎжәҗвҖ”вҖ”е®ҢжҲҗ
actionпјҒ
еҲӣе»әд»“еә“дҪҚзҪ®пјҡ
[root@centos66 ~]# mkdir -p Code/CV
[root@centos66 ~]# cd Code/CV/
еҲқе§ӢеҢ–д»“еә“пјҡ
[root@centos66 CV]# git init #еҲқе§ӢеҢ–д»“еә“ Reinitialized existing Git repository in/root/Code/CV/.git/
з”ЁжҲ·еҗҚеҸҠйӮ®з®ұй…ҚзҪ®пјҡ
[root@centos66 CV]# git config --globaluser.name "userlx"
[root@centos66 CV]# git config --global user.email"15210680512@163.com"
дёӢиҪҪз®ҖеҺҶжЁЎжқҝпјҡ
[root@centos66 CV]# wget http://labfile.oss.aliyuncs.com/courses/624/cv-template.zip
зј–иҫ‘з®ҖеҺҶпјҡ
[root@centos66 CV]# unzip cv-template.zip [root@centos66 CV]# mv cv-template/*. [root@centos66 CV]# rm -rf cv-template* __MACOSX* [root@centos66 CV]#firefox index.html #еңЁVNCжҺ§еҲ¶еҸ°жү“ејҖ Xshellдёӯжү“ејҖдјҡжҠҘй”ҷ
дҝ®ж”№з®ҖеҺҶпјҢе°ұжҳҜеңЁзҪ‘йЎөдёҠеҸҜд»ҘзӣҙжҺҘжӣҙж”№зҡ„пјҢдҪҶжҳҜпјҢпјҢпјҢиҝҷзі»з»ҹзҡ„иҫ“е…Ҙжі•зү№еҲ«зҡ„дёҚеҘҪз”ЁпјҢжҲ‘е°ұеҸӘжӣҙж”№дәҶеҮ йЎ№еҶ…е®№пјӣ
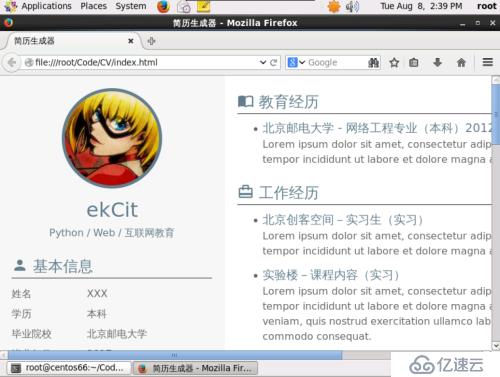
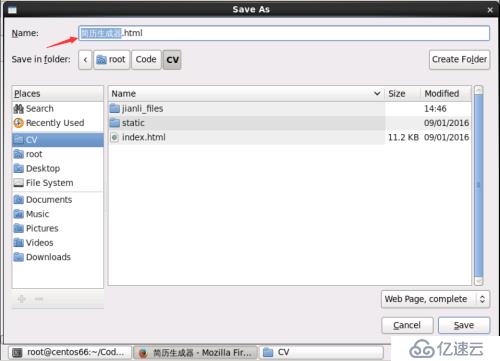
#дҝ®ж”№е®ҢпјҢ然еҗҺе°ұCtrl+sдҝқеӯҳзҪ‘йЎө
еҲӣе»әд»“еә“пјҡ
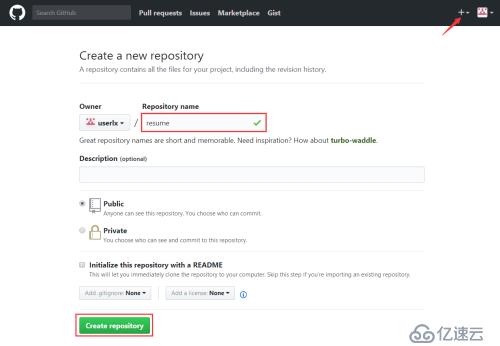
#иҫ“е…Ҙд»“еә“еҗҚз§°вҖ”вҖ”еҲӣе»әд»“еә“пјҲй»ҳи®Өи®ҫзҪ®дёәе…¬жңүпјҢз§ҒжңүжҳҜ收иҙ№зҡ„пјү
#еҲӣе»әе®ҢжҲҗеҗҺеҸҜд»ҘзңӢеҲ°жҸҗзӨәж“ҚдҪң
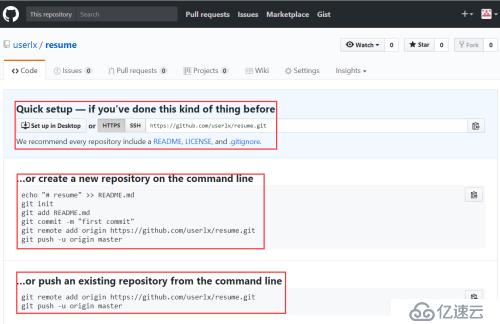
еҝ«йҖҹи®ҫзҪ®-еҰӮжһңдҪ д№ӢеүҚеҒҡиҝҮзұ»дјјзҡ„дәӢжғ…
жҲ–иҖ…еңЁе‘Ҫд»ӨиЎҢдёҠеҲӣе»әдёҖдёӘж–°зҡ„еӯҳеӮЁеә“
жҲ–иҖ…д»Һе‘Ҫд»ӨиЎҢдёӯжҺЁеҠЁзҺ°жңүзҡ„еӯҳеӮЁеә“
иӢұиҜӯдёҚеҘҪзҡ„жңӢеҸӢеҸҜд»ҘеғҸжҲ‘дёҖж ·жңүйҒ“зҝ»иҜ‘пјӣдҪҶзҝ»иҜ‘еҗҺдёҖе®ҡиҰҒеҜ№еә”зқҖеӯҰд№ дёҖдёӢпјҒ
OKпјҒдёӢдёҖжӯҘпјҒ
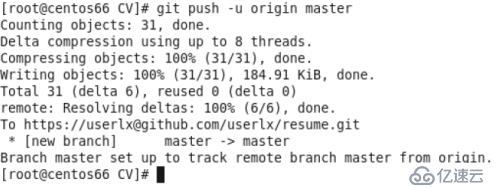
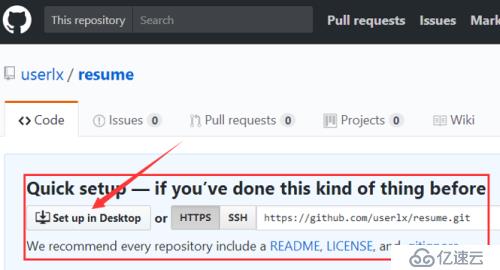
дёҠдј жң¬ең°д»Јз ҒеҲ°иҝңзЁӢд»“еә“пјҡ
[root@centos66 CV]# git add . #е°ҶжүҖжңүдҝ®ж”№иҝҮзҡ„е·ҘдҪңж–Ү件жҸҗдәӨжҡӮеӯҳеҢә [root@centos66 CV]# git commit -m"first commit" #ж·»еҠ еӨҮжіЁfirst commit [master (root-commit) cacc967] first commit 26files changed, 2286 insertions(+), 0 deletions(-) create mode 100644 index.html create mode 100644 static/.DS_Store create mode 100644 static/css/.DS_Store create mode 100644 static/css/style.css create mode 100644 static/fonts/.DS_Store create mode 100644 static/fonts/demo.css createmode 100644 static/fonts/demo.html create mode 100644 static/fonts/iconfont.css create mode 100644 static/fonts/iconfont.eot create mode 100644 static/fonts/iconfont.svg create mode 100644 static/fonts/iconfont.ttf create mode 100644 static/fonts/iconfont.woff create mode 100644 static/p_w_picpath/.DS_Store create mode 100755 static/p_w_picpath/bg.jpg create mode 100644 static/p_w_picpath/weixin.png create mode 100644 static/js/.DS_Store create mode 100644 static/js/modal.js createmode 100644 static/js/script.js create mode 100644"\347\256\200\345\216\206\347\224\237\346\210\220\345\231\250.html" create mode 100644"\347\256\200\345\216\206\347\224\237\346\210\220\345\231\250_files/jquery.js" create mode 100644 "\347\256\200\345\216\206\347\224\237\346\210\220\345\231\250_files/remodal-default-theme.css" create mode 100644"\347\256\200\345\216\206\347\224\237\346\210\220\345\231\250_files/remodal.css" create mode 100644"\347\256\200\345\216\206\347\224\237\346\210\220\345\231\250_files/remodal.js" create mode 100644"\347\256\200\345\216\206\347\224\237\346\210\220\345\231\250_files/script.js" create mode 100644"\347\256\200\345\216\206\347\224\237\346\210\220\345\231\250_files/style.css" create mode 100644 "\347\256\200\345\216\206\347\224\237\346\210\220\345\231\250_files/weixin.png" [root@centos66 CV]# git config --globaluser.name "userlx" #й…ҚзҪ®githubз”ЁжҲ· [root@centos66 CV]# git config --globaluser.email "15210680512@163.com" #й…ҚзҪ®githubйӮ®з®ұ [root@centos66 CV]# git remote add orgin https://github.com/userlx/resume.git #и®ҫзҪ®иҝңзЁӢд»“еә“ең°еқҖпјҢең°еқҖеңЁдёҠеӣҫдёӯ [root@centos66 CV]# git push -u origin master #жҺЁйҖҒеҲ°иҝңзЁӢд»“еә“ fatal: 'origin' does not appear to be a gitrepository fatal: The remote end hung up unexpectedly #жҠҘй”ҷ [root@centos66 CV]# git remote add orgin https://github.com/userlx/resume #жӣҙжҚўиҝңзЁӢд»“еә“ең°еқҖ fatal: remote origin already exists. #жҸҗзӨәиҝңзЁӢд»“еә“е·ІеӯҳеңЁ [root@centos66 CV]# git remote rm origin #еҲ йҷӨиҝңзЁӢд»“еә“ [root@centos66 CV]# git remote add orgin #йҮҚж–°и®ҫзҪ®иҝңзЁӢд»“еә“ең°еқҖ [root@centos66 CV]# git push -u origin master #еҶҚж¬ЎжҺЁйҖҒеҲ°иҝңзЁӢд»“еә“ error: The requested URL returned error:403 Forbidden while accessing https://github.com/userlx/resume.git/info/refs #жҠҘй”ҷпјҒжҸҗзӨәиҜ·жұӮеӨұиҙҘ fatal: HTTP request failed [root@centos66 CV]#vim .git/config #жӣҙж”№gitй…ҚзҪ®ж–Ү件 [core] repositoryformatversion = 0 filemode = true bare = false logallrefupdates = true [remote "orgin"] url = https://github.com/userlx/resume.git fetch = +refs/heads/*:refs/remotes/orgin/* url = https://github.com/userlx/resume.git ж”№дёәпјҡ url = https://userlx@github.com/userlx/resume.git [root@centos66 CV]# git push -u originmaster #еҶҚеҶҚж¬ЎжҺЁйҖҒеҲ°иҝңзЁӢд»“еә“ (gnome-ssh-askpass:46184): Gtk-WARNING **:cannot open display: #cannot open display
#жҲ‘жҳҜз”Ёxshellжү“ејҖзҡ„пјҢжүҖд»ҘдјҡжҳҫзӨәcannot open displayпјӣдәҺжҳҜе°ұж”№з”ЁVNCпјҢеҰӮдёӢ:
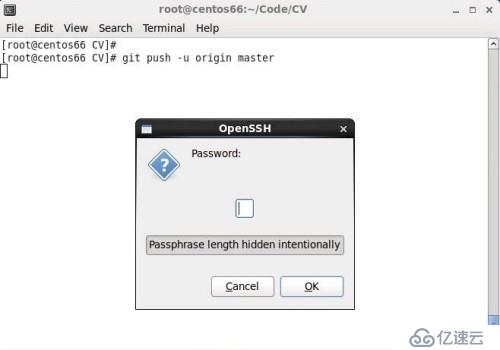
#жҸҗзӨәиҫ“е…ҘеҜҶз ҒпјҲGitHubеҜҶз Ғпјү
дҪҝз”Ёжүҳз®Ўжәҗпјҡ
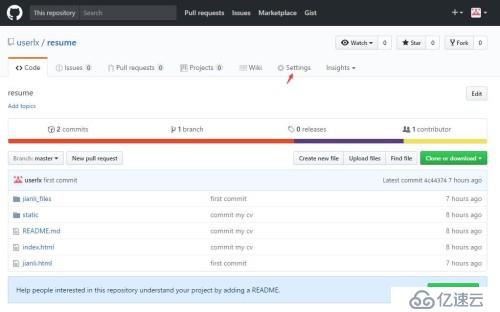
#йҖүжӢ©SettingsвҖ”вҖ”еҗ‘дёӢжӢү жүҫеҲ°GitHub Pags
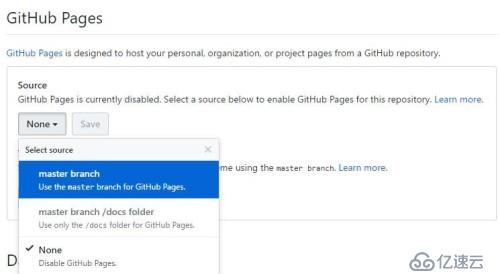
#йҖүжӢ©master branchвҖ”вҖ”save
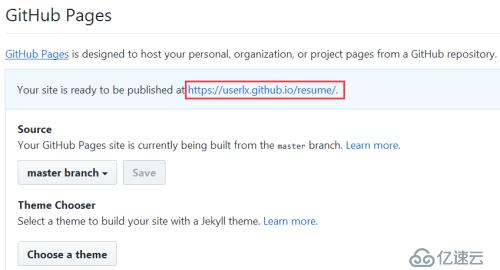
CongratulationпјҒ Your site is published at https://userlx.github.io/resume/
д»ҘеҗҺе°ұеҸҜд»Ҙи®ҝй—®userlx.github.io/resumeдәҶпјҒ
е°ұжҳҜиҝҷд№Ҳз®ҖеҚ•пјҢдҪҶжҳҜпјҒеҒҡд№ӢеүҚе…ҲеҲ«жҖҘзқҖж•Іе‘Ҫд»ӨпјҢе…ҲзҹҘжҷ“жөҒзЁӢпјҢзҗҶжё…жҖқи·ҜпјҢжҳҺзҷҪе‘Ҫд»ӨпјҢд№ӢеҗҺеҶҚдёӢжүӢеҒҡпјӣеҝ…е®ҡдәӢеҚҠеҠҹеҖҚпјҒе…ұеӢүВ·В·
еҸҰдёҖдёӘй—®йўҳпјҡжҲ‘зҡ„з®ҖеҺҶеҘҪеғҸиҝҳжІЎж”№е®Ңж•ҙе‘ўпјҹ
иҝңзЁӢжҲ–иҖ…иҷҡжӢҹжңәдёҠйғҪдёҚж–№дҫҝж”№пјҢйӮЈе°ұеңЁиҮӘе·ұз”өи„‘дёҠж”№пјҒдёӢиҪҪдёӘgithubе®ўжҲ·з«ҜпјҢе°ұеҸҜд»ҘеңЁжң¬ең°зӣҙжҺҘжү“ејҖйҡҸж„Ҹж“ҚдҪңпјӣзәҜеӣҫеҪўеҢ–ж“ҚдҪңпјҢдёҚеҶҚиөҳиҝ°пјӣ
жӢ“еұ•пјҡGitзҹҘиҜҶзӮ№еҫҲеӨҡпјҢGitHubеҫҲејәеӨ§пјҢиҜҘзҜҮеҚҡе®ўи®Ізҡ„зҹҘиҜҶд№қзүӣдёҖжҜӣпјӣ
gitи®Іи§Јпјҡе»–йӣӘеі°и®Іgit
gitе‘Ҫд»ӨпјҡйӮЈдёӘи°Ғзҡ„еҚҡе®ў
VNCзҡ„дҪҝз”Ёе°ұдёҚиҜҙдәҶеҗ§
е…ҚиҙЈеЈ°жҳҺпјҡжң¬з«ҷеҸ‘еёғзҡ„еҶ…е®№пјҲеӣҫзүҮгҖҒи§Ҷйў‘е’Ңж–Үеӯ—пјүд»ҘеҺҹеҲӣгҖҒиҪ¬иҪҪе’ҢеҲҶдә«дёәдё»пјҢж–Үз« и§ӮзӮ№дёҚд»ЈиЎЁжң¬зҪ‘з«ҷз«ӢеңәпјҢеҰӮжһңж¶үеҸҠдҫөжқғиҜ·иҒ”зі»з«ҷй•ҝйӮ®з®ұпјҡis@yisu.comиҝӣиЎҢдёҫжҠҘпјҢ并жҸҗдҫӣзӣёе…іиҜҒжҚ®пјҢдёҖз»ҸжҹҘе®һпјҢе°Ҷз«ӢеҲ»еҲ йҷӨж¶үе«ҢдҫөжқғеҶ…е®№гҖӮ
жӮЁеҘҪпјҢзҷ»еҪ•еҗҺжүҚиғҪдёӢи®ўеҚ•е“ҰпјҒ