您好,登录后才能下订单哦!
Spread for ASP.NET表格控件兼容Excel的强大功能,并将其嵌入到您的应用系统中。完备的Excel文档支持使得您可以在企业中分享和访问数据信息;内嵌的图表引擎和数据可视化支持让您更加轻松的为商务、工程以及科学应用系统中创建丰富高效的信息中心。新版本7中提供几个主要更新,包括:
上下文菜单
列头RowTemplate
用于单元格编辑器的Css
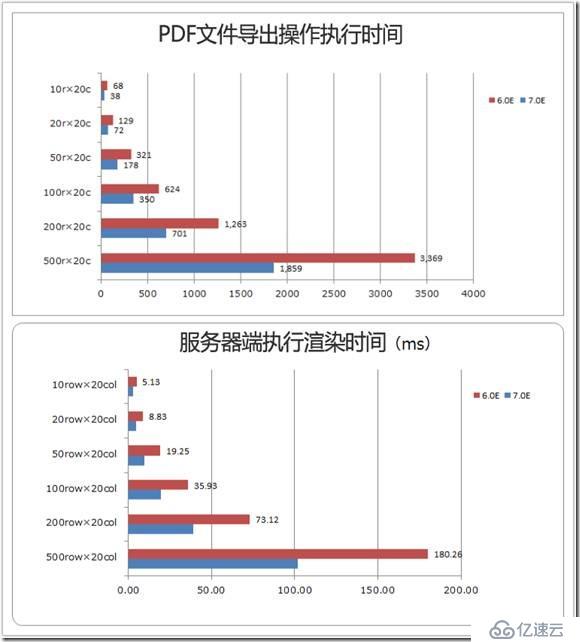
性能提升
其他Spread for ASP.NET的增强
为DateTime、Currency、Double和Integer单元格类型增加独立的编辑模式和非编辑模式格式。
增强虚拟页面以支持滚动条文本提示。
打印时支持行和列的分页。
支持客户端脚本锁定和解锁。
新增Cell.EncodeValue属性,支持在单元格文本中直接输入原始HTML标记。
客户端支持在隐藏的行或列中设置单元格的值。
新增ClientIDMode支持。
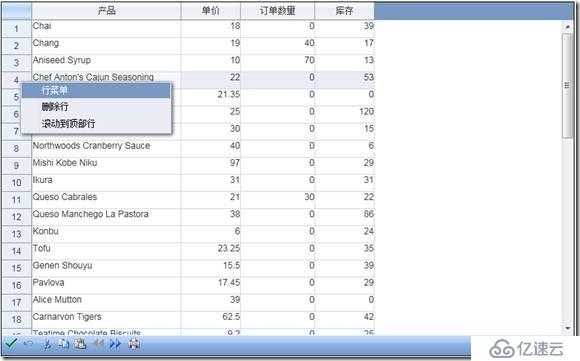
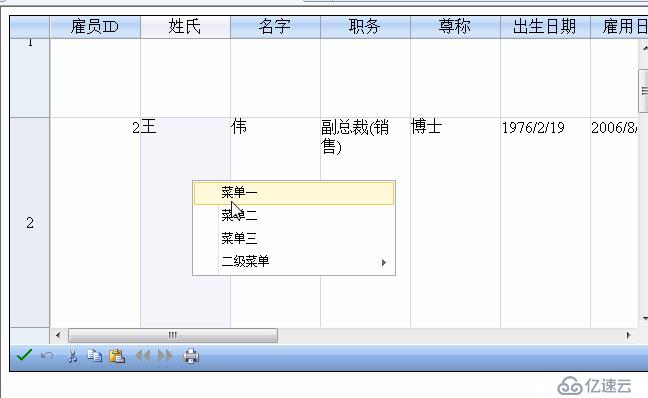
Spread for ASP.NET内嵌的上下文菜单代替了浏览器自带的上下文菜单,您可以通过Spread上下文菜单特性为您的应用程序加入更多的数据挖掘和界面交互的功能。

你可以任意定制上下文菜单的选项,设置高度和其他属性。可以通过 ContextMenuType 枚举设置菜单类型。你可以通过前台属性设置或后天代码来创建上下文菜单。
CommandArgument 属性和 CommandCode 属性用于设置点击菜单属性。同时,也可以在 MenuItemClicked 事件中。
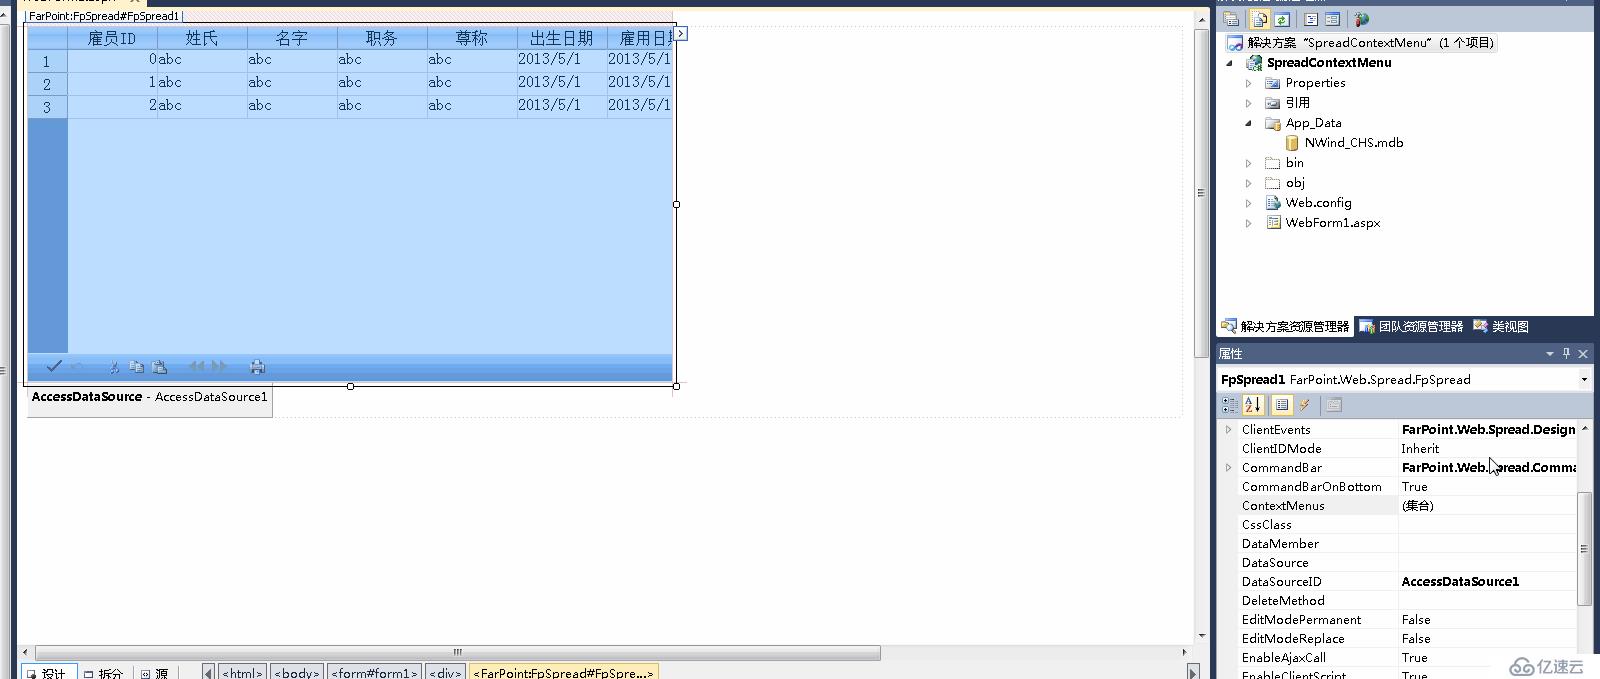
使用属性窗体创建:
在属性窗体中选择 Spread
选择 ContextMenus 属性
在弹出对话框中编辑菜单项即可。
编辑完成后点击“确定”按钮退出。

使用代码创建:
HTML 标记:
<ContextMenus>
<FarPoint:ContextMenu Type="Viewport">
<Items>
<FarPoint:MenuItem Text="菜单一">
</FarPoint:MenuItem>
<FarPoint:MenuItem Text="菜单二">
</FarPoint:MenuItem>
<FarPoint:MenuItem Text="菜单三">
</FarPoint:MenuItem>
</Items>
</FarPoint:ContextMenu>
</ContextMenus>
C#代码:
if (this.IsPostBack) return;
FpSpread1.EnableContextMenu = true;
//创建普通单元格菜单
FarPoint.Web.Spread.ContextMenu viewportMenu = FpSpread1.ContextMenus[FarPoint.Web.Spread.ContextMenuType.Viewport];
FarPoint.Web.Spread.MenuItem customViewportItem = new FarPoint.Web.Spread.MenuItem("二级菜单");
customViewportItem.ChildItems.Add(new FarPoint.Web.Spread.MenuItem("二级菜单项一"));
customViewportItem.ChildItems.Add(new FarPoint.Web.Spread.MenuItem("二级菜单项二"));
viewportMenu.Items.Add(customViewportItem);
//创建行头单元格菜单
FarPoint.Web.Spread.ContextMenu rowHeaderContextMenu = new FarPoint.Web.Spread.ContextMenu();
rowHeaderContextMenu.Type = FarPoint.Web.Spread.ContextMenuType.RowHeader;
FarPoint.Web.Spread.MenuItem rowHeaderItem = new FarPoint.Web.Spread.MenuItem("行头菜单");
rowHeaderItem.ChildItems.Add(new FarPoint.Web.Spread.MenuItem("菜单一"));
rowHeaderItem.ChildItems.Add(new FarPoint.Web.Spread.MenuItem("菜单二"));
rowHeaderContextMenu.Items.Add(rowHeaderItem);
FpSpread1.ContextMenus.Add(rowHeaderContextMenu);
更多新特性请参考在线演示实例:
http://www.gcpowertools.com.cn/LiveSamples/Spread/ASPNET/sampleexplorer/samples/ContextMenu/Overview.aspx
Spread for ASP.NET中为RowTemplate新增了新的列头模板,这样,列头单元格可以拥有与数据行完全不同的布局风格。您可以改变传统的Spread布局方式,将一条数据展示在多行中。多行布局由行模板控制,行模板可以通过代码或者Spread设计器定制。
在本篇文章中,我们将阐述如何使用代码添加行模板布局,已经绑定表格控件 Spread 数据源。

首先需要设置目标表单的模板为行布局模板:
sheet.LayoutMode = FarPoint.Web.Spread.SheetView.LayoutModeType.RowTemplateLayoutMode;
然后,设置行布局模板:
//设置行布局模板
sheet.WorksheetTemplate.ColumnCount = 4;
sheet.WorksheetTemplate.RowTemplate.RowCount = 2;
sheet.WorksheetTemplate.ColumnHeaderTemplate.RowCount = 1;
sheet.WorksheetTemplate.LayoutColumns[0].Width = 100;
sheet.WorksheetTemplate.LayoutColumns[1].Width = 100;
sheet.WorksheetTemplate.LayoutColumns[2].Width = 70;
sheet.WorksheetTemplate.LayoutColumns[3].Width = 300;
最后,我们需要设置数据源字段在行模板中的显示顺序。
//设置行布局模板中显示数据字段顺序
sheet.WorksheetTemplate.LayoutCells[0, 0].DataIndex = 1;
sheet.WorksheetTemplate.LayoutCells[0, 1].DataIndex = 2;
sheet.WorksheetTemplate.LayoutCells[1, 0].DataIndex = 3;
sheet.WorksheetTemplate.LayoutCells[0, 2].DataIndex = 6;
sheet.WorksheetTemplate.LayoutCells[0, 3].DataIndex = 4;
sheet.WorksheetTemplate.LayoutCells[1, 3].DataIndex = 5;
//从数据源中取数据
DataTable employees = new DataTable("Employees");
using (OleDbConnection connection = new OleDbConnection(@"Provider=Microsoft.Jet.OLEDB.4.0;Data Source=|DataDirectory|\Northwind.mdb;Persist Security Info=True"))
{
using (OleDbDataAdapter adapter = new OleDbDataAdapter("SELECT EmployeeID, FirstName, LastName, Title, Address, HomePhone FROM Employees", connection))
{
adapter.Fill(employees);
}
}
employees.Columns.Add(new DataColumn("Photo"));
//通过 FpSpread 类下 DataSource 属性设置数据源
FpSpread1.DataSource = employees;
更多新特性请参考在线演示实例:
http://www.gcpowertools.com.cn/LiveSamples/Spread/ASPNET/sampleexplorer/samples/RowTemplateLayout/Overview.aspx
在表格控件 Spread for ASP.NET 7 之前, 我们无法设置单元格在编辑模式下的格式。直到用户点击“更新按钮”时单元格内容才会被格式化。现在, V7 中新增 “编辑格式化支持” 允许用户定制编辑格式如数值格式或日期格式,这无疑增强了用户体验度。

下面我们将阐述如何设置单元格的“编辑格式”。
通过Spread for ASP.NET 的EditorCssClass属性可以设置可编辑的单元格类型。通过Css代码设置单元格类型编辑器的样式。它独立于通过CssClass属性定制的单元格显示模式。
通过各个单元格类型的 EditMode 属性可以设置表格控件的 Spread 编辑格式。这里我们以 CurrencyCellType 为例。
//设置单元格类型
FarPoint.Web.Spread.CurrencyCellType cct = new FarPoint.Web.Spread.CurrencyCellType();
cct.NumberFormat = new System.Globalization.NumberFormatInfo();
cct.NumberFormat.CurrencySymbol = "USD";
首先设置单元格类型,代码如下:
//设置单元格类型
FarPoint.Web.Spread.CurrencyCellType cct = new FarPoint.Web.Spread.CurrencyCellType();
cct.NumberFormat = new System.Globalization.NumberFormatInfo();
cct.NumberFormat.CurrencySymbol = "USD";
这是我们双击编辑该单元格会发现,单元格进入编辑状态后格式消失了:

然后,设置单元格类型编辑模式:
//设置单元格类型的编辑格式
cct.EditMode.NumberFormat = new System.Globalization.NumberFormatInfo();
cct.EditMode.NumberFormat.CurrencySymbol = "$";
效果图如下:

以上即为 Spread for ASP.NET 7 新特性-编辑格式。
更多新特性请参考在线演示实例:
http://www.gcpowertools.com.cn/LiveSamples/Spread/ASPNET/sampleexplorer/samples/EditModeFormat/Overview.aspx
· 新增LoadOnDemandMode属性用于支持在用户滚动到最后一行之前通过后台加载数据。新增TriggerMode属性用于支持定时加载和越界加载。
· 提升了渲染表格、PDF以及导入Excel文件的性能。
· 提升了客户端滚动性能,通过后台按需加载数据并触发新的客户端事件。
· 增强了虚拟滚动,它可以在加载新的数据行时保持来自前一页面的额外数据。
· 支持异步渲染图表。
· 通过合并JS和CSS优化脚本加载时间。
· 使用平行任务库实现了关键性能的提升。

更多有关Spread Studio for .NET产品细节请参考:http://www.gcpowertools.com.cn/products/Spread_Studio.htm
免责声明:本站发布的内容(图片、视频和文字)以原创、转载和分享为主,文章观点不代表本网站立场,如果涉及侵权请联系站长邮箱:is@yisu.com进行举报,并提供相关证据,一经查实,将立刻删除涉嫌侵权内容。