您好,登录后才能下订单哦!
密码登录
登录注册
点击 登录注册 即表示同意《亿速云用户服务条款》
//在APPDelegate.h中,即项目的入口部分
//didFinishLaunchingWithOptions该方法表示APP启动完毕,接下来进入自定义界面
//如下MyViewController是自定义的类,即一个界面实现UIViewController接口
- (BOOL)application:(UIApplication *)application didFinishLaunchingWithOptions:(NSDictionary *)launchOptions {
    // Override point for customization after application launch.

    self.window = [[UIWindow alloc] initWithFrame:[[UIScreen mainScreen] bounds]];

    self.window.backgroundColor = [UIColor whiteColor];

    MyViewController *myController = [[MyViewController alloc] init];
    UINavigationController *navController = [[UINavigationController alloc] initWithRootViewController:myController];

    self.window.rootViewController = navController;
    [self.window makeKeyAndVisible];

    return YES;
}
//MyViewController.h
//定义四个控件
@interface MyViewController : UIViewController
@property (strong, nonatomic) UILabel *labelNum;
@property (strong, nonatomic) UILabel *labelPwd;
@property (strong, nonatomic) UITextField *fieldNum;
@property (strong, nonatomic) UITextField *fieldPwd;
@end
//MyViewController.m
- (void)viewDidLoad {
[super viewDidLoad];
// Do any additional setup after loading the view.
self.labelNum = [[UILabel alloc] init];
self.labelNum.frame = CGRectMake(100, 100, 50, 20);
self.labelNum.text = @"Num: ";
self.fieldNum = [[UITextField alloc] init];
self.fieldNum.frame = CGRectMake(150, 100, 100, 20);
self.fieldNum.borderStyle = UITextBorderStyleRoundedRect;
self.labelPwd = [[UILabel alloc] init];
self.labelPwd.frame = CGRectMake(100, 150, 50, 20);
self.labelPwd.text = @"Pwd: ";
self.fieldPwd = [[UITextField alloc] init];
self.fieldPwd.frame = CGRectMake(150, 150, 100, 20);
self.fieldPwd.borderStyle = UITextBorderStyleRoundedRect;
UIButton *btn = [UIButton buttonWithType:UIButtonTypeRoundedRect];
btn.frame = CGRectMake(100, 200, 80, 20);
btn.backgroundColor = [UIColor grayColor];
[btn setTitle:@"login" forState:UIControlStateNormal];
//设置按钮监听事件,监听方法为login
[btn addTarget:self action:@selector(login) forControlEvents:UIControlEventTouchDown];
[self.view addSubview:self.labelNum];
[self.view addSubview:self.fieldNum];
[self.view addSubview:self.labelPwd];
[self.view addSubview:self.fieldPwd];
[self.view addSubview:btn];
}//页面跳转,并传递参数
-(void) login{
    NSLog(@"login");

    NSString *num = self.fieldNum.text;
    NSString *pwd = self.fieldPwd.text;

    if([num isEqualToString:@"123"] == TRUE){

        NSLog(@"yes");

        //初始化要跳转的界面
        MainViewController *mm = [[MainViewController alloc] init];

        //把账号密码传递到下个界面
        [mm initData:num two:pwd];

        //开始跳转
        [self.navigationController pushViewController:mm animated:FALSE];
    }else{
        NSLog(@"error");
    }

}
//MainViewController.h
@interface MainViewController : UIViewController
//@property( nonatomic) NSString

//传递两个参数a、b NSString 类型
-(void) initData:(NSString *) a two:(NSString *) b;

@end
//接收参数,并保存
-(void) initData:(NSString *) a two:(NSString *) b{
    self.num = a;
    self.pwd = b;

    NSLog(@"%@,%@", self.num, self.pwd);
}
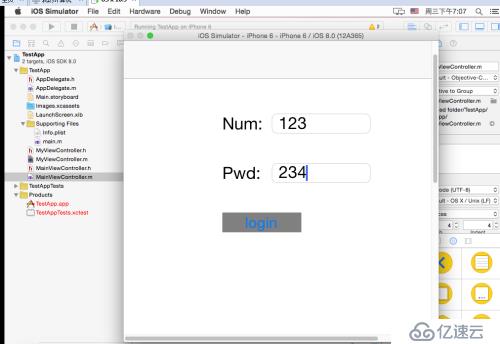
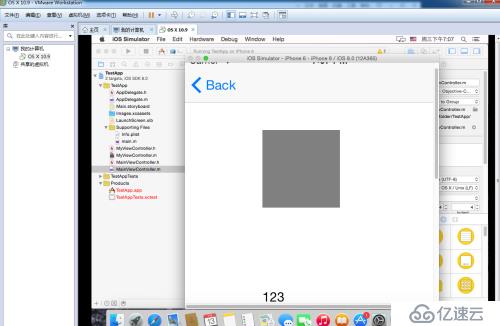
//效果图


免责声明:本站发布的内容(图片、视频和文字)以原创、转载和分享为主,文章观点不代表本网站立场,如果涉及侵权请联系站长邮箱:is@yisu.com进行举报,并提供相关证据,一经查实,将立刻删除涉嫌侵权内容。