您好,登录后才能下订单哦!
密码登录
登录注册
点击 登录注册 即表示同意《亿速云用户服务条款》
首先来看看它的整个调用流程:
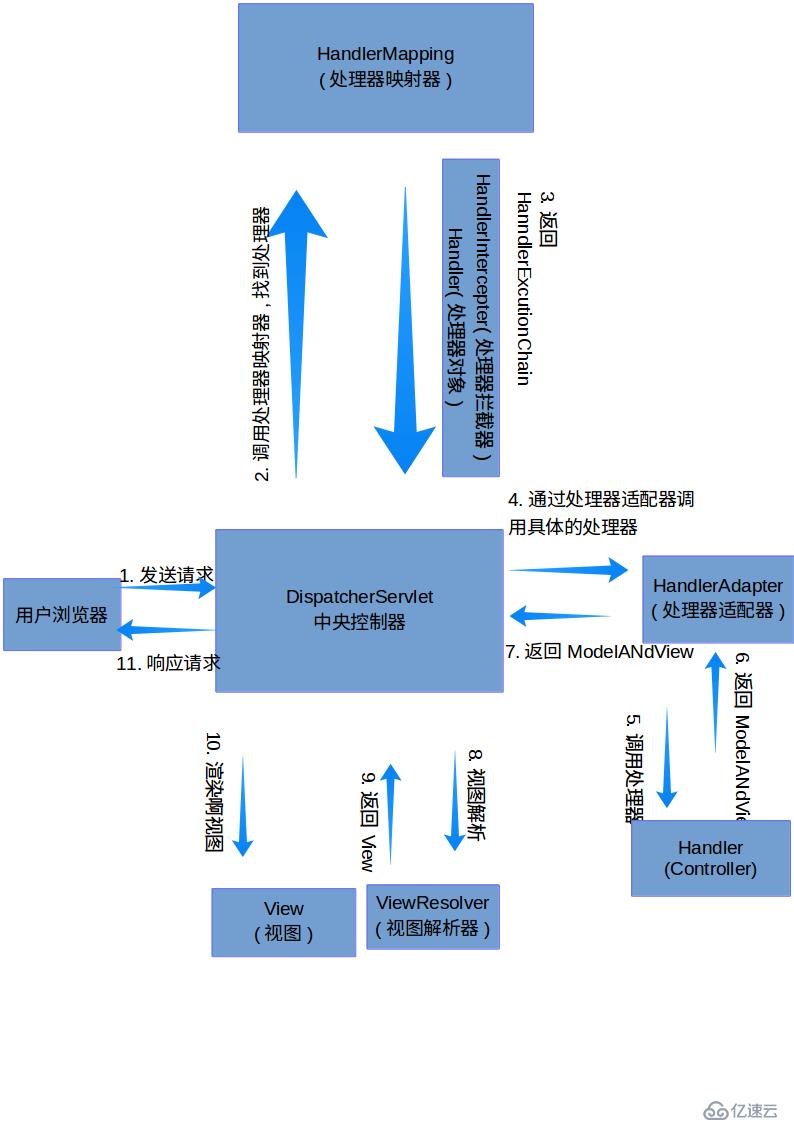
1、用户发送请求至前端控制器DispatcherServlet,前端控制器管理整个请求生命周期,从请求到响应的整个周期.
2、DispatcherServlet收到请求调用HandlerMapping处理器映射器。
3、从处理器映射器找到具体的处理器,生成处理器对象及处理器拦截器(如果有则生成)一并返回给DispatcherServlet。
4、DispatcherServlet调用HandlerAdapter处理器适配器
5、HandlerAdapter经过适配调用具体的处理器(Controller,也叫后端控制器)。
6、Controller执行完成返回ModelAndView
7、HandlerAdapter将controller执行结果ModelAndView返回给DispatcherServlet
8、DispatcherServlet将ModelAndView传给ViewReslover视图解析器
9、ViewReslover解析后返回具体View
10、DispatcherServlet根据View进行渲染视图(即将模型数据填充至视图中)。
11、DispatcherServlet响应用户
下面来统一一个简单Demo来 了解基本额配置:
1. 首先通过Maven创建一个项目,给项目添加Spring-web框架,会自动加载spring相关的依赖文件和生成xml配置文件.先看web.xml
<?xml version="1.0" encoding="UTF-8"?>
<web-app version="3.1" xmlns="http://xmlns.jcp.org/xml/ns/javaee" xmlns:xsi="http://www.w3.org/2001/XMLSchema-instance" xsi:schemaLocation="http://xmlns.jcp.org/xml/ns/javaee http://xmlns.jcp.org/xml/ns/javaee/web-app_3_1.xsd">
    <context-param>
        <param-name>contextConfigLocation</param-name>
        <param-value>/WEB-INF/applicationContext.xml</param-value>
    </context-param>
    <listener>
        <listener-class>org.springframework.web.context.ContextLoaderListener</listener-class>
    </listener>
    <servlet>
        <servlet-name>dispatcher</servlet-name>
        <servlet-class>org.springframework.web.servlet.DispatcherServlet</servlet-class>
        <load-on-startup>1</load-on-startup>
    </servlet>
    <servlet-mapping>
        <servlet-name>dispatcher</servlet-name>
        <url-pattern>/</url-pattern>
    </servlet-mapping>
    <session-config>
        <session-timeout>
            30
        </session-timeout>
    </session-config>
    <welcome-file-list>
        <welcome-file>redirect.jsp</welcome-file>
    </welcome-file-list>
</web-app>
dispartcher-servlet.xml文件
<?xml version='1.0' encoding='UTF-8' ?>
<!-- was: <?xml version="1.0" encoding="UTF-8"?> -->
<beans xmlns="http://www.springframework.org/schema/beans"
       xmlns:xsi="http://www.w3.org/2001/XMLSchema-instance"
       xmlns:p="http://www.springframework.org/schema/p"
       xmlns:aop="http://www.springframework.org/schema/aop"
       xmlns:tx="http://www.springframework.org/schema/tx"
       xsi:schemaLocation="http://www.springframework.org/schema/beans http://www.springframework.org/schema/beans/spring-beans-4.0.xsd
       http://www.springframework.org/schema/aop http://www.springframework.org/schema/aop/spring-aop-4.0.xsd
       http://www.springframework.org/schema/tx http://www.springframework.org/schema/tx/spring-tx-4.0.xsd">

    <bean class="org.springframework.web.servlet.mvc.support.ControllerClassNameHandlerMapping"/>

    <!--
    Most controllers will use the ControllerClassNameHandlerMapping above, but
    for the index controller we are using ParameterizableViewController, so we must
    define an explicit mapping for it.
    -->
    <bean id="urlMapping" class="org.springframework.web.servlet.handler.SimpleUrlHandlerMapping">
        <property name="mappings">
            <props>
                <prop key="index.htm">indexController</prop>
            </props>
        </property>
    </bean>

    <bean id="viewResolver"
          class="org.springframework.web.servlet.view.InternalResourceViewResolver"
          p:prefix="/WEB-INF/jsp/"
          p:suffix=".jsp" />

    <!--
    The index controller.
    -->
    <bean name="indexController"
          class="org.springframework.web.servlet.mvc.ParameterizableViewController"
          p:viewName="index" />

</beans>
applicationContext.xml
<?xml version='1.0' encoding='UTF-8' ?>
<!-- was: <?xml version="1.0" encoding="UTF-8"?> -->
<beans xmlns="http://www.springframework.org/schema/beans"
       xmlns:xsi="http://www.w3.org/2001/XMLSchema-instance"
       xmlns:p="http://www.springframework.org/schema/p"
       xmlns:aop="http://www.springframework.org/schema/aop"
       xmlns:tx="http://www.springframework.org/schema/tx"
       xsi:schemaLocation="http://www.springframework.org/schema/beans http://www.springframework.org/schema/beans/spring-beans-4.0.xsd
       http://www.springframework.org/schema/aop http://www.springframework.org/schema/aop/spring-aop-4.0.xsd
       http://www.springframework.org/schema/tx http://www.springframework.org/schema/tx/spring-tx-4.0.xsd">

    <!--bean id="propertyConfigurer"
          class="org.springframework.beans.factory.config.PropertyPlaceholderConfigurer"
          p:location="/WEB-INF/jdbc.properties" />

<bean id="dataSource"
    class="org.springframework.jdbc.datasource.DriverManagerDataSource"
    p:driverClassName="${jdbc.driverClassName}"
    p:url="${jdbc.url}"
    p:username="${jdbc.username}"
    p:password="${jdbc.password}" /-->

    <!-- ADD PERSISTENCE SUPPORT HERE (jpa, hibernate, etc) -->

</beans>免责声明:本站发布的内容(图片、视频和文字)以原创、转载和分享为主,文章观点不代表本网站立场,如果涉及侵权请联系站长邮箱:is@yisu.com进行举报,并提供相关证据,一经查实,将立刻删除涉嫌侵权内容。