您好,登录后才能下订单哦!
xHci-PCI驱动设计
虽然Linux内核拥有C语言构建的身体,但它骨子里散发的是面向对象的气质,这一个个的对象就是struct。面对一个内核模块的时候,首先要找出关键的struct和它们之间的关系,才能摸清代码的骨骼脉络。
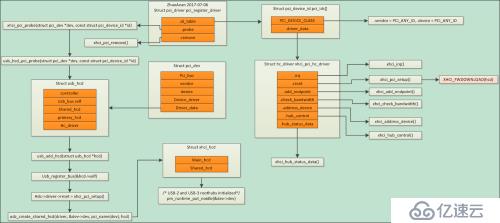
先上图,下面分析的过程结束之后各个结构体就是这种关系:

重要的配置:
xHCI是USB 3.x的host controller规范,首先进入drivers/usb/host目录浏览一下,其实从文件名就可以知道,跟xHCI关系最密切的必然是xhci.c。保险起见还是看一下KConfig:
config USB_XHCI_HCD
tristate "xHCI HCD (USB 3.0)support"
---help---
TheeXtensible Host Controller Interface (xHCI) is standard forUSB 3.0
"SuperSpeed"host controller hardware.
Tocompile this driver as a module, choose M here: the
module will be called xhci-hcd.
ifUSB_XHCI_HCD
config USB_XHCI_PCI
tristate
depends on PCI
defaulty
config USB_XHCI_PLATFORM
tristate
config USB_XHCI_MVEBU
tristate "xHCI support forMarvell Armada 375/38x"
select USB_XHCI_PLATFORM
depends on ARCH_MVEBU || COMPILE_TEST
---help---
Say'Y'to enable the support for the xHCI host controller
found in Marvell Armada 375/38x ARM SOCs.
config USB_XHCI_RCAR
tristate "xHCI support forRenesas R-Car SoCs"
select USB_XHCI_PLATFORM
depends on ARCH_SHMOBILE || COMPILE_TEST
---help---
Say'Y'to enable the support for the xHCI host controller
found in Renesas R-Car ARM SoCs.
endif # USB_XHCI_HCD
主要配置项叫做USB_XHCI_HCD,另外还有USB_XHCI_PCI和USB_XHCI_PLATFORM。再看Makefile,直接搜索XHCI有关的内容:
xhci-hcd-y := xhci.oxhci-mem.o
xhci-hcd-y += xhci-ring.o xhci-hub.oxhci-dbg.o
xhci-hcd-y += xhci-trace.o
xhci-plat-hcd-y := xhci-plat.o
ifneq ($(CONFIG_USB_XHCI_MVEBU), )
xhci-plat-hcd-y +=xhci-mvebu.o
endif
ifneq ($(CONFIG_USB_XHCI_RCAR), )
xhci-plat-hcd-y +=xhci-rcar.o
endif
obj-$(CONFIG_USB_XHCI_PCI) += xhci-pci.o
obj-$(CONFIG_USB_XHCI_PLATFORM) +=xhci-plat-hcd.o
obj-$(CONFIG_USB_XHCI_HCD) += xhci-hcd.o
USB_XHCI_PCI,顾名思义,是xHCI驱动和PCI总线驱动之间的“接口”(内核开发者称这种“接口”为glue)。USB控制器大多是PCI设备,若控制器连接到PCI总线上,那么自然是先由PCI驱动发现该设备,识别之后才能交给xHCI驱动处理。所以实际上,作为glue的xhci-pci模块代码要早于xhci-hcd模块代码开始工作,因此关键的初始化过程放在xhci-pci里面。
现在进入正题:
xHCI相关的代码,很容易发现几个貌似重要的struct类型:usb_hcd、xhci_hcd和hc_driver,还有几个全局变量xhci_pci_driver、xhci_hc_driver和xhci_pci_hc_driver,再加上PCI总线相关的类型pci_dev和pci_driver。
xhci-pci模块启动,执行xhci_pci_init函数
staticint__init xhci_pci_init(void)
{
xhci_init_driver(&xhci_pci_hc_driver, xhci_pci_setup);
#ifdef CONFIG_PM
xhci_pci_hc_driver.pci_suspend = xhci_pci_suspend;
xhci_pci_hc_driver.pci_resume = xhci_pci_resume;
#endif
returnpci_register_driver(&xhci_pci_driver);
}
xhci_pci_init调用xhci_init_driver,初始化xhci_pci_hc_driver变量,主要作用就是把全局变量xhci_hc_driver的值一股脑赋给另一个全局变量xhci_pci_hc_driver。两者都是struct hc_driver类型,xhci_pci_hc_driver在xhci-pci.c中定义,是真正起作用的xHCI驱动,但它在定义的时候没有进行任何成员的初始化:
void xhci_init_driver(struct hc_driver *drv, int(*setup_fn)(struct usb_hcd *))
{
BUG_ON(!setup_fn);
*drv= xhci_hc_driver;
drv->reset= setup_fn;
}
staticstructhc_driver __read_mostly xhci_pci_hc_driver;
而xhci_hc_driver在xhci.c中定义,它包揽了所有的脏活累活:
staticconststruct hc_driver xhci_hc_driver = {
.description = "xhci-hcd",
.product_desc = "xHCI Host Controller",
.hcd_priv_size= sizeof(structxhci_hcd *),
/*
*generic hardware linkage
*/
.irq= xhci_irq,
.flags = HCD_MEMORY |HCD_USB3 | HCD_SHARED,
/*
*basic lifecycle operations
*/
.reset = NULL, /* set in xhci_init_driver() */
.start = xhci_run,
.stop= xhci_stop,
.shutdown = xhci_shutdown,
/*
*managing i/o requests and associated device resources
*/
.urb_enqueue = xhci_urb_enqueue,
.urb_dequeue = xhci_urb_dequeue,
.alloc_dev = xhci_alloc_dev,
.free_dev = xhci_free_dev,
.alloc_streams = xhci_alloc_streams,
.free_streams = xhci_free_streams,
.add_endpoint = xhci_add_endpoint,
.drop_endpoint= xhci_drop_endpoint,
.endpoint_reset = xhci_endpoint_reset,
.check_bandwidth = xhci_check_bandwidth,
.reset_bandwidth = xhci_reset_bandwidth,
.address_device = xhci_address_device,
.enable_device = xhci_enable_device,
.update_hub_device = xhci_update_hub_device,
.reset_device = xhci_discover_or_reset_device,
/*
*scheduling support
*/
.get_frame_number = xhci_get_frame,
/*
*root hub support
*/
.hub_control = xhci_hub_control,
.hub_status_data = xhci_hub_status_data,
.bus_suspend = xhci_bus_suspend,
.bus_resume = xhci_bus_resume,
/*
*call back when device connected and addressed
*/
.update_device = xhci_update_device,
.set_usb2_hw_lpm = xhci_set_usb2_hardware_lpm,
.enable_usb3_lpm_timeout = xhci_enable_usb3_lpm_timeout,
.disable_usb3_lpm_timeout = xhci_disable_usb3_lpm_timeout,
.find_raw_port_number = xhci_find_raw_port_number,
};
xhci_init_driver函数将xhci_hc_driver的值赋给xhci_pci_hc_driver后,前者也就退下了舞台。
xhci_pci_driver被专业人员称为pcidriver glue,属于一种新型的PCI驱动模块。
xhci_pci_init调用pci_register_driver,将xhci_pci_driver注册为PCI设备驱动。在xhci-pci.c中静态定义并初始化:
/* pci driver glue; this is a"new style" PCI driver module */
staticstructpci_driver xhci_pci_driver = {
.name= (char*) hcd_name,
.id_table = pci_ids,
.probe = xhci_pci_probe,
.remove = xhci_pci_remove,
/* suspend and resume implemented later */
.shutdown = usb_hcd_pci_shutdown,
#ifdef CONFIG_PM
.driver = {
.pm = &usb_hcd_pci_pm_ops
},
#endif
};
id_table包含了驱动支持的PCI设备类型,PCI总线就是靠它判断驱动和设备能否配对。这里的id_table成员设置为pci_ids,它也是静态定义的全局变量:
/* PCI driver selectionmetadata; PCI hotplugging uses this */
staticconststructpci_device_id pci_ids[] = { {
/* handle any USB 3.0 xHCI controller */
PCI_DEVICE_CLASS(PCI_CLASS_SERIAL_USB_XHCI, ~0),
.driver_data = (unsignedlong)&xhci_pci_hc_driver,
},
{ /* end: all zeroes */ }
};
MODULE_DEVICE_TABLE(pci, pci_ids);
pci_ids中唯一一个元素的driver_data成员指向刚才在xhci_pci_init中完成初始化的xhci_pci_hc_driver变量,这就将作为PCI设备驱动的xhci_pci_driver和作为USB主机控制器设备驱动xhci_pci_hc_driver联系了起来。
staticintxhci_pci_setup(struct usb_hcd *hcd)
{
structxhci_hcd *xhci;
structpci_dev *pdev =to_pci_dev(hcd->self.controller);
int retval;
//uDP720202芯片的配置
xhci_fwdownload(hcd);
//创建了对xHCI至关重要的数据结构——xhci_hcd类型,并完成了大量的初始化工作
retval = xhci_gen_setup(hcd, xhci_pci_quirks);
if(retval)
return retval;
xhci = hcd_to_xhci(hcd);
if(!usb_hcd_is_primary_hcd(hcd))
return0;
pci_read_config_byte(pdev, XHCI_SBRN_OFFSET, &xhci->sbrn);
xhci_dbg(xhci, "GotSBRN %u\n", (unsignedint)xhci->sbrn);
/* Find any debug ports */
retval = xhci_pci_reinit(xhci, pdev);
if(!retval)
return retval;
kfree(xhci);
returnretval;
}
USB 3.1 Spec中Figure 3-1可以知道,USB 3.x的Host包含两个roothub,对应两条USB总线,一条连接USB 2.0设备,一条连接USB 3.x设备。
xhci_pci_probe调用usb_hcd_pci_probe,创建usb_hcd和xhci_hcd。回到最初的示意图,现在所有的连接都已经完成!
int usb_hcd_pci_probe(struct pci_dev *dev, conststruct pci_device_id *id)
{
structhc_driver *driver;
structusb_hcd *hcd;
int retval;
int hcd_irq = 0;
if(usb_disabled())
return-ENODEV;
if(!id)
return-EINVAL;
driver= (structhc_driver *)id->driver_data;
if(!driver)
return-EINVAL;
if(pci_enable_device(dev) < 0)
return-ENODEV;
/*
* The xHCI driver has its own irq management
* make sure irq setup is not touched for xhciin generic hcd code
*/
if((driver->flags & HCD_MASK) != HCD_USB3) {
if(!dev->irq) {
dev_err(&dev->dev,
"Found HC with no IRQ. Check BIOS/PCI %s setup!\n",
pci_name(dev));
retval= -ENODEV;
gotodisable_pci;
}
hcd_irq= dev->irq;
}
hcd =usb_create_hcd(driver, &dev->dev, pci_name(dev));
if(!hcd) {
retval= -ENOMEM;
gotodisable_pci;
}
......
returnretval;
}
uDP720202芯片的配置的时序图:

//@@----------------------PCI 信息
#define XHCI_FWFILENAME_720201_202ES20 "renesas/K2011070.mem"
//uDp720202 寄存器配置
#define XHCI_VENDOR_ID_720202 (0x1912)
#define XHCI_DEVICE_ID_720202 (0x0015)
#define XHCI_DEVICE_REV_ES20 (0x02)
//@@---------------------- FM下载配置寄存器
#define PCICNF0F4 0xF4 // 来自芯片寄存器手册
/*
0 = FWdownload enable (1), RW
1 = FWdownload lock (1) or unlock (0), need 0 to perform download, RW(Write Once)
6:4 =Result code, RO -- processing (0), success (1), error (2),
8 =Set Data 0, RW
9 =Set Data 1, RW
16:31= (used for serial EEPROM read/write. 31= serial EEPROM present.)
*/
#define PCICNF0F4_FWDOWNLOADENABLE_B (0)
#define PCICNF0F4_FWDOWNLOADLOCK_B (1)
#define PCICNF0F4_SETDATA0_B (8)
#define PCICNF0F4_SETDATA1_B (9)
#define PCICNF0F4_RESULT_B (4)
#define PCICNF0F8 0xF8 // 数据页 0
#define PCICNF0FC 0xFC // 数据页 1
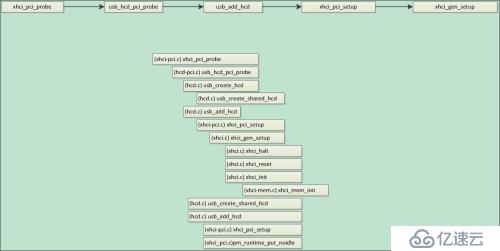
主要调用过程:

免责声明:本站发布的内容(图片、视频和文字)以原创、转载和分享为主,文章观点不代表本网站立场,如果涉及侵权请联系站长邮箱:is@yisu.com进行举报,并提供相关证据,一经查实,将立刻删除涉嫌侵权内容。