您好,登录后才能下订单哦!
密码登录
登录注册
点击 登录注册 即表示同意《亿速云用户服务条款》
这篇文章主要介绍HTML5中WebSocket怎么用,文中介绍的非常详细,具有一定的参考价值,感兴趣的小伙伴们一定要看完!
在WebSocket API中,浏览器和服务器只需要做一个握手动作,然后,浏览器和服务器之间就形成一条快速通道,两者之间就可以直接进行数据传送,这一个功能可以应用到“字幕”,自己做了一个demo,废话不说了,直接贴代码:
1 <!DOCTYPE html> 2 <html> 3 <head> 4 <meta charset="utf-8"> 5 <title>弹幕</title> 6 </head> 7 <script type="text/javascript" src="http://cdn.hcharts.cn/jquery/jquery-1.8.3.min.js"></script> 8 <style type="text/css"> 9 #Barrage{ 10 width:800px; 11 height:400px; 12 margin:0 auto; 13 border:1px solid #000; 14 } 15 #Video1{ 16 box-shadow: 10px 5px 5px black; 17 display: block; 18 } 19 </style> 20 <script type="text/javascript"> 21 22 function vidplay() { 23 var video = document.getElementById("Video1"); 24 var button = document.getElementById("play"); 25 if (video.paused) { 26 video.play(); 27 button.innerHTML = "||"; 28 } else { 29 video.pause(); 30 button.innerHTML = ">"; 31 } 32 } 33 34 function restart() { 35 var video = document.getElementById("Video1"); 36 video.currentTime = 0; 37 } 38 39 function skip(value) { 40 var video = document.getElementById("Video1"); 41 video.currentTime += value; 42 } 43 44 function makeBig(){ 45 var video = document.getElementById("Video1"); 46 video.width = 600; 47 } 48 </script> 49 50 <body> 51 <p id="Barrage"> 52 <video id="Video1" autoplay loop> 53 <source src="http://www.runoob.com/try/demo_source/mov_bbb.mp4" type="video/mp4"> 54 <source src="http://www.runoob.com/try/demo_source/mov_bbb.ogg" type="video/ogg"> 55 </video> 56 <p id="buttonbar" style="margin-left: 50px;margin-top: 20px"> 57 <button id="restart" onclick="restart();">重播</button> 58 <button id="rew" onclick="skip(-3)"><<</button> 59 <button id="play" onclick="vidplay()">暂停</button> 60 <button id="fastFwd" onclick="skip(3)">>></button> 61 <button onclick="makeBig()">放大</button> 62 </p> 63 </p> 64 </body> 65 <script type="text/javascript"> 66 var that = this; 67 //舞台是全局变量 68 var stage = $('#Barrage'); 69 //弹幕的总时间,这个是值得思考的问题,根据业务而已,这个不应该是一开始写死,因为是动态的弹幕,不过这里是为了测试方便,后面会修改 70 var totalTime = 9000; 71 //检测时间间隔 72 var checkTime = 1000; 73 //总飞幕数 74 var playCount = Math.ceil(totalTime / checkTime); 75 76 var messages=[{ 77 //从何时开始 78 time:0, 79 //经过的时间 80 duration:4292, 81 //舞台偏移的高度 82 top:10, 83 //弹幕文字大小 84 size:16, 85 //弹幕颜色 86 color:'#000', 87 //内容 88 text:'前方高能注意' 89 },{ 90 //从何时开始 91 time:100, 92 //经过的时间 93 duration:6192, 94 //舞台偏移的高度 95 top:100, 96 //弹幕文字大小 97 size:14, 98 //弹幕颜色 99 color:'green', 100 //内容 101 text:'我准备追上前面那条', 102 },{ 103 //从何时开始 104 time:130, 105 //经过的时间 106 duration:4192, 107 //舞台偏移的高度 108 top:90, 109 //弹幕文字大小 110 size:16, 111 //弹幕颜色 112 color:'red', 113 //内容 114 text:'遮住遮住遮住。。', 115 },{ 116 //从何时开始 117 time:1000, 118 //经过的时间 119 duration:6992, 120 //舞台偏移的高度 121 top:67, 122 //弹幕文字大小 123 size:20, 124 //弹幕颜色 125 color:'blue', 126 //内容 127 text:'临水照影Testing....~~', 128 }]; 129 130 //构造一个单独的弹幕 131 var BarrageItem = function(config){ 132 //保存配置 133 this.config = config; 134 //设置样式,这里的样式指的是一个容器,它指包含了单个弹幕的基础样式配置的p 135 this.outward = this.mySelf(); 136 //准备弹出去,先隐藏再加入到舞台,后面正式获取配置参数时会把一些样式修改。 137 this.outward.hide().appendTo(stage); 138 } 139 140 //单个弹幕样式,从config中提取配置 141 BarrageItem.prototype.mySelf = function(){ 142 //把配置中的样式写入 143 var outward = $('<p style="min-width:400px;font-size:'+this.config.size +'px;color:'+this.config.color+';">'+this.config.text+'</p>'); 144 return outward; 145 } 146 147 //定义弹的过程,这是弹幕的核心,而且一些高级扩展也是在这里添加 148 149 BarrageItem.prototype.move = function(){ 150 var that = this; 151 var outward = that.outward; 152 var myWidth = outward.width(); 153 //用jq自带animate来让它运动 154 outward.animate({ 155 left: -myWidth 156 },that.config.duration,'swing',function(){ 157 outward.hide(); //弹完我就藏起来 158 }); 159 } 160 161 //开始弹弹弹 162 163 BarrageItem.prototype.start = function(){ 164 var that = this; 165 var outward = that.outward; //这里引用的还是原型中的那个outward 166 //开始之前先隐藏自己 167 outward.css({ 168 position: 'absolute', 169 left: stage.width() + 'px', //隐藏在右侧 170 top:that.config.top || 0 , //如果有定义高度就从配置中取,否则就置顶 171 zIndex:10,//展示到前列 172 display: 'block' 173 }); 174 175 //延迟时间由配置的开始时间减去队列中该弹幕所处的位置所需要等的位置,而这里的队列位置是由驱使者diretor分配的,事实上根据我的调试发现这种写法只能近似于模仿顺序,然而如果两个播放时间间隔不大将会同时出发,不过这个对于普通体验影响不大。后期如果有强需求可能需要把整个逻辑改掉 176 var delayTime = that.config.time - (that.config.queue - 1) * checkTime; 177 setTimeout(function(){ 178 that.move(); 179 },delayTime); 180 181 } 182 183 //设置一个支持事件机制的对象,也就是弹幕们的驱使者,它来驱使弹幕弹弹弹 184 185 var diretor = $({});//创建一个空的对象 186 187 //对舞台进行样式设置,其实可以直接写到css里面 188 stage.css({ 189 position:'relative', 190 overflow:'hidden' 191 }); 192 193 //批量读取写好的弹幕配置内容,然而后期是需要动态弹幕,打算采用websocket来分配因此这里也只是为了测试而简写 194 195 //that.messages 是配合vue的data来设置的,如果是为了在单个文件中引用,去掉that,把message写在该js里面 196 197 $.each(messages,function(k,config){ 198 //确认弹出的时间 199 var queue = Math.ceil(config.time / checkTime); 200 config.queue = queue; 201 202 //新建一个对象给它配置 203 var go = new BarrageItem(config); 204 //驱动者监听驱使动作 205 diretor.on(queue+'start',function(){ 206 go.start(); 207 }) 208 }); 209 210 var currentQueue = 0; 211 setInterval(function(){ 212 //从队列中取第n个开始谈 213 diretor.trigger(currentQueue+'start'); 214 //如果都弹完了 循环来一遍 215 if (currentQueue === playCount) { 216 currentQueue = 0; 217 }else{ 218 currentQueue++; 219 } 220 221 },checkTime); 222 </script> 223 224 225 226 </html>
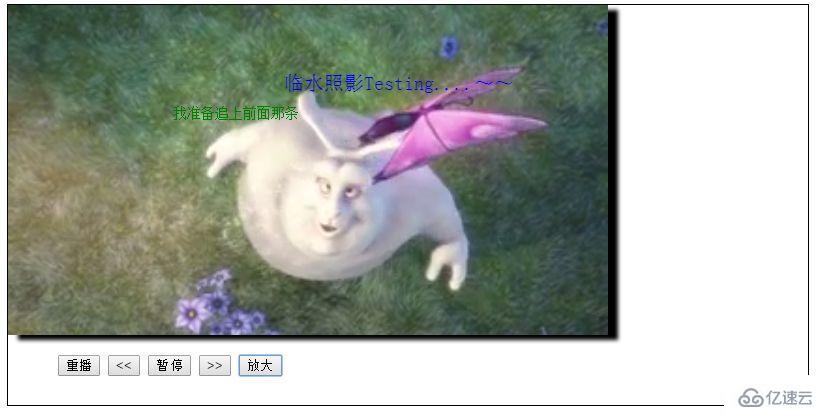
效果展示:

以上是“HTML5中WebSocket怎么用”这篇文章的所有内容,感谢各位的阅读!希望分享的内容对大家有帮助,更多相关知识,欢迎关注亿速云行业资讯频道!
免责声明:本站发布的内容(图片、视频和文字)以原创、转载和分享为主,文章观点不代表本网站立场,如果涉及侵权请联系站长邮箱:is@yisu.com进行举报,并提供相关证据,一经查实,将立刻删除涉嫌侵权内容。