您好,登录后才能下订单哦!
密码登录
登录注册
点击 登录注册 即表示同意《亿速云用户服务条款》
这期内容当中小编将会给大家带来有关怎么在Python中使用PyPDF2模块,文章内容丰富且以专业的角度为大家分析和叙述,阅读完这篇文章希望大家可以有所收获。
PyPDF2模块主要的功能是分割或合并PDF文件,裁剪或转换PDF文件中的页面。
0、安装PyPDF2的模块
pip install PyPDF2
1、常用的函数
#!/usr/bin/env python
# -*- coding: utf-8 -*-
# @Time  : 2020/1/15 13:38
# @Author : suk
# @File  : pyxl.py
# @Software: PyCharm
import PyPDF2

reader = PyPDF2.PdfFileReader(open('linux.pdf', 'rb'))
print(reader.getNumPages()) # 获取pdf总页数
print(reader.isEncrypted) # 判断是否有加密
page = reader.getPage(4) # 获取第四页
print(page.extractText()) # 获取第四页的内容
print(reader.getDocumentInfo()) # 获取PDF元信息,即创建时间,作者,标题等
2、读取PDF文件,取指定页数,写入到硬盘上的示例
#!/usr/bin/env python
# -*- coding: utf-8 -*-

import PyPDF2

reader = PyPDF2.PdfFileReader(open('linux.pdf', 'rb'))

output = PyPDF2.PdfFileWriter()

output.addPage(reader.getPage(1))
output.addPage(reader.getPage(4))
output.addPage(reader.getPage(5))
print(output.getNumPages()) # 获取写入页的总页数

output.encrypt('123456')
outputStream = open('PyPDF2-output.pdf', 'wb')
output.write(outputStream)
outputStream.close()
3、读取PDF某一页,旋转180度后,写入到新的PDF文件的示例
#!/usr/bin/env python
# -*- coding: utf-8 -*-

import PyPDF2

reader = PyPDF2.PdfFileReader(open('linux.pdf', 'rb'))

page = reader.getPage(0) # 获取第0页
page.rotateClockwise(180) # 旋转180度

writer = PyPDF2.PdfFileWriter() # 创建PDF写入的对象
writer.addPage(page)

outputStream = open('rotate-page-test.pdf', 'wb') # 创建一个PDF文件
writer.write(outputStream) # 往文件写入PDF数据
outputStream.close() # 写入流
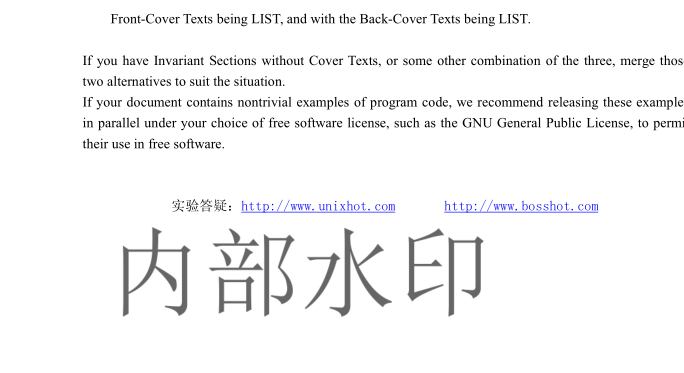
4、PDF增加水印的示例
注意:水印模板可以利用WORD文档写好文字,转为PDF即可
#!/usr/bin/env python
# -*- coding: utf-8 -*-

import PyPDF2

reader = PyPDF2.PdfFileReader(open('linux.pdf', 'rb')) # 增加水印的原文件

watermark = PyPDF2.PdfFileReader(open('水印模板.pdf', 'rb')) # 水印的模板

writer = PyPDF2.PdfFileWriter() # 写入PDF的对象

for i in range(reader.getNumPages()):
  page = reader.getPage(i)
  page.mergePage(watermark.getPage(0)) # 将原文件与水印模板合并
  writer.addPage(page) # 增加到写入对象中

outputStream = open('watermark-test-linux.pdf', 'wb') # 打开一个写入硬盘的文件对象
writer.write(outputStream) # 将合并好的数据,写入硬盘中
outputStream.close() # 关闭文件句柄
测试效果

5、合并多个指定的PDF文件的示例
#!/usr/bin/env python
# -*- coding: utf-8 -*-

from PyPDF2 import PdfFileMerger

merger = PdfFileMerger() # 创建一个合并的对象

input1 = open('01PDF.pdf', 'rb')
input2 = open('02PDF.pdf', 'rb')
input3 = open('03PDF.pdf', 'rb')

merger.append(fileobj=input1, pages=(0, 3)) # 合并文件1的0到3页
merger.merge(position=2, fileobj=input2, pages=(0, 1)) # 合并文件2的0到1页
merger.append(fileobj=input3) # 合并文件的所有页

output = open('document-output.pdf', 'wb') # 保存硬盘上
merger.write(output) # 写入到硬盘上
output.close() # 关闭文件句柄
6、批量合并指定目录的PDF文件的示例
#!/usr/bin/env python
# -*- coding: utf-8 -*-

import PyPDF2
import os
import glob

def get_all_pdf_files(path):
  """获取指定目录的所有pdf文件名"""
  all_pdfs = glob.glob('{0}/*.pdf'.format(path))
  all_pdfs.sort(key=str.lower) # 排序
  return all_pdfs

def main():
  path = os.getcwd()
  all_pdfs = get_all_pdf_files(path)
  if not all_pdfs:
    raise SystemExit('没有可用的PDF类型文件')

  merger = PyPDF2.PdfFileMerger()

  first_obj = open(all_pdfs[0], 'rb') # 打开第一个PDF文件
  merger.append(first_obj) # 增加到合并的对象中

  file_objs = []
  for pdf in all_pdfs[1:]: # 读取所有的文件对象
    file_objs.append(open(pdf, 'rb'))

  for file_obj in file_objs:
    reader = PyPDF2.PdfFileReader(file_obj)
    merger.append(fileobj=file_obj, pages=(1, reader.getNumPages()))

  outputStream = open('merge-pdfs.pdf', 'wb')
  merger.write(outputStream)
  outputStream.close()
  for file_obj in file_objs: # 批量关闭文件句柄
    file_obj.close()

if __name__ == '__main__':
  main()
上述就是小编为大家分享的怎么在Python中使用PyPDF2模块了,如果刚好有类似的疑惑,不妨参照上述分析进行理解。如果想知道更多相关知识,欢迎关注亿速云行业资讯频道。
免责声明:本站发布的内容(图片、视频和文字)以原创、转载和分享为主,文章观点不代表本网站立场,如果涉及侵权请联系站长邮箱:is@yisu.com进行举报,并提供相关证据,一经查实,将立刻删除涉嫌侵权内容。