您好,登录后才能下订单哦!
密码登录
登录注册
点击 登录注册 即表示同意《亿速云用户服务条款》
这篇文章主要介绍js怎么实现简单放大镜效果,文中介绍的非常详细,具有一定的参考价值,感兴趣的小伙伴们一定要看完!
具体内容如下
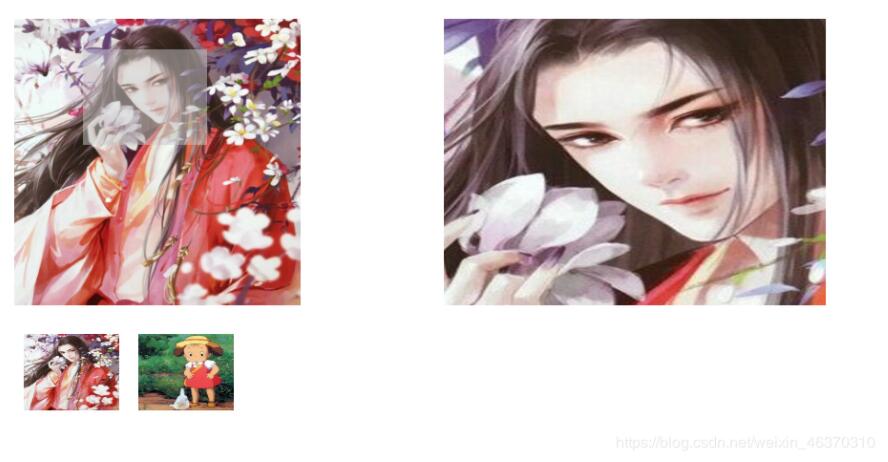
此处放大镜实现的效果就是当鼠标放置在图片上会有半透明遮罩,图片的一个区域就会被放大,然后展示在右边。当鼠标移动时右边的大图片也会局部移动。这里的放大并不是真正的放大,而是等比例移动。下面是实现的代码:
css样式代码如下:
<style>
 .s_box{width:400px;height: 300px;position: absolute;left: 50px;top:100px;}
 .s_box img{width: 400px;height: 300px;}
 .s_box span{width: 130px;height: 100px;background: rgba(200,200,200,0.5);position: absolute;left:0;top:0;display: none;cursor:move;}

 .b_box{width: 400px;height: 300px;overflow: hidden;position: absolute;left:500px;top:100px;display: none;}
 .b_box img{width: 1200px;height: 900px;position: absolute;left:0;top:0;}

 .list{margin: 0;padding: 0;list-style: none;position: absolute;left:50px;top:430px;}
 .list li{float: left;margin: 0 10px;}
 .list li img{width: 100px;height: 80px;}
</style>
html代码如下:
<body>
 <div class="s_box">
 <img src="../img/large1.jpg" alt="">
 <span></span>
 </div>
 <div class="b_box">
 <img src="../img/large1.jpg" alt="">
 </div>
 <ul class="list">
 <li><img src="../img/large1.jpg" alt=""></li>
 <li><img src="../img/large2.jpg" alt=""></li>
 </ul>
</body>
js主要代码如下:
// 分析:
// 1.选择元素
// 2.绑定事件
// 3.进入的时候显示元素
// 4.移动:遮罩层跟随鼠标移动的同时计算遮罩层的移动比例 、右侧大图,等比例移动
// 5.离开的时候隐藏元素
<script>
 class Large{
 constructor(){
 this.sBox = document.querySelector(".s_box");
 this.sImg = document.querySelector(".s_box img");
 this.sSpan = document.querySelector(".s_box span");
 this.bBox = document.querySelector(".b_box");
 this.bImg = document.querySelector(".b_box img");
 // 点击小图切换大图的按钮
 this.li = document.querySelectorAll(".list li");
 }
 addEvent(){
 var that = this;
 this.sBox.onmouseover = function(){
 that.over();
 }
 this.sBox.onmousemove = function(eve){
 var e = eve || window.event;
 that.move(e);
 }
 this.sBox.onmouseout = function(){
 that.out();
 }
 // 切换图片按钮的点击事件:根据布局做出调整
 for(var i=0;i<this.li.length;i++){
 this.li[i].onclick = function(){
  that.sImg.src = this.children[0].src;
  that.bImg.src = this.children[0].src;
 }
 }
 }
 over(){
 this.sSpan.style.display = "block";
 this.bBox.style.display = "block";
 }
 move(e){
 // 计算遮罩层跟随鼠标移动时的left和top
 var l = e.pageX - this.sBox.offsetLeft - this.sSpan.offsetWidth/2;
 var t = e.pageY - this.sBox.offsetTop - this.sSpan.offsetHeight/2;
 // 边界限定
 if(l<0) l=0;
 if(t<0) t=0;
 if(l > this.sBox.offsetWidth - this.sSpan.offsetWidth){
 l = this.sBox.offsetWidth - this.sSpan.offsetWidth;
 }
 if(t > this.sBox.offsetHeight - this.sSpan.offsetHeight){
 t = this.sBox.offsetHeight - this.sSpan.offsetHeight;
 }
 // 设置遮罩层的位置
 this.sSpan.style.left = l + "px";
 this.sSpan.style.top = t + "px";
 // 根据遮罩层移动的距离计算比例
 var x = l / (this.sBox.offsetWidth - this.sSpan.offsetWidth);
 var y = t / (this.sBox.offsetHeight - this.sSpan.offsetHeight);
 // 根据上一步得到的比例,计算右侧大图要移动的当前值
 this.bImg.style.left = (this.bBox.offsetWidth - this.bImg.offsetWidth) * x + "px";
 this.bImg.style.top = (this.bBox.offsetHeight - this.bImg.offsetHeight) * y + "px";
 }
 out(){
 this.sSpan.style.display = "none";
 this.bBox.style.display = "none";
 }
 }

 // 启动
 var l = new Large();
 l.addEvent();

</script>
实现效果:
以上是“js怎么实现简单放大镜效果”这篇文章的所有内容,感谢各位的阅读!希望分享的内容对大家有帮助,更多相关知识,欢迎关注亿速云行业资讯频道!
免责声明:本站发布的内容(图片、视频和文字)以原创、转载和分享为主,文章观点不代表本网站立场,如果涉及侵权请联系站长邮箱:is@yisu.com进行举报,并提供相关证据,一经查实,将立刻删除涉嫌侵权内容。