жӮЁеҘҪпјҢзҷ»еҪ•еҗҺжүҚиғҪдёӢи®ўеҚ•е“ҰпјҒ
еҜҶз Ғзҷ»еҪ•
зҷ»еҪ•жіЁеҶҢ
зӮ№еҮ» зҷ»еҪ•жіЁеҶҢ еҚіиЎЁзӨәеҗҢж„ҸгҖҠдәҝйҖҹдә‘з”ЁжҲ·жңҚеҠЎжқЎж¬ҫгҖӢ
иҝҷзҜҮж–Үз« дё»иҰҒд»Ӣз»ҚдәҶJavaScriptеҰӮдҪ•е®һзҺ°з®Җжҳ“иҒҠеӨ©еҜ№иҜқжЎҶпјҢе…·жңүдёҖе®ҡеҖҹйүҙд»·еҖјпјҢж„ҹе…ҙи¶Јзҡ„жңӢеҸӢеҸҜд»ҘеҸӮиҖғдёӢпјҢеёҢжңӣеӨ§е®¶йҳ…иҜ»е®ҢиҝҷзҜҮж–Үз« д№ӢеҗҺеӨ§жңү收иҺ·пјҢдёӢйқўи®©е°Ҹзј–еёҰзқҖеӨ§е®¶дёҖиө·дәҶи§ЈдёҖдёӢгҖӮ
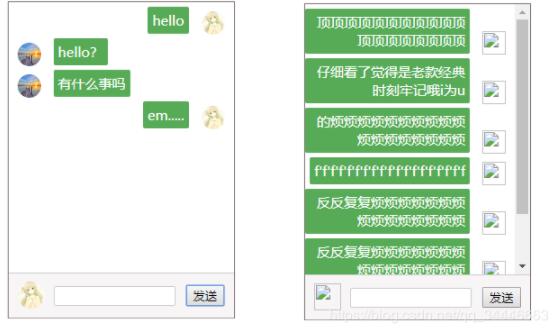
д»ҠеӨ©зңӢдәҶеҮ дёӘJSзҡ„и§Ҷйў‘пјҢиҖҒеёҲеёғзҪ®дәҶдёҖдёӘзј–еҶҷдёҖдёӘз®Җжҳ“иҒҠеӨ©еҜ№иҜқжЎҶзҡ„д»»еҠЎпјҢжІЎжңүж¶үеҸҠеҲ°Ajax.дё»иҰҒе®һзҺ°дәҶеҲҮжҚўеӨҙеғҸжЁЎжӢҹдёӨж–№зҡ„иҒҠеӨ©жғ…еҶөпјҢж ·ејҸжҜ”иҫғз®ҖеҚ•пјҢеҗҺжңҹеҸҜд»ҘиҝӣиЎҢзҫҺеҢ–гҖӮ
йңҖиҰҒжіЁж„Ҹзҡ„ең°ж–№жҳҜжҲ‘жҳҜз”Ёзҡ„ul liеҲ—иЎЁжқҘе®һзҺ°е…ғзҙ зҡ„ж·»еҠ пјҢиҝҷж ·жӣҙеҲ©дәҺж ·ејҸзҡ„и®ҫзҪ®пјҢжҜҸж·»еҠ дёҖдёӘеҜ№иҜқжЎҶйңҖиҰҒжё…йҷӨдёҖдёӢжө®еҠЁпјҢдёҚ然дјҡеҮәзҺ°иҝһз»ӯеҮ дёӘеҜ№иҜқжЎҶеҮәзҺ°еңЁдёҖиЎҢзҡ„зҺ°иұЎгҖӮ
д»Јз ҒеҰӮдёӢпјҡ
<!DOCTYPE html>
<html>
<head>
<meta charset="utf-8">
<title>иҒҠеӨ©еҜ№иҜқжЎҶ</title>
<style type="text/css">
#container{
width: 250px;
height: 350px;
border:1px solid #7b6b6b;
margin: 0 auto;
position: relative;
}
#content{
width: 250px;
height: 300px;
border-bottom: 1px solid #ccc;
overflow-y: auto;
}
#content ul{
margin: 0;
padding: 0;
}
#Img{
width: 30px;
height: 30px;
position: absolute;
left: 10px;
top: 310px;
border-radius: 15px;
}
#txt{
margin: 0;
position: absolute;
left: 50px;
top: 315px;
border-radius: 2px;
border:1px solid #ccc;
width: 133px;
height: 18px;
}
#btn{
margin-right: 10px;
position: absolute;
margin: 0;
left: 197px;
top: 314px;
}
#edit{
background: #ece7e766;
width: 250px;
height: 50px;
}
.showTxt{
width: auto;
height: auto;
max-width: 230px;
background: #008000a8;
border:0;
font-size: 15px;
color: white;
padding: 5px;
border-radius: 2px;
word-break: break-all;
list-style: none;
margin-top: 5px;
display: list-item;
}
.left{
text-align: left;
margin-left: 50px;
float: left;
}
.right{
text-align: right;
margin-right: 50px;
float: right;
}
.showImg{
width: 26px;
height: 26px;
border-radius: 13px;
}
.leftImg{
left: 10px;
position: absolute;
}
.rightImg{
right: 10px;
position: absolute;
}
#scroll{
position: relative;
}
</style>
</head>
<body>
<div id="container">
<div id="content">
<div id="scroll">
<ul id="save"></ul>
</div>
</div>
<div id="edit">
<img src="1.jpg" id="Img">
<input type="text" name="" id="txt">
<input type="button" name="" value="еҸ‘йҖҒ" id="btn">
</div>
</div>
<script type="text/javascript">
//иҺ·еҸ–е…ғзҙ
var oCont=document.getElementById('content');
var oImg=document.getElementById('Img');
var oTxt=document.getElementById('txt');
var oBtn=document.getElementById('btn');
var oSTxt=document.getElementsByClassName('showTxt');
var oSave=document.getElementById('save');
var num=0;
//еҲҮжҚўеӨҙеғҸ
oImg.Оҝnclick=function(){
num++;
if(num%2==0)
oImg.src='1.jpg';
else
oImg.src='2.jpg';
}
//еҸ‘йҖҒдәӢ件
oBtn.Оҝnclick= function(){
addCon();
}
function addCon(){
//е®ҡд№үйңҖиҰҒж·»еҠ зҡ„е…ғзҙ
var newLi=document.createElement("li");
var newImg=document.createElement('img');
//еҲӨж–ӯиҒҠеӨ©зҡ„еҜ№иұЎжҳҜе“ӘдёҖж–№пјҢж–Үеӯ—жЎҶеҮәзҺ°еңЁе·Ұиҫ№иҝҳжҳҜеҸіиҫ№
if(num%2==0){
//ж·»еҠ еҜ№иҜқжЎҶ
newLi.innerHTML=oTxt.value;
newLi.className='showTxt right';
oSave.appendChild(newLi);
oTxt.value='';
//ж·»еҠ еӨҙеғҸ
newImg.src=oImg.src;
newImg.className='showImg rightImg';
newLi.appendChild(newImg);
//жё…йҷӨжө®еҠЁ
var div = document.createElement('div');
div.style = 'clear:both';
oSave.appendChild(div);
}else{
newLi.innerHTML=oTxt.value;
newLi.className='showTxt left';
oSave.appendChild(newLi);
oTxt.value='';
newImg.src=oImg.src;
newImg.className='showImg leftImg';
newLi.appendChild(newImg);
var div = document.createElement('div');
div.style = 'clear:both';
oSave.appendChild(div);
}
}
</script>
</body>
</html>йЎөйқўз»“жһңеҰӮеӣҫпјҡ
ж„ҹи°ўдҪ иғҪеӨҹи®Өзңҹйҳ…иҜ»е®ҢиҝҷзҜҮж–Үз« пјҢеёҢжңӣе°Ҹзј–еҲҶдә«зҡ„вҖңJavaScriptеҰӮдҪ•е®һзҺ°з®Җжҳ“иҒҠеӨ©еҜ№иҜқжЎҶвҖқиҝҷзҜҮж–Үз« еҜ№еӨ§е®¶жңүеё®еҠ©пјҢеҗҢж—¶д№ҹеёҢжңӣеӨ§е®¶еӨҡеӨҡж”ҜжҢҒдәҝйҖҹдә‘пјҢе…іжіЁдәҝйҖҹдә‘иЎҢдёҡиө„и®Ҝйў‘йҒ“пјҢжӣҙеӨҡзӣёе…ізҹҘиҜҶзӯүзқҖдҪ жқҘеӯҰд№ !
е…ҚиҙЈеЈ°жҳҺпјҡжң¬з«ҷеҸ‘еёғзҡ„еҶ…е®№пјҲеӣҫзүҮгҖҒи§Ҷйў‘е’Ңж–Үеӯ—пјүд»ҘеҺҹеҲӣгҖҒиҪ¬иҪҪе’ҢеҲҶдә«дёәдё»пјҢж–Үз« и§ӮзӮ№дёҚд»ЈиЎЁжң¬зҪ‘з«ҷз«ӢеңәпјҢеҰӮжһңж¶үеҸҠдҫөжқғиҜ·иҒ”зі»з«ҷй•ҝйӮ®з®ұпјҡis@yisu.comиҝӣиЎҢдёҫжҠҘпјҢ并жҸҗдҫӣзӣёе…іиҜҒжҚ®пјҢдёҖз»ҸжҹҘе®һпјҢе°Ҷз«ӢеҲ»еҲ йҷӨж¶үе«ҢдҫөжқғеҶ…е®№гҖӮ
жӮЁеҘҪпјҢзҷ»еҪ•еҗҺжүҚиғҪдёӢи®ўеҚ•е“ҰпјҒ