您好,登录后才能下订单哦!
密码登录
登录注册
点击 登录注册 即表示同意《亿速云用户服务条款》
本文实例为大家分享了微信小程序轮播图的具体代码,供大家参考,具体内容如下
1.逻辑层
mine.js
// pages/mine/mine.js
Page({

 /**
 * 页面的初始数据
 */
 data: {
 /*轮播图 配置*/
 imgUrls: [
 'http://img02.tooopen.com/images/20150928/tooopen_sy_143912755726.jpg',
 'http://img06.tooopen.com/images/20160818/tooopen_sy_175866434296.jpg',
 'http://img06.tooopen.com/images/20160818/tooopen_sy_175833047715.jpg'
 ],
 indicatorDots: true, // 是否显示面板指示点
 autoplay: true, // 是否自动切换
 interval: 5000, // 自动切换时间间隔
 duration: 500, // 滑动动画时长
 circular: true, // 是否采用衔接滑动
 /*自定义轮播图 配置*/
 slider: [
 { id: '0', linkUrl: 'pages/index/index', picUrl: 'http://img02.tooopen.com/images/20150928/tooopen_sy_143912755726.jpg' },
 { id: '0', linkUrl: 'pages/index/index', picUrl: 'http://img06.tooopen.com/images/20160818/tooopen_sy_175866434296.jpg' },
 { id: '0', linkUrl: 'pages/index/index', picUrl: 'http://img06.tooopen.com/images/20160818/tooopen_sy_175833047715.jpg' }
 ],
 swiperCurrent: 0
 },

 /**
 * 生命周期函数--监听页面加载
 */
 onLoad: function (options) {

 },

 //轮播图的切换事件
 swiperChange: function (e) {
 //只要把切换后当前的index传给<swiper>组件的current属性即可
 this.setData({
 swiperCurrent: e.detail.current
 })
 },
 //点击指示点切换
 chuangEvent: function (e) {
 this.setData({
 swiperCurrent: e.currentTarget.id
 })
 }
})
2.页面布局
mine.wxml
<!--pages/mine/mine.wxml-->
<view>
 <!-- 轮播图 -->
 <swiper class="swiper" indicator-dots="{{indicatorDots}}"
 autoplay="{{autoplay}}" interval="{{interval}}" duration="{{duration}}" circular="{{circular}}">
 <block wx:for="{{imgUrls}}" wx:key="id">
 <swiper-item>
 <image src="{{item}}" class="slide-image" />
 </swiper-item>
 </block>
 </swiper>
 <!-- 自定义轮播图 -->
 <view class="swiper-container">
 <swiper circular="true" autoplay="auto" interval="5000" duration="500" current="{{swiperCurrent}}" bindchange="swiperChange" class="swiper">
 <block wx:for="{{slider}}" wx:key="unique">
 <swiper-item data-id="{{item.id}}" data-url="{{item.linkUrl}}">
  <image src="{{item.picUrl}}" class="img"></image>
 </swiper-item>
 </block>
 </swiper>
 <view class="dots">
 <block wx:for="{{slider}}" wx:key="unique">
 <view class="dot{{index == swiperCurrent ? ' active' : ''}}" bindtap="chuangEvent" id="{{index}}">{{index+1}}</view>
 </block>
 </view>
 </view>
</view>
3.样式
mine.wxss
/* pages/mine/mine.wxss */
/**轮播图 start**/
.swiper {
 height: 400rpx;
 width: 100%;
}
.swiper image {
 height: 100%;
 width: 100%;
}
/**轮播图 end**/
/**自定义轮播图 start**/
.swiper-container{
 position: relative;
}
.swiper-container .swiper{
 height: 400rpx;
}
.swiper-container .swiper .img{
 width: 100%;
 height: 100%;
}
.swiper-container .dots{
 position: absolute;
 right: 40rpx;
 bottom: 20rpx;
 display: flex;
 justify-content: center;
}
.swiper-container .dots .dot{
 margin: 0 10rpx;
 width: 28rpx;
 height: 28rpx;
 background: #fff;
 border-radius: 50%;
 transition: all .6s;
 font: 300 18rpx/28rpx "microsoft yahei";
 text-align: center;
}
.swiper-container .dots .dot.active{
 background: #f80;
 color:#fff;
}
/**自定义轮播图 end**/
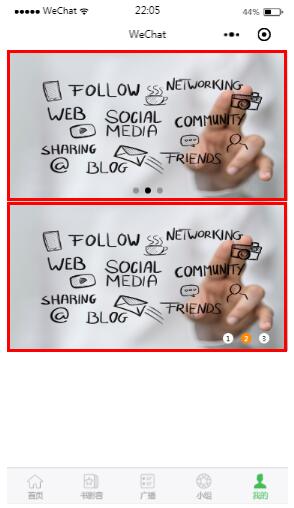
4.效果图

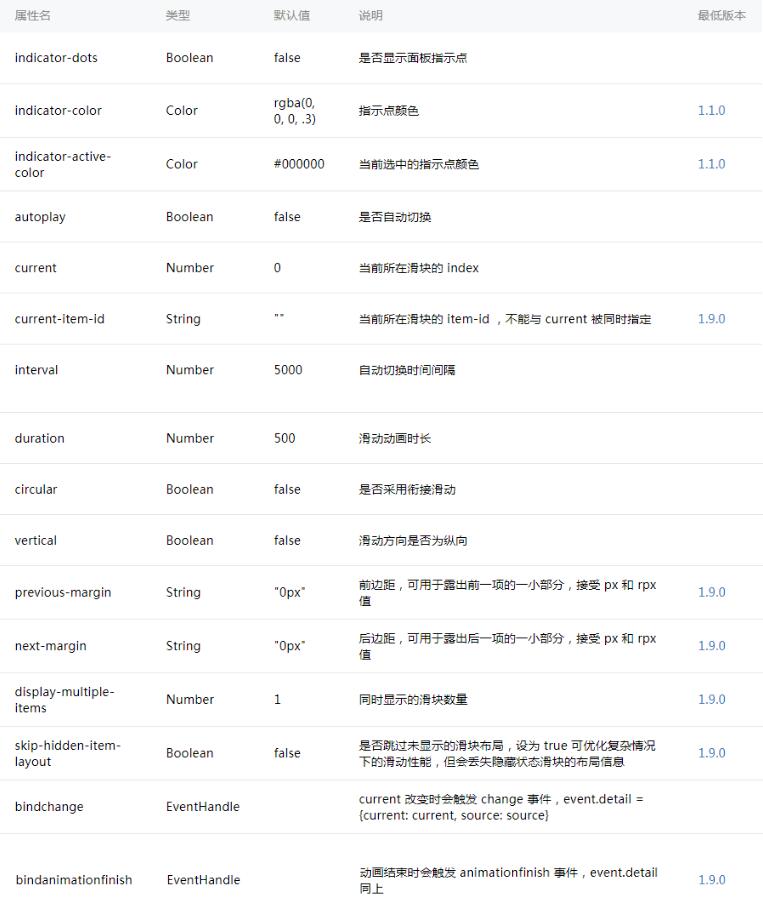
5.参数

更多关于轮播图效果的专题,请点击下方链接查看学习
javascript图片轮播效果汇总
jquery图片轮播效果汇总
Bootstrap轮播特效汇总
以上就是本文的全部内容,希望对大家的学习有所帮助,也希望大家多多支持亿速云。
免责声明:本站发布的内容(图片、视频和文字)以原创、转载和分享为主,文章观点不代表本网站立场,如果涉及侵权请联系站长邮箱:is@yisu.com进行举报,并提供相关证据,一经查实,将立刻删除涉嫌侵权内容。