您好,登录后才能下订单哦!
今天就跟大家聊聊有关如何在nginx中配置二级域名,可能很多人都不太了解,为了让大家更加了解,小编给大家总结了以下内容,希望大家根据这篇文章可以有所收获。
我的vps挂了三个服务, 分别是:
WordPress搭建的博客服务, 运行于8000端口, 访问方式 http://fangyuanxiaozhan.com:8000
Gogs搭建的git服务, 运行于10080端口, 访问方式 http://fangyuanxiaozhan.com:10080
Nextcloud搭建的网盘服务, 运行于8080端口, 访问方式 http://fangyuanxiaozhan.com:10080
我的需求:
1.访问博客服务时, 直接输入 http://fangyuanxiaozhan.com
访问git服务时, 直接输入 http://git.fangyuanxiaozhan.com
访问网盘服务时, 直接输入 http://cloud.fangyuanxiaozhan.com
实现的方法
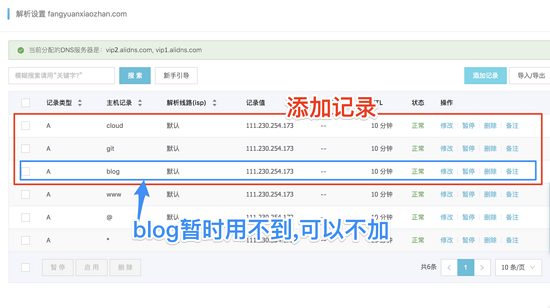
1、到托管域名的网站, 添加DNS解析, 我的域名 fangyuanxiaozhan.com 托管在阿里云, 我的做法是登录 https://dns.console.aliyun.com/#/dns/domainList , 添加二级记录

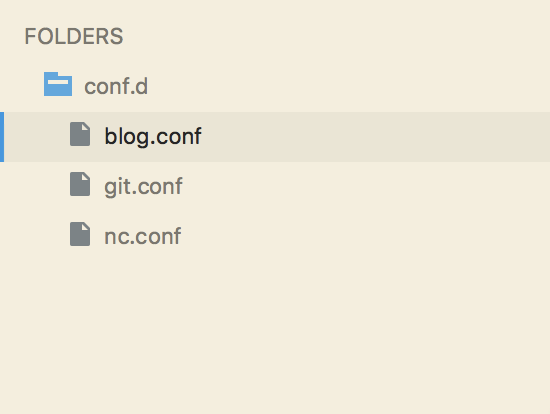
2、我使用的是centos7, nginx配置文件的默认位置为 /etc/nginx/nginx.conf , 有意思的是, /etc/nginx/nginx.conf 内引入了 配置文件夹 /etc/nginx/conf.d , 也就是我们可以把 /etc/nginx/nginx.conf 中的一些默认配置注释掉, 直接在文件夹 /etc/nginx/conf.d 中配置多个独立的配置文件.

/etc/nginx/nginx.conf 的配置
# For more information on configuration, see:
#  * Official English Documentation: http://nginx.org/en/docs/
#  * Official Russian Documentation: http://nginx.org/ru/docs/

user nginx;
worker_processes auto;
error_log /var/log/nginx/error.log;
pid /run/nginx.pid;

# Load dynamic modules. See /usr/share/nginx/README.dynamic.
include /usr/share/nginx/modules/*.conf;

events {
  worker_connections 1024;
}

http {
  log_format main '$remote_addr - $remote_user [$time_local] "$request" '
           '$status $body_bytes_sent "$http_referer" '
           '"$http_user_agent" "$http_x_forwarded_for"';

  access_log /var/log/nginx/access.log main;

  sendfile      on;
  tcp_nopush     on;
  tcp_nodelay     on;
  keepalive_timeout  65;
  types_hash_max_size 2048;

  include       /etc/nginx/mime.types;
  default_type    application/octet-stream;

  include /etc/nginx/conf.d/*.conf;

}
注意上述配置文件的最后一行, include /etc/nginx/conf.d/*.conf; 保证了 /etc/nginx/conf.d/ 下,所有以.conf结尾的配置文件, 都会被主配置文件 nginx.conf 引入并生效
在 /etc/nginx/conf.d/ 下面需要新建三个文件

blog.conf (实现8000端口映射到80端口, 不使用二级域名)
server {
  listen 80;
  server_name fangyuanxiaozhan.com;

  location / {
    proxy_set_header  X-Real-IP $remote_addr;
    proxy_set_header  Host   $http_host;
    proxy_pass     http://0.0.0.0:8000;
  }
}
blog.conf实现了fangyuanxiaozhan.com:8000映射到 fangyuanxiaozhan.com
git.conf (实现10080端口映射到80端口, 使用二级域名 git )
server {
  listen 80;
  server_name git.fangyuanxiaozhan.com;

  location / {
    proxy_set_header  X-Real-IP $remote_addr;
    proxy_set_header  Host   $http_host;
    proxy_pass     http://0.0.0.0:10080;
  }
}
git.conf实现了fangyuanxiaozhan.com:10080映射到 git.fangyuanxiaozhan.com
nc.conf (实现10080端口映射到80端口, 使用二级域名 cloud )
server {
  listen 80;
  server_name cloud.fangyuanxiaozhan.com;

  location / {
    proxy_set_header  X-Real-IP $remote_addr;
    proxy_set_header  Host   $http_host;
    proxy_pass     http://0.0.0.0:8080;
  }
}
git.conf实现了fangyuanxiaozhan.com:8080映射到 cloud.fangyuanxiaozhan.com
重启nginx使配置生效
关闭nginx
sudo $(which nginx) -s stop
开启nginx
sudo $(which nginx)
效果展示


看完上述内容,你们对如何在nginx中配置二级域名有进一步的了解吗?如果还想了解更多知识或者相关内容,请关注亿速云行业资讯频道,感谢大家的支持。
免责声明:本站发布的内容(图片、视频和文字)以原创、转载和分享为主,文章观点不代表本网站立场,如果涉及侵权请联系站长邮箱:is@yisu.com进行举报,并提供相关证据,一经查实,将立刻删除涉嫌侵权内容。