您好,登录后才能下订单哦!
后端代码就不介绍了,可以参考 django rest framework 实现用户登录认证
这里介绍一下前端代码,和前后端的联调过程
在components下新建login.vue 文件
<template>
 <div class="login">
  <el-form label-width="80px">
  <el-form-item label="用户名">
   <el-input v-model="form.username"></el-input>
  </el-form-item>
  <el-form-item label="密码">
   <el-input v-model="form.password" type="password"></el-input>
  </el-form-item>
  <el-form-item>
   <el-button type="primary" @click="onLogin">登录</el-button>
   <el-button>取消</el-button>
  </el-form-item>
  </el-form>
 </div>
</template>

<script>
import axios from 'axios';
export default {
 name: "login",
 data() {
 return {
  form: {
  username: null,
  password: null
  }
 }
 },
 methods: {
 onLogin() {
  axios.post('http://127.0.0.1:8000/api/v1/auth/',this.form,{withCredentials:true}).then((res)=> {
  console.log(res);
  this.$router.go({path:'/'});
  });
 }
 }
}
</script>

<style scoped>
.login {
 width: 50%;
 margin: 0 auto;
}
</style>
修改rounter下index.js
import Vue from 'vue'
import Router from 'vue-router'
import HelloWorld from '@/components/HelloWorld'
import test from '@/components/test'
import runoob from '@/components/runoob'
import vhtml from '@/components/vhtml'
import Login from '@/components/login'
Vue.use(Router)

var router = new Router({
 routes: [
 {
  path: '/',
  name: 'HelloWorld',
  component: HelloWorld
 },
 {
  path: '/test',
  name: 'test',
  component: test
 }
 ,
 {
  path: '/login',
  name: 'login',
  component: Login
 }
 ,
 {
  path: '/runoob',
  name: 'runoob',
  component: runoob
 },
 {
  path: '/vhtml',
  name: 'vhtml',
  component: vhtml
 },
 ]
})
router.beforeEach((to,from,next)=> {
 if(to.path==='/login') {
 window.hideLogin = false;
 }
 // if(!window.token&&to.path!=='/login') {
 // router.go('/login');
 // }else {
 // next();
 // }
 next();
})
export default router;
修改项目 man.js
// The Vue build version to load with the `import` command
// (runtime-only or standalone) has been set in webpack.base.conf with an alias.
import Vue from 'vue'
import App from './App'
import router from './router'
import ElementUI from 'element-ui'
import axios from 'axios'
Vue.prototype.axios = axios

Vue.config.productionTip = false

Vue.use(ElementUI); // 引入elementui

/* eslint-disable no-new */
new Vue({
 el: '#app',
 router,
 components: { App },
 template: '<App/>'
})
启动项目 npm run dev

输入url,访问查看页面

启动服务端

浏览器打开检查功能
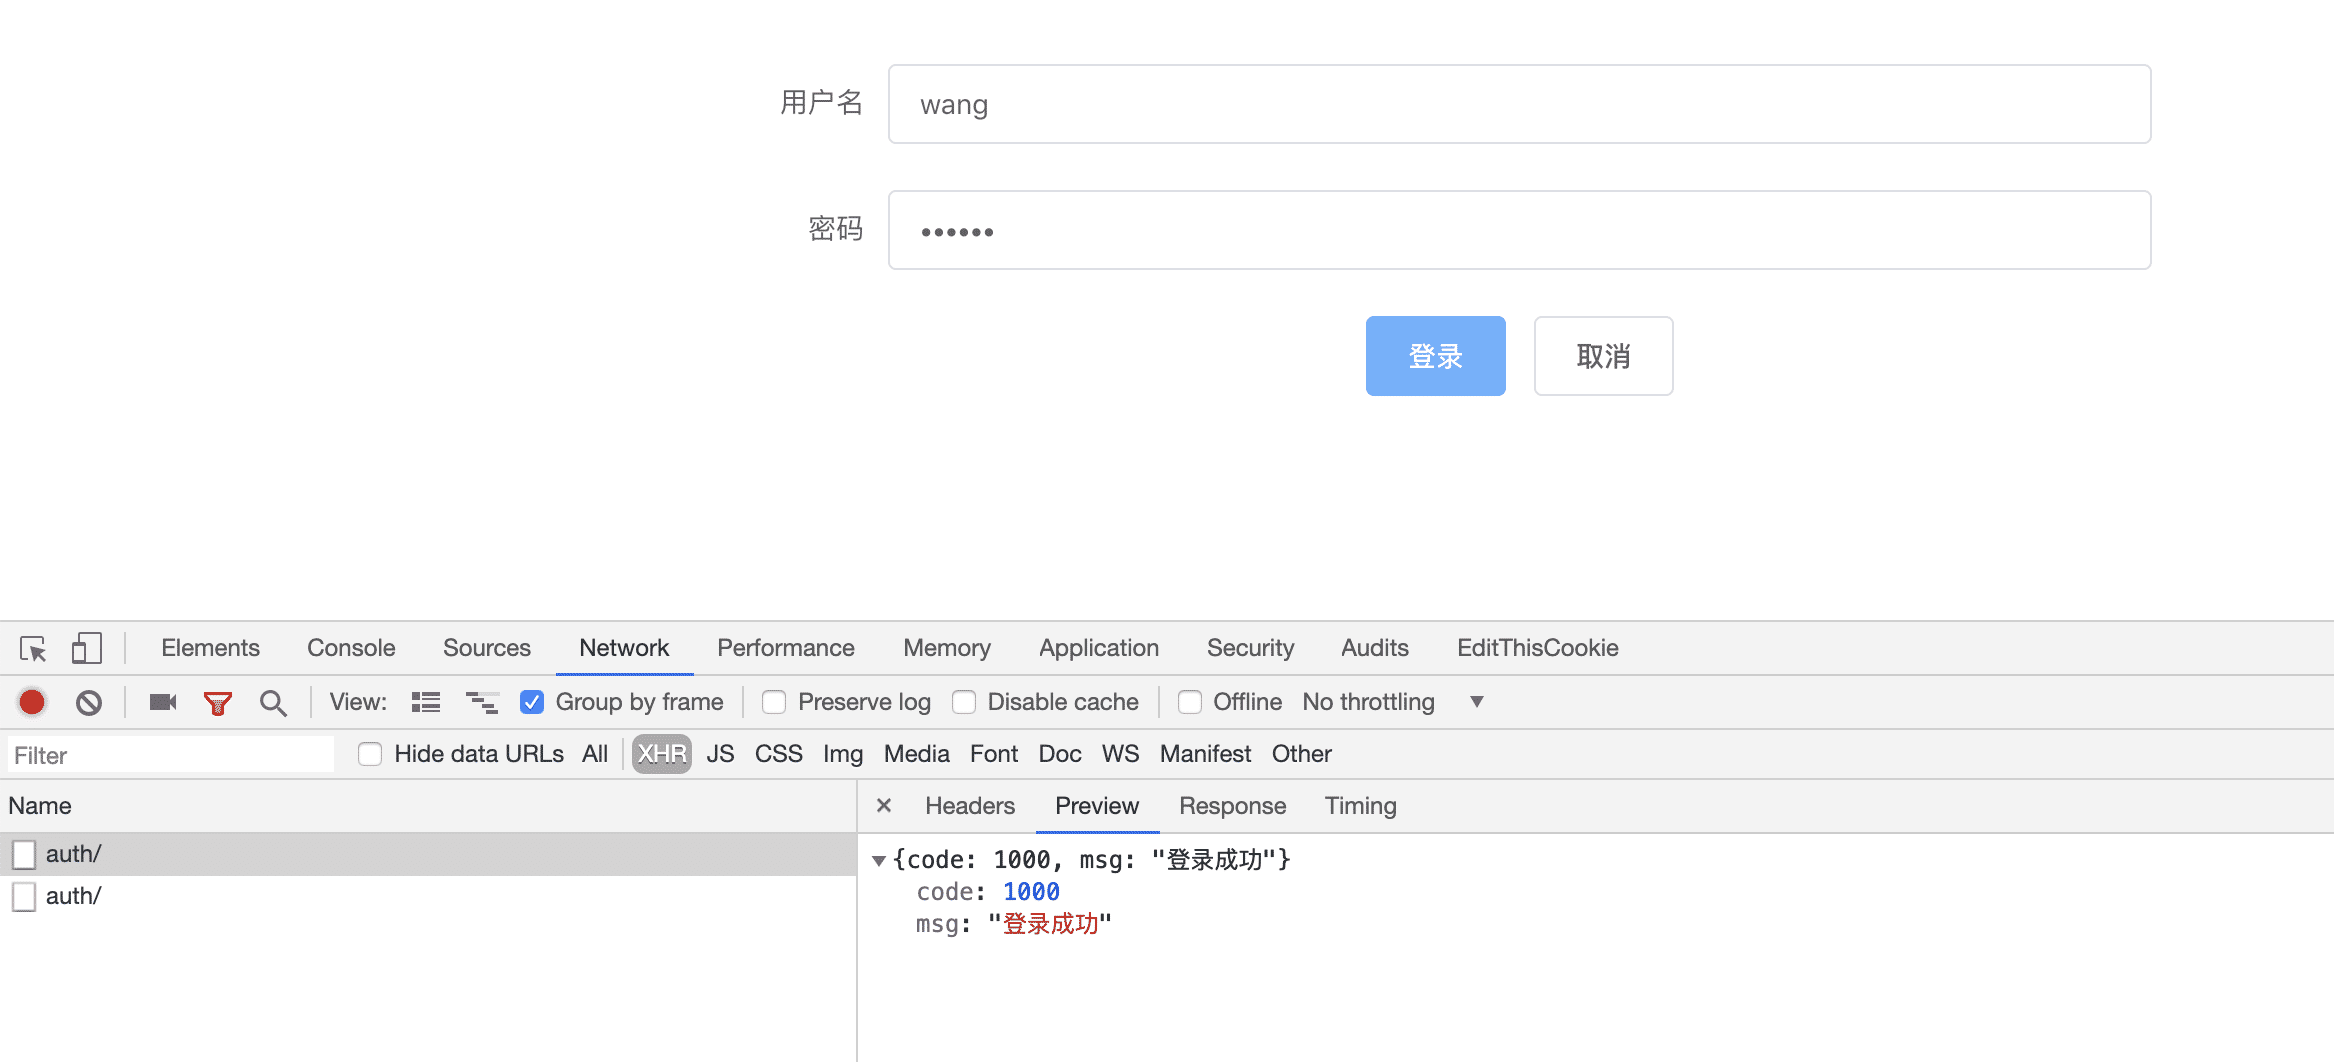
数据用户名和密码,点击登录 如下图。

因为还没做登录跳转页。所以 先通过这种方式,检验是否登录成功。
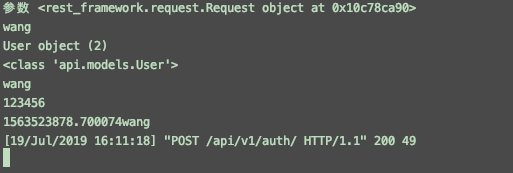
查看后台返回信息

遇到的问题:
1、跨域问题
因为vue 和django项目是两个前后端独立的项目,分别启动后,存在端口不一致的跨域问题。
如这里vue端口是8080,django 是8000,会一直存在找不到服务的问题。
解决方法:修改jango settings.py 文件
首先安装 corsheaders
# 安装
pip install django-cors-headers
# 添加 corsheaders 应用
# Application definition
INSTALLED_APPS = [
 'django.contrib.admin',
 'django.contrib.auth',
 'django.contrib.contenttypes',
 'django.contrib.sessions',
 'django.contrib.messages',
 'django.contrib.staticfiles',
 'rest_framework',
 'api',
 'corsheaders', # 解决跨域问题 修改1
]
# 中间层设置
# 添加如下
MIDDLEWARE = [
 ...
 'corsheaders.middleware.CorsMiddleware',
 'django.middleware.common.CommonMiddleware',
 ...
]
# CORS 设置跨域域名 配置白名单
CORS_ORIGIN_WHITELIST = [
 "https://example.com",
 "https://sub.example.com",
 "http://localhost:8080",
 "http://localhost:8000",
 "http://127.0.0.1:8000"
]
#直接允许所有主机跨域

CORS_ORIGIN_ALLOW_ALL = True 默认为False
CORS_ALLOW_CREDENTIALS = True # 允许携带cookie
# 下面这两个设置 经测试无用
#
# # 解决跨域问题 修改5
# CORS_ALLOW_METHODS = (
#  'DELETE',
#  'GET',
#  'OPTIONS',
#  'PATCH',
#  'POST',
#  'PUT',
#  'VIEW',
# )
# # 解决跨域问题 修改6
# CORS_ALLOW_HEADERS = (
#  'XMLHttpRequest',
#  'X_FILENAME',
#  'accept-encoding',
#  'authorization',
#  'content-type',
#  'dnt',
#  'origin',
#  'user-agent',
#  'x-csrftoken',
#  'x-requested-with',
#  'Pragma',
# )
settings.py文件
"""
Django settings for logintest project.
Generated by 'django-admin startproject' using Django 2.1.2.
For more information on this file, see
https://docs.djangoproject.com/en/2.1/topics/settings/
For the full list of settings and their values, see
https://docs.djangoproject.com/en/2.1/ref/settings/
"""
import os
# Build paths inside the project like this: os.path.join(BASE_DIR, ...)
BASE_DIR = os.path.dirname(os.path.dirname(os.path.abspath(__file__)))
# Quick-start development settings - unsuitable for production
# See https://docs.djangoproject.com/en/2.1/howto/deployment/checklist/
# SECURITY WARNING: keep the secret key used in production secret!
SECRET_KEY = 'zj9a#c4al&@_up8^g46ke44a1l%p^_wa1_5xgx60ertwu9$y(%'
# SECURITY WARNING: don't run with debug turned on in production!
# DEBUG = True
DEBUG = False
ALLOWED_HOSTS = ['localhost', '127.0.0.1']
# Application definition
INSTALLED_APPS = [
 'django.contrib.admin',
 'django.contrib.auth',
 'django.contrib.contenttypes',
 'django.contrib.sessions',
 'django.contrib.messages',
 'django.contrib.staticfiles',
 'rest_framework',
 'api',
 'corsheaders', # 解决跨域问题 修改1
]
MIDDLEWARE = [
 'django.middleware.security.SecurityMiddleware',
 'django.contrib.sessions.middleware.SessionMiddleware',
 'django.middleware.common.CommonMiddleware',
 'django.middleware.csrf.CsrfViewMiddleware',
 'django.contrib.auth.middleware.AuthenticationMiddleware',
 'django.contrib.messages.middleware.MessageMiddleware',
 'django.middleware.clickjacking.XFrameOptionsMiddleware',
 'corsheaders.middleware.CorsMiddleware', # 解决跨域问题 修改2
 'django.middleware.common.CommonMiddleware', # 注意顺序 解决跨域问题 修改3
]
ROOT_URLCONF = 'logintest.urls'
#
# #跨域增加忽略 修改4
CORS_ALLOW_CREDENTIALS = True
CORS_ORIGIN_ALLOW_ALL = True
# # CORS_ORIGIN_WHITELIST = (
# #  '*'
# # )
CORS_ORIGIN_WHITELIST = [
 "https://example.com",
 "https://sub.example.com",
 "http://localhost:8080",
 "http://localhost:8000",
 "http://127.0.0.1:8000"
]
#
#
# # 解决跨域问题 修改5
# CORS_ALLOW_METHODS = (
#  'DELETE',
#  'GET',
#  'OPTIONS',
#  'PATCH',
#  'POST',
#  'PUT',
#  'VIEW',
# )
# # 解决跨域问题 修改6
# CORS_ALLOW_HEADERS = (
#  'XMLHttpRequest',
#  'X_FILENAME',
#  'accept-encoding',
#  'authorization',
#  'content-type',
#  'dnt',
#  'origin',
#  'user-agent',
#  'x-csrftoken',
#  'x-requested-with',
#  'Pragma',
# )
TEMPLATES = [
 {
  'BACKEND': 'django.template.backends.django.DjangoTemplates',
  # 'DIRS': [],
  'DIRS': ['vuefront/dist'], # 修改1
  'APP_DIRS': True,
  'OPTIONS': {
   'context_processors': [
    'django.template.context_processors.debug',
    'django.template.context_processors.request',
    'django.contrib.auth.context_processors.auth',
    'django.contrib.messages.context_processors.messages',
   ],
  },
 },
]
# 新增2
# Add for vue.js
STATICFILES_DIRS = [
 os.path.join(BASE_DIR, "vuefront/dist/static"),
]
WSGI_APPLICATION = 'logintest.wsgi.application'
# Database
# https://docs.djangoproject.com/en/2.1/ref/settings/#databases

# DATABASES = {
#  'default': {
#   'ENGINE': 'django.db.backends.sqlite3',
#   'NAME': os.path.join(BASE_DIR, 'db.sqlite3'),
#  }
# }
# MySQL adil 密码:helloyyj
DATABASES = {
 'default':{
  'ENGINE':'django.db.backends.mysql',
  'HOST':'127.0.0.1',
  'PORT':'3306',
  'NAME':'pyweb', # 数据库名
  'USER':'adil',
  'PASSWORD':'helloyyj',
  'OPTIONS':{
   'sql_mode': 'traditional'
  },
 }
}
# Password validation
# https://docs.djangoproject.com/en/2.1/ref/settings/#auth-password-validators

AUTH_PASSWORD_VALIDATORS = [
 {
  'NAME': 'django.contrib.auth.password_validation.UserAttributeSimilarityValidator',
 },
 {
  'NAME': 'django.contrib.auth.password_validation.MinimumLengthValidator',
 },
 {
  'NAME': 'django.contrib.auth.password_validation.CommonPasswordValidator',
 },
 {
  'NAME': 'django.contrib.auth.password_validation.NumericPasswordValidator',
 },
]
# Internationalization
# https://docs.djangoproject.com/en/2.1/topics/i18n/
# LANGUAGE_CODE = 'en-us'
#
# TIME_ZONE = 'UTC'
LANGUAGE_CODE = 'zh-Hans'
TIME_ZONE = 'Asia/Shanghai'
USE_I18N = True
USE_L10N = True
USE_TZ = True
# Static files (CSS, JavaScript, Images)
# https://docs.djangoproject.com/en/2.1/howto/static-files/
STATIC_URL = '/static/'
更多设置可以参考 https://github.com/ottoyiu/django-cors-headers/
2、ESlint代码检测,启动vue时系统报错错误警告
解决方式
1、如果对自己信不过。最好的办法就是创建项目的时候不要ESlint 直接N

2、注释掉ESlint
在自己的项目目录下build.js——webpack.base.conf.js文件里面有段代码注释掉就行

以上就是本文的全部内容,希望对大家的学习有所帮助,也希望大家多多支持亿速云。
免责声明:本站发布的内容(图片、视频和文字)以原创、转载和分享为主,文章观点不代表本网站立场,如果涉及侵权请联系站长邮箱:is@yisu.com进行举报,并提供相关证据,一经查实,将立刻删除涉嫌侵权内容。