您好,登录后才能下订单哦!
1.背景
最近在做一个单页面的管理后台项目,为了提高开发效率,使用了Vue框架来开发。为了使各个部分的功能,独立结构更加清晰,于是就拆分了很多组件,但是组件与组件之间数据共享成了一个问题,父子组件实现起来相对简单,prop,$emit,$on就能搞定。除此之外,有很多兄弟组件和跨多级组件,实现起来过程繁琐,在多人协同开发上,不利于统一管理,于是,开始了Vue的生态之一的Vux实践之旅。
2.概述
每一个 Vuex 应用的核心就是 store(仓库)。“store”基本上就是一个容器,它包含着你的应用中大部分的状态 (state)。
Vuex 和单纯的全局对象有以下两点不同:
1.Vuex 的状态存储是响应式的。当 Vue 组件从 store 中读取状态的时候,若 store 中的状态发生变化,那么相应的组件也会相应地得到高效更新;2.你不能直接改变 store 中的状态。改变 store 中的状态的唯一途径就是显式地提交 (commit) mutation。这样使得我们可以方便地跟踪每一个状态的变化,从而让我们能够实现一些工具帮助我们更好地了解我们的应用
3.安装使用
3.1.使用Vue-cli开发安装vue包
cnpm install vuex --save
3.2.在src目录下创建store文件夹并创建index.js如下(src/store/index.js)
import Vue from 'vue'
import Vuex from 'vuex'

Vue.use(Vuex);

export default new Vuex.Store({
 state: {

 },
 getters: {

 },
 mutations: {

 },
 actions: {

 }
});
然后在src文件下的main.js中使用
import Vue from 'vue'
import App from './App'
import store from './store'
Vue.config.productionTip = false


new Vue({
 el: '#app',
 store,
 components: { App },
 template: '<App/>'
})
4.用法简介
4.1.state
state是保存共享数据的,现在改store/index.js如下:
state: {
  count:0
 },
在components目录下创建Index.vue如:
<template>
 <div class="index">
  {{count}}
 </div>
</template>

<script>
 export default {
  name: "index",
  computed:{
   count(){
    return this.$store.state.count;
   }
  }
 }
</script>
结果如下:

我们可以通过组件的计算属性来保存state里面的值,那么问题来了,如果store太多的话,我们组件里面的计算属性岂不是成了这个样子:
computed:{
 count(){
   return this.$store.state.count;
 },
  stateA(){
   return this.$store.state.stateA;
  },
  stateB(){
   return this.$store.state.stateB;
  }
}
这样获取共享状态的数据也没有什么问题不过看起来还是有大量的重复冗余代码,我们可以使用 mapState 辅助函数帮助我们生成计算属性,让你少按几次键:
当映射的计算属性的名称与 state 的子节点名称相同时,我们也可以给 mapState 传一个字符串数组。
import {mapState} from 'vuex'
 export default {
  name: "index",
  computed:{
   ...mapState(['count']),
  }
 }
小结:使用 Vuex 并不意味着你需要将所有的状态放入 Vuex。虽然将所有的状态放到 Vuex 会使状态变化更显式和易调试,但也会使代码变得冗长和不直观。如果有些状态严格属于单个组件,最好还是作为组件的局部状态。
4.2.getter
有的时候我们需要对共享状态里面的某一个属性做一些处理后再使用,我们可以把数据获取后再在组件的计算属性中处理,举个例子如下:
// store/index.js
state: {
  count:0,
  numbers:[0,1,2,3,4,5,6,7,8]
 },
// Index组件
<template>
 <div class="index">
  {{count}}
  <br>
  {{numbers.join()}}
 </div>
</template>
<script>
 import {mapState} from 'vuex'
 export default {
  name: "index",
  computed:{
   ...mapState(['count']),
   numbers(){
    return this.$store.state.numbers.filter((item)=>{
     return item>3;
    })
   }
  }
 }
</script>
结果如下:

那么问题来了,如果多个组件都要做同样的处理,我们就需要把一份代码复制到多个地方,显然是不大合理的,于是有了getter,可以理解为组件里面的计算属性。示例如下:
/ store/index.js
getters: {
  filterNumbers(state){
   return state.numbers.filter((item)=>{
    return item>3;
   })
  }
 },
// Index组件
<template>
 <div class="index">
  {{count}}
  <br>
  {{filterNumbers.join()}}
 </div>
</template>

<script>
 import {mapState} from 'vuex'
 export default {
  name: "index",
  computed:{
   ...mapState(['count']),
   filterNumbers(){
    return this.$store.getters.filterNumbers;
   }
  }
 }
</script>
结果完全一样,我们可以根据this.$store.getters.属性名来获取getters,也可以通过 mapGetters 辅助函数将 store 中的 getter 映射到局部计算属性:
具体实现方式如下:
<template>
 <div class="index">
  {{count}}
  <br>
  {{filterNumbers.join()}}
  <br>
  {{antherNumbers.join()}}
 </div>
</template>

<script>
 import {mapState,mapGetters} from 'vuex'
 export default {
  name: "index",
  computed:{
   ...mapState(['count']),6
   ...mapGetters(['filterNumbers']),
   ...mapGetters({
    antherNumbers:'filterNumbers'
   })
  }
 }
</script>
如果用同一名字直接把数组作为参数,如果想改一个名字,可以传入一个对象作为参数,结果如下:

4.3.mutation
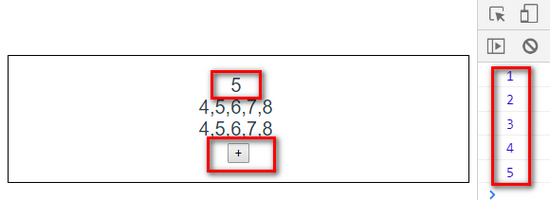
在组件内,来自store的数据只能读取,不能手动改变,改变store中数据唯一的途径就是显示的提交mutations。Vuex 中的 mutation 非常类似于事件:每个 mutation 都有一个字符串的 事件类型 (type) 和 一个 回调函数 (handler)。这个回调函数就是我们实际进行状态更改的地方,并且它会接受 state 作为第一个参数。改变代码如下:
// store/index.js
mutations: {
 add(state){
  state.count++;
 }
},

// Index组件
**
  <button @click="add">+</button>
**
  methods:{
   add(){
    this.$store.commit('add');
    console.log(this.count);
   }
**

连续点击5次增加按钮,发现count的值也改变了。当然,我们也可以传参进去
// store/index.js
mutations: {
 add(state,n){
  state.count+=n;
 }
},

// Index组件
**
  <button @click="add">+</button>
**
  methods:{
   add(){
    this.$store.commit('add',10);
    console.log(this.count);
   }
**
触发方法语句为:this.$store.commit(方法名);也可以使用辅助函数mapMutations代替:
methods:{
  ...mapMutations(['add']),
}
4.4.action
前面我们讲过,mutation有必须同步执行这个限制,我们在业务需求中有时候需要在获取ajax请求数据之后再操作或定时器操作数据,这些都属于异步请求,要用actions来实现。具体实现如下:
// store/index.js
mutations: {
  changeCount(state){
   state.count=3000;
  },
 },
 actions: {
  changeCount3000s(context){
   setTimeout(()=>{
    context.commit('changeCount')
   },3000)

// Index组件
<button @click="changeCount3000s">点击按钮3s后count的值改变</button>
methods:{
 ...mapMutations(['add']),
  changeCount3000s(){
    this.$store.dispatch('changeCount3000s');
  }
 }
我们在点击按钮3s后count的值改变为3000,我们可以通过this.$store.dispatch(方法名)来触发事件,也可以通过辅助函数mapActions来触发。
import {mapState,mapGetters,mapMutations,mapActions} from 'vuex'
  methods:{
   ...mapMutations(['add']),
   ...mapActions(['changeCount3000s'])
  }
学会以上几个属性的使用基本就可以满足平时业务中的需求了,但使用Vuex会有一定的门槛和复杂性,它的主要使用场景是大型单页面应用,如果你的项目不是很复杂,用一个bus也可以实现数据的共享,但是它在数据管理,维护,还只是一个简单的组件,而Vuex可以更优雅高效地完成状态管理,所以,是否使用Vuex取决于你的团队和技术储备。
参考资料:
《Vue.js实践》 Vuex
以上就是本文的全部内容,希望对大家的学习有所帮助,也希望大家多多支持亿速云。
免责声明:本站发布的内容(图片、视频和文字)以原创、转载和分享为主,文章观点不代表本网站立场,如果涉及侵权请联系站长邮箱:is@yisu.com进行举报,并提供相关证据,一经查实,将立刻删除涉嫌侵权内容。