您好,登录后才能下订单哦!
密码登录
登录注册
点击 登录注册 即表示同意《亿速云用户服务条款》
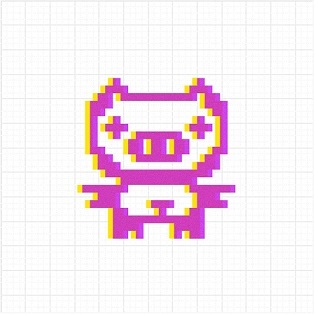
起因
看到网上的像素图片,感觉蛮有趣的,就打算用python一些PIL类库写一个。
实现思路
把一张图片分成多个块,每个块的颜色都等于这个色块中颜色最多的颜色,如下图。
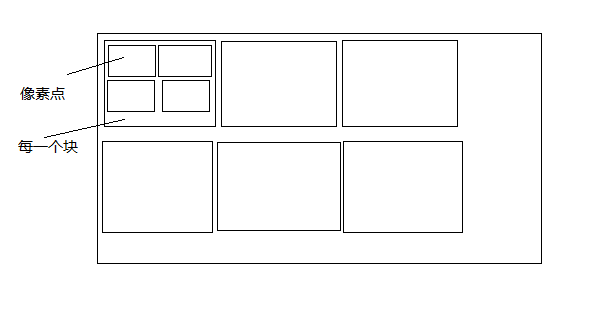
这个图取2×2的像素为块的大小,把快中颜色与每个颜色出现的数量存放到字典里,取最大的颜色,填充整个块。
具体实现
from PIL import Image

def init():
  # 设置每个像素区块的大小
  block_size = 75
  img = Image.open("a.jpg")
  # 获取图片的宽高
  width, height = img.size
  # 获取像素点对应RGB颜色值,可以改变img_array中的值来改变颜色值
  img_array = img.load()
  # 为了处理最后的区块,加了一次循环
  max_width = width + block_size
  max_height = height + block_size
  for x in range(block_size - 1, max_width, block_size):
    for y in range(block_size - 1, max_height, block_size):
      # 如果是最后一次循环,则x坐标等于width - 1
      if x == max_width - max_width % block_size - 1:
        x = width - 1
      # 如果是最后一次循环,则x坐标等于height - 1
      if y == max_height - max_height % block_size - 1:
        y = height - 1
      # 改变每个区块的颜色值
      change_block(x, y, block_size, img_array)
      y += block_size
    x += block_size
  img.save(r'D:\python\pixel_image\awesome_copy.png')
  img.show()

"""
:param x坐标 x:
:param y坐标 y:
:param 区块大小 black_size:
:param 可操作图片数组 img_array:
"""
def change_block(x, y, black_size, img_array):

  color_dist = {}
  block_pos_list = []
  for pos_x in range(-black_size + 1, 1):
    for pos_y in range(-black_size + 1, 1):
      # todo print(x + pos_x,y + pos_y)
      block_pos_list.append([x + pos_x, y + pos_y])
  for pixel in block_pos_list:
    if not str(img_array[pixel[0], pixel[1]]) in color_dist.keys():
      color_dist[str(img_array[pixel[0], pixel[1]])] = 1
    else:
      color_dist[str(img_array[pixel[0], pixel[1]])] += 1
  # key-->value => value-->key
  new_dict = {v: k for k, v in color_dist.items()}
  max_color = new_dict[max(color_dist.values())]
  # 将区块内所有的颜色值设置为颜色最多的颜色
  for a in block_pos_list:
    img_array[a[0], a[1]] = tuple(list(map(int, max_color[1:len(max_color) - 1].split(","))))


def get_key(dict, value):
  return [k for k, v in dict.items() if v == value]


if __name__ == "__main__":
  init()
效果对比

总结
开源地址https://github.com/MasakiOvO/pixel_image
还有很多改进的地方,比如取色值的算法上,应该有更好的解决方法,应该用多进程来实现,这样程序速度会快很多。OvO
以上就是本文的全部内容,希望对大家的学习有所帮助,也希望大家多多支持亿速云。
免责声明:本站发布的内容(图片、视频和文字)以原创、转载和分享为主,文章观点不代表本网站立场,如果涉及侵权请联系站长邮箱:is@yisu.com进行举报,并提供相关证据,一经查实,将立刻删除涉嫌侵权内容。