您好,登录后才能下订单哦!
本篇文章给大家分享的是有关使用jQuery怎么实现一个轮播图,小编觉得挺实用的,因此分享给大家学习,希望大家阅读完这篇文章后可以有所收获,话不多说,跟着小编一起来看看吧。
1、html+css+js代码
<!DOCTYPE html>
<html>
<head>
 <title></title>
 <style type="text/css">
 *{
  margin: 0;
  padding: 0;
  text-decoration: none;
 }
 body{
  padding: 20px;
 }
 #container{
  min-width: 1000px;
  /*width: 1300px;*/
  height: 400px;
  overflow: hidden;
  position: relative;
  margin: 0 auto;
 }
 #list{
  /*width: 9100px;*/
  height: 400px;
  position: absolute;
  z-index: 1;
  top:0;
  left: 0;
  overflow: hidden;
 }
 #list img{
  float: left;
  /*width: 1300px;*/
  height: 400px;
 }
 #buttons{
  position: absolute;
  height: 10px;
  width: 100px;
  z-index: 2;
  bottom: 20px;
  left: 660px;
  text-align: center;
 }
 #buttons span{
  cursor: pointer;
  float: left;
  width: 10px;
  height: 10px;
  margin-right: 9px;
  display: inline-block;
  background-image: url(img/_eb1b95e.png);
  background-position: -1079px -687px;

 }
 #buttons .on{
  background-position: -1049px -687px;
 }
 .arrow{
  cursor: pointer;
  display: none;
  width: 36px;
  height: 76px;
  position: absolute;
  z-index: 2;
  top: 180px;
  background-color: rgba(0,0,0,.3);
  color: #fff;
 }
 #container:hover .arrow{
  display: block;
 }
 #prev{
  background: url(img/_eb1b95e.png);
  background-position: -569px -491px;
  left: 20px;
 }
 #next{
  background: url(img/_eb1b95e.png);
  background-position: -513px -491px;
  right: 20px;
 }
 </style>
</head>
<body>
 <div id="container">
 <div id="list" >
  <img src="img/5.jpg" alt="1"/>
  <img src="img/1.jpg" alt="1"/>
  <img src="img/2.jpg" alt="2"/>
  <img src="img/3.jpg" alt="3"/>
  <img src="img/4.jpg" alt="4"/>
  <img src="img/5.jpg" alt="5"/>
  <img src="img/1.jpg" alt="5"/>
 </div>
 <div id="buttons">
  <span index="1" class="on"></span>
  <span index="2"></span>
  <span index="3"></span>
  <span index="4"></span>
  <span index="5"></span>
 </div>
 <a href="javascript:;" id="prev" class="arrow"></a>
 <a href="javascript:;" id="next" class="arrow"></a>
 </div>

<script type="text/javascript" src="js/jquery.1.10.2.js"></script>
<script type="text/javascript">
 var container = $("#container");
 var list = $("#list");
 var listimg = $("#list img");
 var buttons = $("#buttons span");
 var prev = $("#prev");
 var next = $("#next");
 var index = 1;
 var len = 5;
 var num =len+2;
 var interval = 3000;//变换周期
 var timer;
 var clientwidth=document.documentElement.clientWidth;//屏幕的宽度
 var conwidth = parseInt(clientwidth)-100;//显示界面的宽度

 $(function(){


 setwidth();//设置container的宽度以及里面元素list和list中img的宽度


 function animate(offset){
  var left = parseInt(list.css("left"))+offset;

  // list.animate({left:left+'px'},'normal');
  list.animate({left:left+'px'},conwidth,function(){
  //第一位规定产生动画效果的样式,第二位设置速度,第三位是动画函数执行完后执行的函数
  if (left > -conwidth) {//如果是第一个元素还向前移,就让最后一个元素是这个元素
   list.css('left',-conwidth*len);
  }
  if (left < (-conwidth*len)) {//如果是最后一个元素还向后移,就让第一个元素是这个元素
   list.css('left', -conwidth);
  }
  });
 }

 function showbutton(){//通过操作css来将显示的图片代表的下方原点变大,其余变小
  buttons.eq(index-1).addClass('on').siblings().removeClass('on');
 }

 function play(){
  timer = setTimeout(function(){
  next.trigger('click');//trigger()方法触发被选元素的指定事件类型。
  play();
  },interval);
 }
 function stop(){
  clearTimeout(timer);
 }

 next.bind('click',function(){
  if (list.is(':animated')) {
  return;
  }
  if (index == 5) {
  index = 1;
  }
  else{
  index++;
  }
  animate(-conwidth);
  showbutton();
 });

 prev.bind('click',function(){
  if (list.is(':animated')) {
  return;
  }
  if (index == 1) {
  index = 5;
  }
  else{
  index--;
  }
  animate(conwidth);
  showbutton();
 });

 buttons.each(function(){
  $(this).bind('click',function(){
  if (list.is(':animated') || $(this).attr('class')=='on') {
   return;
  }
  var myindex = parseInt($(this).attr('index'));
  var offset = -conwidth*(myindex - index);

  animate(offset);
  index = myindex;
  showbutton();
  })
 });

 container.hover(stop,play);//鼠标悬停时执行stop()函数,移开时执行play()

 play();

 });

 function setwidth(){//设置container的宽度以及里面元素list和list中img的宽度

  container[0].style.width = conwidth +'px' ;
  list[0].style.width = num*conwidth +'px';
  list[0].style.left = '-'+conwidth +'px';
  for (var i = 0; i < listimg.length; i++) {
  listimg[i].style.width = conwidth + 'px';
  }
 }
</script>
</body>
</html>
2、实现思路
轮播图的功能可分为:自动循环播放,点击左边按钮显示前面图片,点击后边显示后面图片,点击下方的小圆点实现跳转播放。
1.自动播放功能:设置一个定时器,每隔一个周期的时间,触发一次点击右边按钮的函数功能。
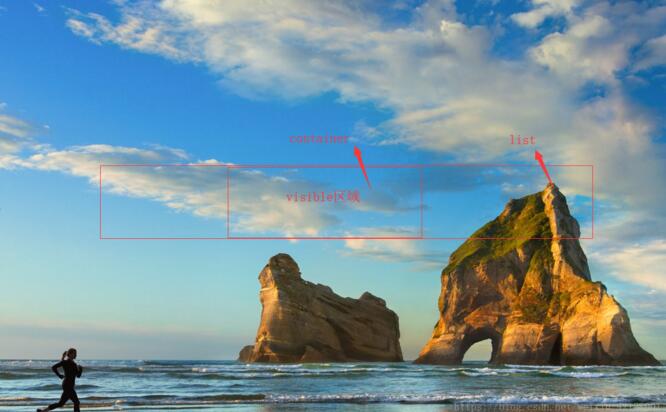
2.点击左边按钮显示前面图片:首先我们应该了解到轮播图的原理。图解

大盒子是container,小盒子是list,list里面有很多图片,没有间隔的排列在一行,用绝对定位来操纵每次可以看到的图片,也就是定位在container里面的是可见部分。当点击左边的按钮时,前面的图片右移,相当于绝对定位中的left值加一个图片的宽度。
3.点击右边按钮显示后面图片:原理和左边的相同,相当于图片左移,让后面的图片显示出来。
4.点击下方的小圆点实现跳转播放:此时页面是第二个图片,要跳转到第五个,相当于点击了三次右边的按钮,也相当于图片左移三个图片的宽度。
3、需要掌握的知识点:
css:
绝对定位
js+jq:
document.documentElement.clientWidth;
obj.animate();
obj.css();
obj.eq()
obj.addClass();
obj.siblings();
obj.removeClass();
setTimeout();
clearTimeout();
obj.trigger();
obj.attr();
obj.bind();
以上就是使用jQuery怎么实现一个轮播图,小编相信有部分知识点可能是我们日常工作会见到或用到的。希望你能通过这篇文章学到更多知识。更多详情敬请关注亿速云行业资讯频道。
免责声明:本站发布的内容(图片、视频和文字)以原创、转载和分享为主,文章观点不代表本网站立场,如果涉及侵权请联系站长邮箱:is@yisu.com进行举报,并提供相关证据,一经查实,将立刻删除涉嫌侵权内容。