您好,登录后才能下订单哦!
密码登录
登录注册
点击 登录注册 即表示同意《亿速云用户服务条款》
这篇文章将为大家详细讲解有关如何使用python处理MS Word,小编觉得挺实用的,因此分享给大家做个参考,希望大家阅读完这篇文章后可以有所收获。
1、简单易用,与C/C++、Java、C# 等传统语言相比,Python对代码格式的要求没有那么严格;2、Python属于开源的,所有人都可以看到源代码,并且可以被移植在许多平台上使用;3、Python面向对象,能够支持面向过程编程,也支持面向对象编程;4、Python是一种解释性语言,Python写的程序不需要编译成二进制代码,可以直接从源代码运行程序;5、Python功能强大,拥有的模块众多,基本能够实现所有的常见功能。
使用python工具读写MS Word文件(docx与doc文件),主要利用了python-docx包。本文给出一些常用的操作,并完成一个样例,帮助大家快速入手。
安装
pyhton处理docx文件需要使用python-docx 包,可以利用pip工具很方便的安装,pip工具在python安装路径下的Scripts文件夹中
pip install python-docx
当然你也可以选择使用easy_install或者手动方式进行安装
写入文件内容
此处我们直接给出一个样例,根据自己的需要摘取有用的内容
#coding=utf-8
from docx import Document
from docx.shared import Pt
from docx.shared import Inches
from docx.oxml.ns import qn
#打开文档
document = Document()
#加入不同等级的标题
document.add_heading(u'MS WORD写入测试',0)
document.add_heading(u'一级标题',1)
document.add_heading(u'二级标题',2)
#添加文本
paragraph = document.add_paragraph(u'我们在做文本测试!')
#设置字号
run = paragraph.add_run(u'设置字号、')
run.font.size = Pt(24)
#设置字体
run = paragraph.add_run('Set Font,')
run.font.name = 'Consolas'
#设置中文字体
run = paragraph.add_run(u'设置中文字体、')
run.font.name=u'宋体'
r = run._element
r.rPr.rFonts.set(qn('w:eastAsia'), u'宋体')
#设置斜体
run = paragraph.add_run(u'斜体、')
run.italic = True
#设置粗体
run = paragraph.add_run(u'粗体').bold = True
#增加引用
document.add_paragraph('Intense quote', style='Intense Quote')
#增加无序列表
document.add_paragraph(
 u'无序列表元素1', style='List Bullet'
)
document.add_paragraph(
 u'无序列表元素2', style='List Bullet'
)
#增加有序列表
document.add_paragraph(
 u'有序列表元素1', style='List Number'
)
document.add_paragraph(
 u'有序列表元素2', style='List Number'
)
#增加图像(此处用到图像image.bmp,请自行添加脚本所在目录中)
document.add_picture('image.bmp', width=Inches(1.25))
#增加表格
table = document.add_table(rows=1, cols=3)
hdr_cells = table.rows[0].cells
hdr_cells[0].text = 'Name'
hdr_cells[1].text = 'Id'
hdr_cells[2].text = 'Desc'
#再增加3行表格元素
for i in xrange(3):
 row_cells = table.add_row().cells
 row_cells[0].text = 'test'+str(i)
 row_cells[1].text = str(i)
 row_cells[2].text = 'desc'+str(i)
#增加分页
document.add_page_break()
#保存文件
document.save(u'测试.docx')
该段代码生成的文档样式如下
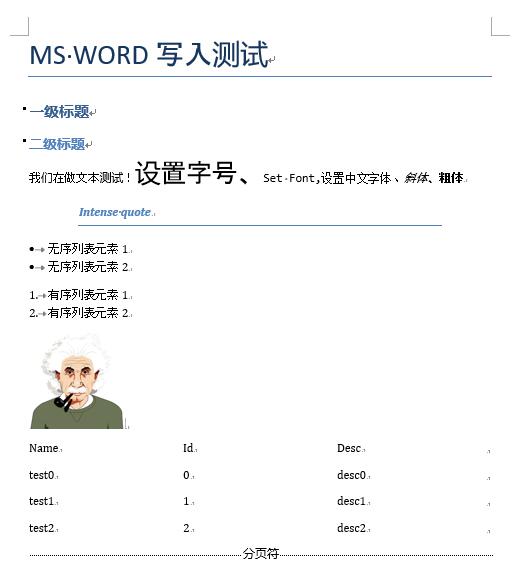
注:有一个问题没找到如何解决,即如何为表格设置边框线。如果您知道,还请能够指教。
读取文件内容
#coding=utf-8
from docx import Document
#打开文档
document = Document(u'测试.docx')
#读取每段资料
l = [ paragraph.text.encode('gb2312') for paragraph in document.paragraphs];
#输出并观察结果,也可以通过其他手段处理文本即可
for i in l:
 print i
#读取表格材料,并输出结果
tables = [table for table in document.tables];
for table in tables:
 for row in table.rows:
  for cell in row.cells:
   print cell.text.encode('gb2312'),'\t',
  print
 print '\n'
我们仍然使用刚才我们生成的文件,可以看到,输出的结果为
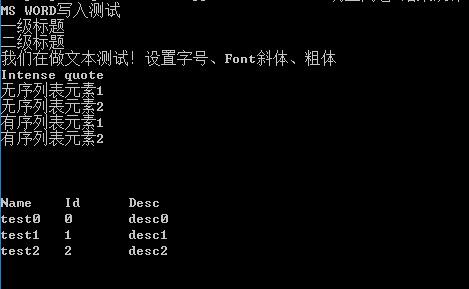
注意:此处我们使用gb2312编码方式读取,主要是保证中文的读写正确。一般情况下,使用的utf-8编码方式。另外,python-docx主要处理docx文件,在加载doc文件时,会出现问题,如果有大量doc文件,建议先将doc文件批量转换为docx文件,例如利用工具doc2doc
关于“如何使用python处理MS Word”这篇文章就分享到这里了,希望以上内容可以对大家有一定的帮助,使各位可以学到更多知识,如果觉得文章不错,请把它分享出去让更多的人看到。
免责声明:本站发布的内容(图片、视频和文字)以原创、转载和分享为主,文章观点不代表本网站立场,如果涉及侵权请联系站长邮箱:is@yisu.com进行举报,并提供相关证据,一经查实,将立刻删除涉嫌侵权内容。