您好,登录后才能下订单哦!
写在前面
分享一下今天下午用python写的“跳一跳”小游戏的辅助程序。之前是准备用树莓派操控一个“机械手指”来代替人的触摸操作,但该方案还在酝酿中,实现了再分享。接下来要分享的是用“纯软件”的方法来玩“跳一跳”。
原理
原理其实很简单,按如下步骤操作即可:
实现
本人只做过Android开发,因此下面只给出Android平台下的实现方法。
步骤1
可以用Android官方提供的adb工具来完成。首先需要搜索并下载对应操作系统下adb工具。其次需要将手机连接电脑, 并将手机的 设置 > 开发人员选项 > USB调试打开。现在在命令行调用一下adb工具,看是否检查到手机:
adb devices
PS:若将adb路径添加到了PATH环境变量中,则可直接在命令行调用adb;否则以上命令需要输入adb的全路径。
若执行以上命令后,输出了设备相关信息,则说明手机连接成功,可继续以下操作。
用如下命令可截取手机屏幕图片至SD卡保存:
adb shell screencap -p /mnt/sdcard/screencap.png
然后可用如下命令pull图片到电脑:
adb pull /mnt/sdcard/screencap.png C:/screencap.png
步骤2
是整个问题的关键。要计算出人偶与将要跳至的台面中心的距离,需要分别识别出人偶的位置(坐标)和台面中心的位置(坐标)。
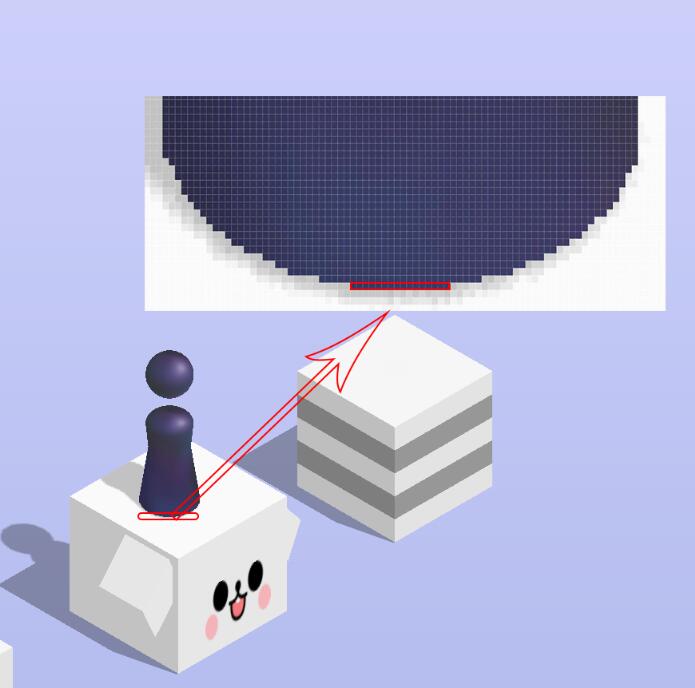
我们以人偶最底部的一行的中心作为人偶的位置,如下图所示:

至于怎么识别出人偶的最底部,可以这样来操作。通过观察可发现,人偶底部的颜色的rgb值在(53, 57, 95)到(59, 61, 103)之间,因此我们逐行扫描各个像素点,找到rbg值在该区间的各行,最后一行即为人偶的底部了。得到了最底部的一行,自然就能算出该行的中心坐标。
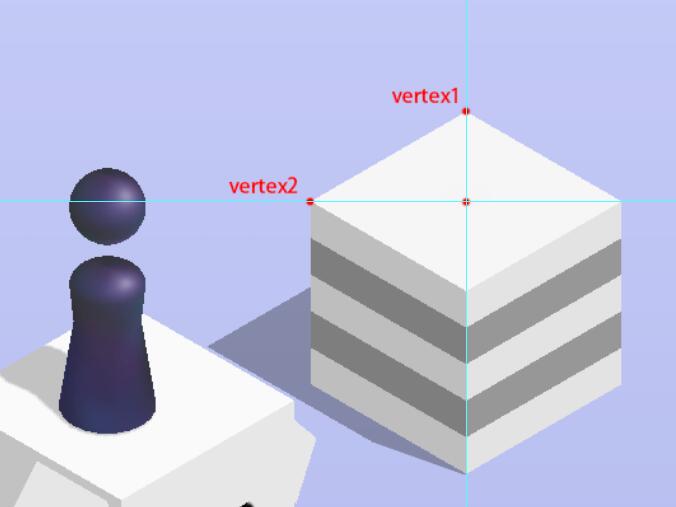
接下来需要识别人偶将要跳至的平台的中心。要想得到该中心的坐标,我们只需要识别得到下图中的两个顶点vertex1和vertex2的坐标即可:

我们同样用从左往右,从上往下的顺序扫描各个像素点的方法来找出vertex1的坐标。扫描之前先获取整个背景的颜色的rgb值,取任意“空白”处即可(例如本人手机截图大小为1920x1080,可断定坐标为(40, 500)的点一定处于“空白”处。)。在扫描过程中一旦发现某处的颜色与背景色不一致,发生了“突变”,可断定该点即为vertex1。
我们把vertex1点的rgb值记录下来作为台面的背景色。在接下去的扫描过程中,我们开始关心当前扫描的点的rgb值是否和该记录值“相似”。“相似”则说明该点“属于”台面,而通过上图可发现,顶点vertex2是所有“属于”台面的点中,横坐标最小的点,这样vertex2的坐标也找到了。
显然,台面中心的横坐标等于vertex1的横坐标,而纵坐标等于vertex2的纵坐标。
步骤3
通过多次尝试,发现用如下公式转换距离dd(单位:px)为时间ss(单位:毫秒)比较合适:
s=d∗1.35
s=d∗1.35
步骤4
得到了触摸时间,我们还是借助adb工具来模拟触摸屏幕的行为,以下是相关命令:
adb shell input swipe 0 0 0 0 1000
以上命令的最后一个参数即为需要模拟按压屏幕的时长,单位是毫秒。
实现效果
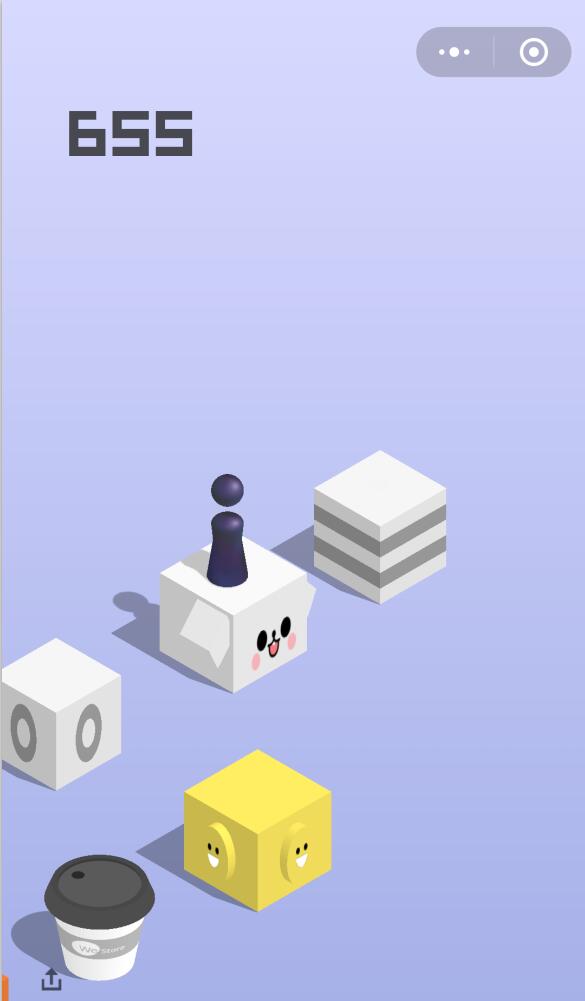
成功连接手机至电脑(手机需开启USB调试),并进入“跳一跳”游戏,然后到电脑上运行该代码即可自动“跳一跳”。
上一张截图:

完整代码
以下是完整代码,在本人手机(1920 * 1080 )下测试发现大多数情况都能正中靶心,少数情况不能命中靶心,极少数情况会跳出台面以外。其他分辨率的手机可能需要适当修改BACKGROUND_POS和DISTANCE_TO_TIME_RATIO参数大小。
import math
import os
import tempfile
import time
from functools import reduce
from PIL import Image
BACKGROUND_POS = (40, 500)
DISTANCE_TO_TIME_RATIO = 1.35
SCREENSHOT_PATH = tempfile.gettempdir() + "/screenshot.png"
def calculate_jump_distance():
 im = Image.open(SCREENSHOT_PATH)
 background_rgb = im.getpixel(BACKGROUND_POS)
 role_pos_list = None
 vertex1_pos = None
 block_background_rgb = None
 vertex2_pos = None
 role_line_flag = True
 for y in range(BACKGROUND_POS[1], im.height):
  if role_pos_list and role_line_flag:
   break
  role_line_flag = True
  vertex2_line_flag = True
  for x in range(BACKGROUND_POS[0], im.width):
   current_rgb = im.getpixel((x, y))
   next_rgb = im.getpixel((x + 1, y)) if x + 1 < im.width else (0, 0, 0)
   # 识别顶点1
   if x > BACKGROUND_POS[0] and y > BACKGROUND_POS[1] and not vertex1_pos \
     and not is_similar(background_rgb, current_rgb) and is_similar(current_rgb, next_rgb):
    vertex1_pos = (x, y)
    block_background_rgb = current_rgb
   # 识别顶点2
   if block_background_rgb and vertex2_line_flag and is_similar(current_rgb, block_background_rgb, 5):
    vertex2_line_flag = False
    if vertex2_pos:
     if x < vertex2_pos[0] and vertex2_pos[0] - x < 20 and y - vertex2_pos[1] < 20:
      vertex2_pos = (x, y)
    else:
     vertex2_pos = (x, y)
   # 识别小人
   if is_part_of_role(current_rgb):
    if role_line_flag:
     role_pos_list = []
     role_line_flag = False
    role_pos_list.append((x, y))
 if len(role_pos_list) == 0:
  raise Exception('无法识别小人位置!!!')
 pos_sum = reduce((lambda o1, o2: (o1[0] + o2[0], o1[1] + o2[1])), role_pos_list)
 role_pos = (int(pos_sum[0] / len(role_pos_list)), int(pos_sum[1] / len(role_pos_list)))
 destination_pos = (vertex1_pos[0], vertex2_pos[1])
 return int(linear_distance(role_pos, destination_pos))
def is_part_of_role(rgb):
 return 53 < rgb[0] < 59 and 57 < rgb[1] < 61 and 95 < rgb[2] < 103
def linear_distance(xy1, xy2):
 return math.sqrt(pow(xy1[0] - xy2[0], 2) + pow(xy1[1] - xy2[1], 2))
def is_similar(rgb1, rgb2, degree=10):
 return abs(rgb1[0] - rgb2[0]) <= degree and abs(rgb1[1] - rgb2[1]) <= degree and abs(rgb1[2] - rgb2[2]) <= degree
def screenshot():
 os.system("adb shell screencap -p /mnt/sdcard/screencap.png")
 os.system("adb pull /mnt/sdcard/screencap.png {} >> {}/jump.out".format(SCREENSHOT_PATH, tempfile.gettempdir()))
def jump(touch_time):
 os.system("adb shell input swipe 0 0 0 0 {}".format(touch_time))
def distance2time(distance):
 return int(distance * DISTANCE_TO_TIME_RATIO)
if __name__ == '__main__':
 count = 1
 while True:
  screenshot()
  distance = calculate_jump_distance()
  touch_time = distance2time(distance)
  jump(touch_time)
  print("#{}: distance={}, time={}".format(count, distance, touch_time))
  count += 1
  time.sleep(1)
总结
以上所述是小编给大家介绍的100行python代码实现跳一跳辅助程序,希望对大家有所帮助,如果大家有任何疑问请给我留言,小编会及时回复大家的。在此也非常感谢大家对亿速云网站的支持!
免责声明:本站发布的内容(图片、视频和文字)以原创、转载和分享为主,文章观点不代表本网站立场,如果涉及侵权请联系站长邮箱:is@yisu.com进行举报,并提供相关证据,一经查实,将立刻删除涉嫌侵权内容。