您好,登录后才能下订单哦!
暂且放下你的编程语言来瞻仰下我所见过的最棒的标准库。

为项目选择编程语言和挑选你最爱的球队不一样。应该从实用主义出发,根据特定的工作选择合适的工具。
在这篇文章中我会告诉你从何时开始并且为什么我认为 Go 语言如此闪耀,具体来说是它的标准库对于基本的网络编程来说显得非常稳固。更具体一点,我们将要编写一个反向代理程序。
Go 为此提供了很多,但真正支撑起它的在于这些低级的网络管道任务,没有更好的语言了。
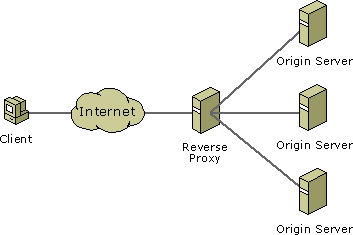
反向代理是什么? 有个很棒的说法是流量转发 。我获取到客户端来的请求,将它发往另一个服务器,从服务器获取到响应再回给原先的客户端。反向的意义简单来说在于这个代理自身决定了何时将流量发往何处。

为什么这很有用?因为反向代理的概念是如此简单以至于它可以被应用于许多不同的场景:负载均衡,A/B 测试,高速缓存,验证等等。
当读完这篇文章之后,你会学到:
我们的反向代理项目
我们来实际写一下项目。我们需要一个 Web 服务器能够提供以下功能:
准备工作
环境配置
我们要做的第一件事是将我们的配置信息写入环境变量,如此就可以使用它们而不必写死在我们的源代码中。
我发现最好的方式是创建一个包含所需环境变量的 .env 文件。
以下就是我为特定项目编写的文件内容:
export PORT=1330
export A_CONDITION_URL="http://localhost:1331"
export B_CONDITION_URL="http://localhost:1332"
export DEFAULT_CONDITION_URL=http://localhost:1333
这是我从 12 Factor App 项目中获得的技巧。
保存完 .env 文件之后就可以运行:
source .env
在任何时候都可以运行该指令来将配置加载进环境变量。
项目基础工作
接着我们创建 main.go 文件做如下事情:
PORT , A_CONDITION_URL , B_CONDITION_URL 和 DEFAULT_CONDITION_URL 变量通过日志打印到控制台。/ 路径上监听请求:
package main

import (
 "bytes"
 "encoding/json"
 "io/ioutil"
 "log"
 "net/http"
 "net/http/httputil"
 "net/url"
 "os"
 "strings"
)

// Get env var or default
func getEnv(key, fallback string) string {
 if value, ok := os.LookupEnv(key); ok {
  return value
 }
 return fallback
}

// Get the port to listen on
func getListenAddress() string {
 port := getEnv("PORT", "1338")
 return ":" + port
}

// Log the env variables required for a reverse proxy
func logSetup() {
 a_condtion_url := os.Getenv("A_CONDITION_URL")
 b_condtion_url := os.Getenv("B_CONDITION_URL")
 default_condtion_url := os.Getenv("DEFAULT_CONDITION_URL")

 log.Printf("Server will run on: %s\n", getListenAddress())
 log.Printf("Redirecting to A url: %s\n", a_condtion_url)
 log.Printf("Redirecting to B url: %s\n", b_condtion_url)
 log.Printf("Redirecting to Default url: %s\n", default_condtion_url)
}

// Given a request send it to the appropriate url
func handleRequestAndRedirect(res http.ResponseWriter, req *http.Request) {
 // We will get to this...
}

func main() {
 // Log setup values
 logSetup()

 // start server
 http.HandleFunc("/", handleRequestAndRedirect)
 if err := http.ListenAndServe(getListenAddress(), nil); err != nil {
  panic(err)
 }
}
现在你就可以运行代码了。
解析请求体
有了项目的基本骨架之后,我们需要添加逻辑来处理解析请求的请求体部分。更新 handleRequestAndRedirect 函数来从请求体中解析出 proxy_condition 字段。
type requestPayloadStruct struct {
 ProxyCondition string `json:"proxy_condition"`
}

// Get a json decoder for a given requests body
func requestBodyDecoder(request *http.Request) *json.Decoder {
 // Read body to buffer
 body, err := ioutil.ReadAll(request.Body)
 if err != nil {
  log.Printf("Error reading body: %v", err)
  panic(err)
 }

 // Because go lang is a pain in the ass if you read the body then any susequent calls
 // are unable to read the body again....
 request.Body = ioutil.NopCloser(bytes.NewBuffer(body))

 return json.NewDecoder(ioutil.NopCloser(bytes.NewBuffer(body)))
}

// Parse the requests body
func parseRequestBody(request *http.Request) requestPayloadStruct {
 decoder := requestBodyDecoder(request)

 var requestPayload requestPayloadStruct
 err := decoder.Decode(&requestPayload)

 if err != nil {
  panic(err)
 }

 return requestPayload
}

// Given a request send it to the appropriate url
func handleRequestAndRedirect(res http.ResponseWriter, req *http.Request) {
 requestPayload := parseRequestBody(req)
  // ... more to come
}
通过 proxy_condition 判断将流量发往何处
现在我们从请求中取得了 proxy_condition 的值,可以根据它来判断我们要反向代理到何处。记住上文我们提到的三种情形:
proxy_condition 值为 A ,我们将流量发送到 A_CONDITION_URLproxy_condition 值为 B ,我们将流量发送到 B_CONDITION_URLDEFAULT_CONDITION_URL
// Log the typeform payload and redirect url
func logRequestPayload(requestionPayload requestPayloadStruct, proxyUrl string) {
 log.Printf("proxy_condition: %s, proxy_url: %s\n", requestionPayload.ProxyCondition, proxyUrl)
}

// Get the url for a given proxy condition
func getProxyUrl(proxyConditionRaw string) string {
 proxyCondition := strings.ToUpper(proxyConditionRaw)

 a_condtion_url := os.Getenv("A_CONDITION_URL")
 b_condtion_url := os.Getenv("B_CONDITION_URL")
 default_condtion_url := os.Getenv("DEFAULT_CONDITION_URL")

 if proxyCondition == "A" {
  return a_condtion_url
 }

 if proxyCondition == "B" {
  return b_condtion_url
 }

 return default_condtion_url
}

// Given a request send it to the appropriate url
func handleRequestAndRedirect(res http.ResponseWriter, req *http.Request) {
 requestPayload := parseRequestBody(req)
 url := getProxyUrl(requestPayload.ProxyCondition)
 logRequestPayload(requestPayload, url)
 // more still to come...
}
反向代理到 URL
最终我们来到了实际的反向代理部分。在如此多的语言中要编写一个反向代理需要考虑很多东西,写大段的代码。或者至少引入一个复杂的外部库。
然而 Go 的标准库使得创建一个反向代理非常简单以至于你都不敢相信。下面就是你所需要的最关键的一行代码:
httputil.NewSingleHostReverseProxy(url).ServeHTTP(res, req)
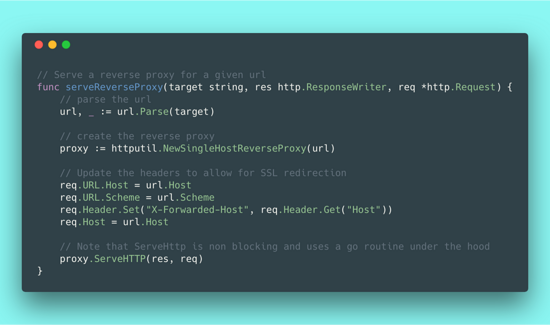
注意下面代码中我们做了些许修改来让它能完整地支持 SSL 重定向(虽然不是必须的)。
// Serve a reverse proxy for a given url
func serveReverseProxy(target string, res http.ResponseWriter, req *http.Request) {
 // parse the url
 url, _ := url.Parse(target)

 // create the reverse proxy
 proxy := httputil.NewSingleHostReverseProxy(url)

 // Update the headers to allow for SSL redirection
 req.URL.Host = url.Host
 req.URL.Scheme = url.Scheme
 req.Header.Set("X-Forwarded-Host", req.Header.Get("Host"))
 req.Host = url.Host

 // Note that ServeHttp is non blocking and uses a go routine under the hood
 proxy.ServeHTTP(res, req)
}

// Given a request send it to the appropriate url
func handleRequestAndRedirect(res http.ResponseWriter, req *http.Request) {
 requestPayload := parseRequestBody(req)
 url := getProxyUrl(requestPayload.ProxyCondition)

 logRequestPayload(requestPayload, url)

 serveReverseProxy(url, res, req)
}
全部启动
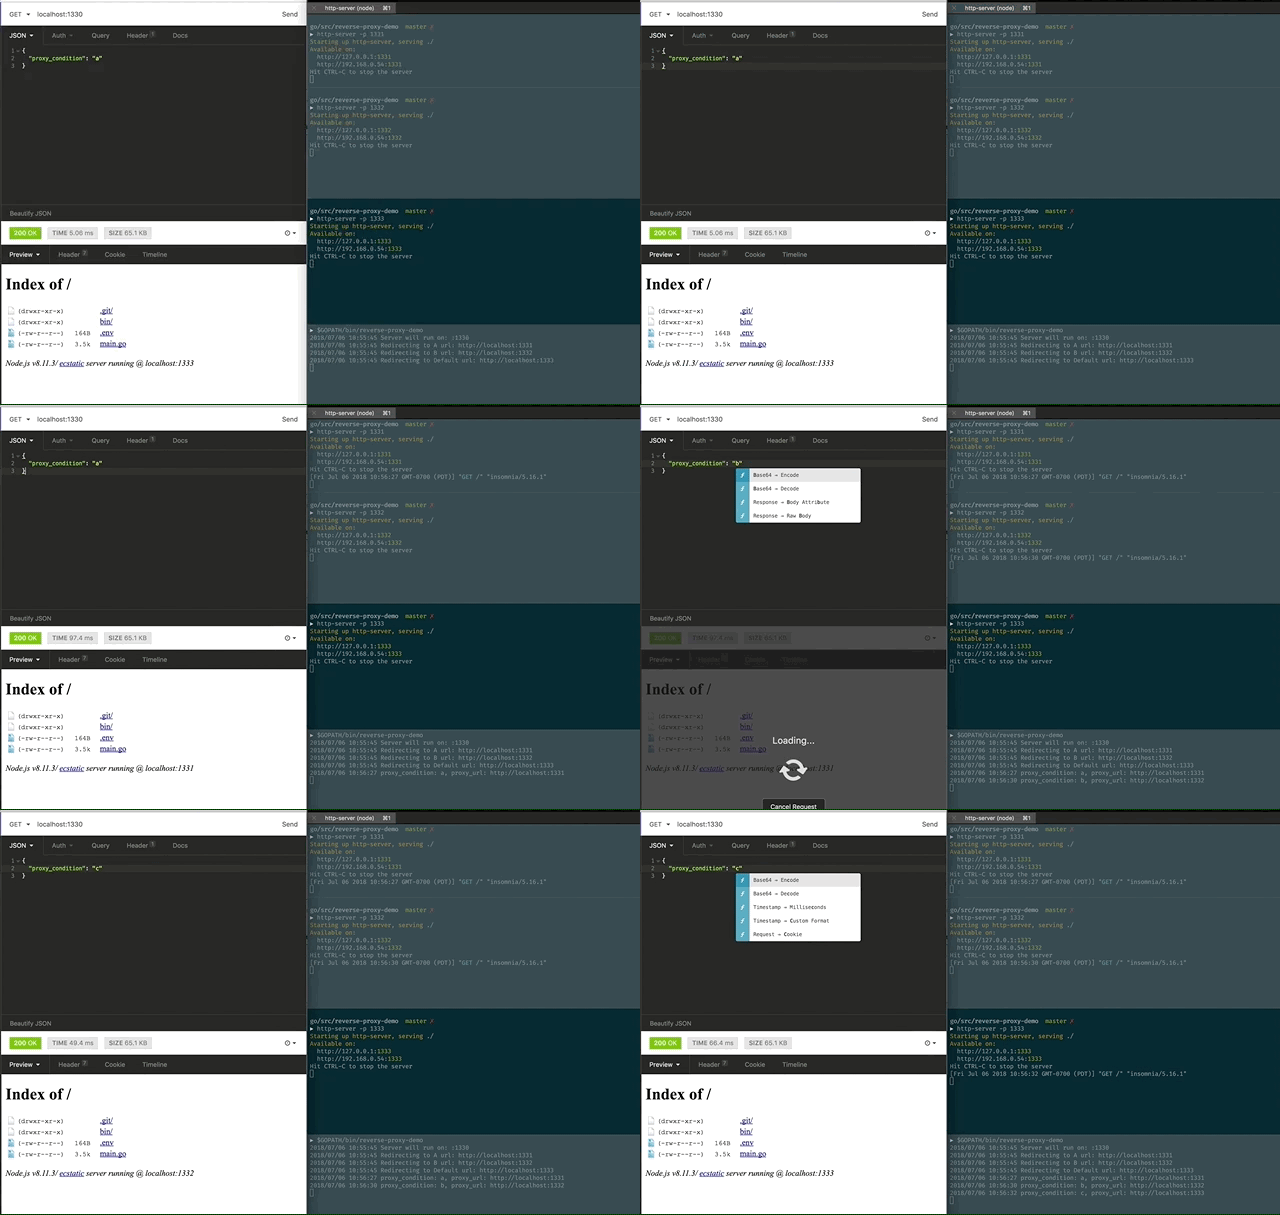
好了,现在启动我们的反向代理程序让其监听 1330 端口。让其他的 3 个简单的服务分别监听 1331–1333 端口(在各自的终端中)。
这些服务都启动之后,我们就可以在另一个终端中像下面这样开始发送带有 JSON 体的请求了:
curl --request GET \
 --url http://localhost:1330/ \
 --header 'content-type: application/json' \
 --data '{
 "proxy_condition": "a"
 }'
如果你在找一个好用的 HTTP 请求客户端,我极力推荐 Insomnia 。
然后我们就会看到我们的反向代理将流量转发给了我们根据 proxy_condition 字段配置的 3 台服务中的其中一台。

总结
Go 为此提供了很多,但真正支撑起它的在于这些低级的网络管道任务,没有更好的语言了。我们写的这个程序简单,高性能,可靠并且随时可用于生产环境。
我能看到在以后我会经常使用 Go 来编写简单的服务。
以上就是本文的全部内容,希望对大家的学习有所帮助,也希望大家多多支持亿速云。
代码是开源的,你可以在 Github 上找到。 :heart: 在 Twitter 上我只聊关于编程和远程工作相关的东西。如果关注我,你不会后悔的。
免责声明:本站发布的内容(图片、视频和文字)以原创、转载和分享为主,文章观点不代表本网站立场,如果涉及侵权请联系站长邮箱:is@yisu.com进行举报,并提供相关证据,一经查实,将立刻删除涉嫌侵权内容。