您好,登录后才能下订单哦!
密码登录
登录注册
点击 登录注册 即表示同意《亿速云用户服务条款》
学过Angular的同学都知道,输入框通过[(ngModel)]实现双向数据绑定,那么自定义组件能不能实现双向数据绑定呢?答案是肯定的。
Angular中,我们常常需要通过方括号[]和圆括号()实现组件间的交互:
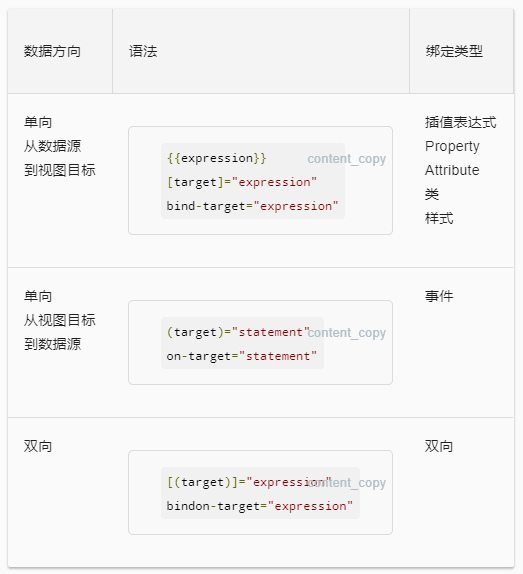
那么在[]和()的基础上,如何实现组件的双向数据绑定?
例子如下。
子组件:
<!--testDataBinding.component.html-->

<h2>childStatus: {{childStatus}}</h2>
//testDataBinding.component.ts

export class TestDataBindingComponent implements OnInit{
 @Input() childStatus;
 @Output() childStatusChange = new EventEmitter();
 ngOnInit(){
 setTimeout(()=>{
  this.childStatus = false;
  this.childStatusChange.emit(this.childStatus);
 },5000);
 }
}
注意这里的写法,这是关键所在,输出属性前半部分必须与输入属性相同,输入属性可以随意取名,输出属性需在输入属性基础上加上Change,比如你的输入属性是myData,那么输出属性就必须是myDataChange。
父组件:
<!--app.component.html-->

<test-binding [(childStatus)]="parentStatus"></test-binding>
<h2>parentStatus: {{parentStatus}}</h2>
//app.component.ts

import { Component,OnInit } from '@angular/core';
@Component({
 selector: 'my-app',
 templateUrl: './app.component.html',
 styleUrls: ['./app.component.css']
})
export class AppComponent implements OnInit{
 parentStatus: boolean = true;
 ngOnInit(){
 setTimeout(()=>{
  this.parentStatus = true;
 },10000);
 }
}
在父组件我们初始化parentStatus为true,并把它传到子组件TestDataBindingComponent。
在子组件里,5秒后我们把childStatus设为false,看它能不能传到父组件。再过5秒,我们在父组件将parentStatus设为true,看它能不能传到子组件。
事实证明,子组件值变化后,父组件的值也跟着变化;父组件值变化后子组件的值也跟着变了!
我们实现了双向绑定!
查看本文代码和效果,可点击这里。
以上这篇Angular自定义组件实现数据双向数据绑定的实例就是小编分享给大家的全部内容了,希望能给大家一个参考,也希望大家多多支持亿速云。
免责声明:本站发布的内容(图片、视频和文字)以原创、转载和分享为主,文章观点不代表本网站立场,如果涉及侵权请联系站长邮箱:is@yisu.com进行举报,并提供相关证据,一经查实,将立刻删除涉嫌侵权内容。