您好,登录后才能下订单哦!
http://mgyongyosi.com/2016/Vuejs-server-side-rendering-with-aspnet-core/
原作者:Mihály Gyöngyösi
译者:oopsguy.com
我真的很喜欢在前端使用 Vue.js,Vue 服务端渲染直到第二个版本才被支持。 在本例中,我想展示如何将 Vue.js 服务端渲染功能整合 ASP.NET Core。 我们在服务端使用了 Microsoft.AspNetCore.SpaServices 包,该包提供 ASP.NET Core API,以便于我们可以使用上下文信息调用 Node.js 托管的 JavaScript 代码,并将生成的 HTML 字符串注入渲染页面。
在此示例中,应用程序将展示一个消息列表,服务端只渲染最后两条消息(按日期排序)。可以通过点击“获取消息”按钮从服务端下载剩余的消息。
项目结构如下所示:
.
├── VuejsSSRSample
| ├── Properties
| ├── References
| ├── wwwroot
| └── Dependencies
├── Controllers
| └── HomeController.cs
├── Models
| ├── ClientState.cs
| ├── FakeMessageStore.cs
| └── Message.cs
├── Views
| ├── Home
| | └── Index.cshtml
| └── _ViewImports.cshtml
├── VueApp
| ├── components
| | ├── App.vue
| | └── Message.vue
| ├── vuex
| | ├── actions.js
| | └── store.js
| ├── app.js
| ├── client.js
| ├── renderOnServer.js
| └── server.js
├── .babelrc
├── appsettings.json
├── Dockerfile
├── packages.json
├── Program.cs
├── project.json
├── Startup.cs
├── web.config
├── webpack.client.config.js
└── webpack.server.config.js
正如你看到的,Vue 应用位于 VueApp 文件夹下,它有两个组件、一个包含了一个 mutation 和一个 action 的简单 Vuex store 和一些我们接下来要讨论的其他文件:app.js、client.js、 renderOnServer.js、server.js。
实现 Vue.js 服务端渲染

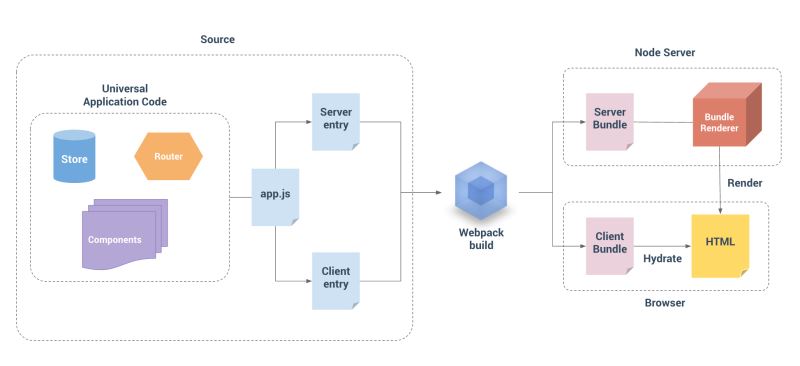
要使用服务端渲染,我们必须从 Vue 应用创建两个不同的 bundle:一个用于服务端(由 Node.js 运行),另一个用于将在浏览器中运行并在客户端上混合应用。
app.js
引导此模块中的 Vue 实例。它由两个 bundle 共同使用。
import Vue from 'vue';
import App from './components/App.vue';
import store from './vuex/store.js';
const app = new Vue({
 store,
 ...App
});
export { app, store };
server.js
此服务端 bundle 的入口点导出一个函数,该函数有一个 context 属性,可用于从渲染调用中推送任何数据。
client.js
客户端 bundle 的入口点,其用一个名为 INITIAL_STATE 的全局 Javascript 对象(该对象将由预渲染模块创建)替换 store 的当前状态,并将应用挂载到指定的元素(.my-app)。
import { app, store } from './app';
store.replaceState(__INITIAL_STATE__);
app.$mount('.my-app');
Webpack 配置
为了创建 bundle,我们必须添加两个 Webpack 配置文件(一个用于服务端,一个用于客户端构建),不要忘了安装 Webpack,如果尚未安装,则:npm install -g webpack。
webpack.server.config.js
const path = require('path');
module.exports = {
 target: 'node',
 entry: path.join(__dirname, 'VueApp/server.js'),
 output: {
 libraryTarget: 'commonjs2',
 path: path.join(__dirname, 'wwwroot/dist'),
 filename: 'bundle.server.js',
 },
 module: {
 loaders: [
  {
  test: /\.vue$/,
  loader: 'vue',
  },
  {
  test: /\.js$/,
  loader: 'babel',
  include: __dirname,
  exclude: /node_modules/
  },
  {
  test: /\.json?$/,
  loader: 'json'
  }
 ]
 },
};
webpack.client.config.js
const path = require('path');
module.exports = {
 entry: path.join(__dirname, 'VueApp/client.js'),
 output: {
 path: path.join(__dirname, 'wwwroot/dist'),
 filename: 'bundle.client.js',
 },
 module: {
 loaders: [
  {
  test: /\.vue$/,
  loader: 'vue',
  },
  {
  test: /\.js$/,
  loader: 'babel',
  include: __dirname,
  exclude: /node_modules/
  },
 ]
 },
};
运行 webpack --config webpack.server.config.js, 如果运行成功,则可以在 /wwwroot/dist/bundle.server.js 找到服端 bundle。获取客户端 bundle 请运行 webpack --config webpack.client.config.js,相关输出可以在 /wwwroot/dist/bundle.client.js 中找到。
实现 Bundle Render
该模块将由 ASP.NET Core 执行,其负责:
渲染我们之前创建的服务端 bundle
将 **window.__ INITIAL_STATE__** 设置为从服务端发送的对象
process.env.VUE_ENV = 'server';
const fs = require('fs');
const path = require('path');
const filePath = path.join(__dirname, '../wwwroot/dist/bundle.server.js')
const code = fs.readFileSync(filePath, 'utf8');
const bundleRenderer = require('vue-server-renderer').createBundleRenderer(code)
module.exports = function (params) {
 return new Promise(function (resolve, reject) {
 bundleRenderer.renderToString(params.data, (err, resultHtml) => { // params.data is the store's initial state. Sent by the asp-prerender-data attribute
  if (err) {
  reject(err.message);
  }
  resolve({
  html: resultHtml,
  globals: {
   __INITIAL_STATE__: params.data // window.__INITIAL_STATE__ will be the initial state of the Vuex store
  }
  });
 });
 });
};
实现 ASP.NET Core 部分
如之前所述,我们使用了 Microsoft.AspNetCore.SpaServices 包,它提供了一些 TagHelper,可轻松调用 Node.js 托管的 Javascript(在后台,SpaServices 使用 Microsoft.AspNetCore.NodeServices 包来执行 Javascript)。
Views/_ViewImports.cshtml
为了使用 SpaServices 的 TagHelper,我们需要将它们添加到 _ViewImports 中。
@addTagHelper "*, Microsoft.AspNetCore.SpaServices"
Home/Index
public IActionResult Index()
{
 var initialMessages = FakeMessageStore.FakeMessages.OrderByDescending(m => m.Date).Take(2);
 var initialValues = new ClientState() {
 Messages = initialMessages,
 LastFetchedMessageDate = initialMessages.Last().Date
 };
 return View(initialValues);
}
它从 MessageStore(仅用于演示目的的一些静态数据)中获取两条最新的消息(按日期倒序排序),并创建一个 ClientState 对象,该对象将被用作 Vuex store 的初始状态。
Vuex store 默认状态:
const store = new Vuex.Store({
 state: { messages: [], lastFetchedMessageDate: -1 },
 // ...
});

ClientState 类:

public class ClientState
{
 [JsonProperty(PropertyName = "messages")]
 public IEnumerable<Message> Messages { get; set; }

 [JsonProperty(PropertyName = "lastFetchedMessageDate")]
 public DateTime LastFetchedMessageDate { get; set; }
}
Index View
最后,我们有了初始状态(来自服务端)和 Vue 应用,所以只需一个步骤:使用 asp-prerender-module 和 asp-prerender-data TagHelper 在视图中渲染 Vue 应用的初始值。
@model VuejsSSRSample.Models.ClientState
<!-- ... -->
<body>
 <div class="my-app" asp-prerender-module="VueApp/renderOnServer" asp-prerender-data="Model"></div>
 <script src="~/dist/bundle.client.js" asp-append-version="true"></script>
</body>
<!-- ... -->
asp-prerender-module 属性用于指定要渲染的模块(在我们的例子中为 VueApp/renderOnServer)。我们可以使用 asp-prerender-data 属性指定一个将被序列化并发送到模块的默认函数作为参数的对象。
您可以从以下地址下载原文的示例代码:
http://github.com/mgyongyosi/VuejsSSRSample
总结
以上所述是小编给大家介绍的Vue.js与 ASP.NET Core 服务端渲染功能整合,希望对大家有所帮助,如果大家有任何疑问请给我留言,小编会及时回复大家的。在此也非常感谢大家对亿速云网站的支持!
免责声明:本站发布的内容(图片、视频和文字)以原创、转载和分享为主,文章观点不代表本网站立场,如果涉及侵权请联系站长邮箱:is@yisu.com进行举报,并提供相关证据,一经查实,将立刻删除涉嫌侵权内容。