您好,登录后才能下订单哦!
小编这次要给大家分享的是用实例分析Unity如何制作小地图和方向导航,文章内容丰富,感兴趣的小伙伴可以来了解一下,希望大家阅读完这篇文章之后能够有所收获。
一、unity方向导航制作
设计要求是方向导航随着鼠标旋转转换方向,效果图如下:
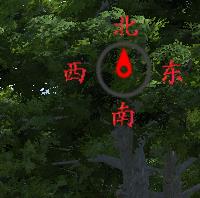
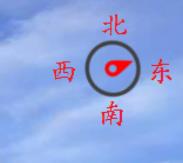
具体的实现方法主要有两个步骤,分别为UI设计和脚本编写。我的设计思路是这个控件分为两层,第一层为东西南北指示层,第二层为图标指示层,这里我的图标采用圆形图标,方向指示这里采用控制图标旋转的方式实现,层级关系如下:
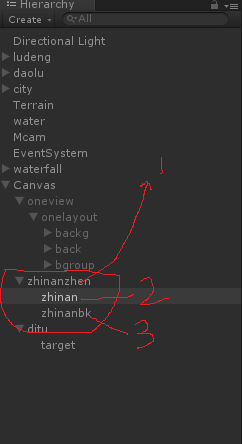
首先创建父节点1,然后在父节点下创建子节点2,3;最后调整好位置。
第二步脚本编写,脚本如下:
using UnityEngine;
using System.Collections;
using UnityEngine.UI;

public class shijiao : MonoBehaviour
{
 public GameObject Gcanvas;
 public GameObject UIzhinanpicture;
 public GameObject Terren;
 public GameObject SMAP;
 //public GameObject bnt=GameObject.Find("Button");
 //方向灵敏度
 public float sensitivityX = 10F;
 public float sensitivityY = 10F;

 //上下最大视角(Y视角)
 public float minimumY = -60F;
 public float maximumY = 60F;
 float rotationY = 0F;
 static public bool ifcanvas;
 void Update()
 {
 if(Input.GetMouseButton (0)){
 //按住鼠标左键才能调节角度,根据鼠标移动的快慢(增量), 获得相机左右旋转的角度(处理X)
 float rotationX = transform.localEulerAngles.y + Input.GetAxis ("Mouse X") * sensitivityX;

 //根据鼠标移动的快慢(增量), 获得相机上下旋转的角度(处理Y)
 rotationY += Input.GetAxis ("Mouse Y") * sensitivityY;
 //角度限制. rotationY小于min,返回min. 大于max,返回max. 否则返回value
 rotationY = Mathf.Clamp (rotationY, minimumY, maximumY);

 //总体设置一下相机角度
 transform.localEulerAngles = new Vector3 (-rotationY, rotationX, 0);
  UIzhinanpicture.transform.localEulerAngles = new Vector3(0,0,- rotationX);
 }
 }
}
二、unity小地图的制作
关于小地图的制作,网上各种帖子铺天盖地,然而仔细看却发现大部分都一样,互相抄袭,很多都是没用的。各种帖子大都采用是正交相机的方式显示小地图,然而这个地图是真实场景的俯视,我们需要的往往是像英雄联盟那样的小地图,这里我采用一种简单的方式实现小地图。废话不说先上效果图:
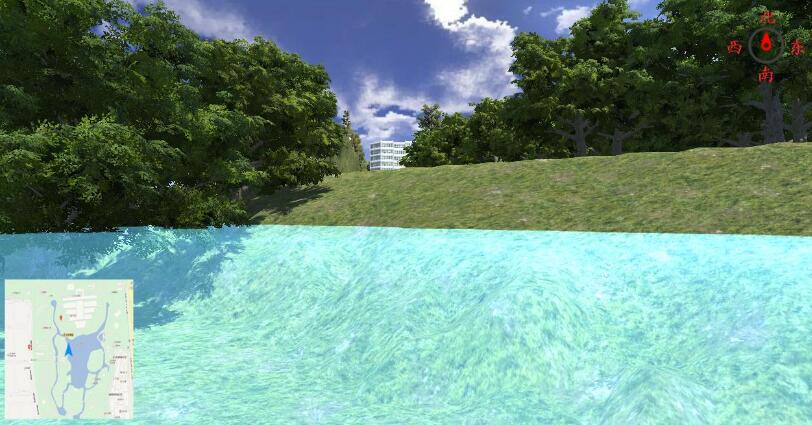
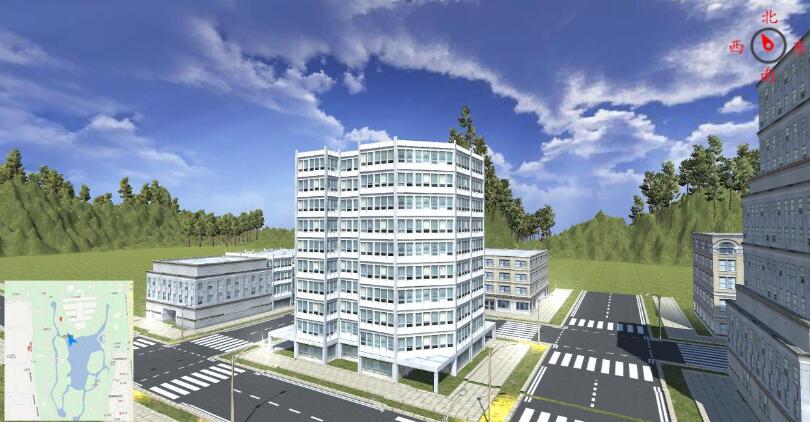
这里的地图只是一张图片,这增加了地图的灵活性,这里的小地图创建跟上面方向导航类似,所不同的是脚本的编写方式。
具体的实现也是分为两个步骤,分别为UI的设计和代码的编写。
第一步:地图UI的设计
层级关系如图:
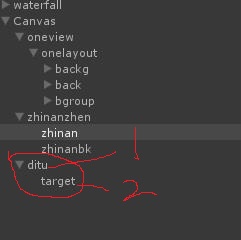
父节点1为背景地图,子节点2为蓝色箭头,蓝色箭头表示目标目前所在的位置。这两个节点仅仅是图片控件。
第二步:脚本的编写
脚本如下:
using UnityEngine;
using System.Collections;
using UnityEngine.UI;
using System;
using UnityEngine.EventSystems;

public class shijiao : MonoBehaviour
{
 public GameObject Gcanvas;//画布
 public GameObject UIzhinanpicture;
 public GameObject Terren;//大地
 public GameObject SMAP;//小地图指针
 public GameObject SMAPBK;//小地图背景
 GameObject Cm;

 //方向灵敏度
 public float sensitivityX = 10F;
 public float sensitivityY = 10F;

 //上下最大视角(Y视角)
 public float minimumY = -60F;
 public float maximumY = 60F;

 //山地的大小
 float Twidth;
 float Tlongth;
 //地图大小
 float mapwidth;
 float maplongth;
 //比例大小
 static public float widthScale;
 static public float longthscal;
 //图片缩放比例
 //比例大小
 //static public float PwidthScale;
 //static public float Plongthscal;

 float rotationY = 0F;
 static public bool ifcanvas;
 private float movespeed = 20;
 CharacterController ctrlor;
 void Start ()
 {
 RenderSettings.fog = false;
 ifcanvas =true;
 Gcanvas.SetActive (ifcanvas);
 Cm = GameObject.Find("Mcam");
 ctrlor = GetComponent<CharacterController>();
 Twidth=Terren.GetComponent<Collider>().bounds.size.x;
 Tlongth =Terren.GetComponent<Collider>().bounds.size.z;
 mapwidth = SMAPBK.GetComponent<RectTransform>().rect.width;
 maplongth = SMAPBK.GetComponent<RectTransform>().rect.height;
 widthScale =(mapwidth) /Twidth;
 longthscal =(maplongth) /Tlongth;
 SMAP.transform.localPosition= new Vector3(Cm.transform.position.x* widthScale- 50, Cm.transform.position.z* longthscal-50,0);
 }
 void Update()
 {
 if (Input.GetMouseButton (1)) {

 ifcanvas = true;
 Gcanvas.SetActive (ifcanvas);
 }
 else{
 if (Input.GetKey(KeyCode.Escape))
 {
 ifcanvas = false;
 Gcanvas.SetActive (ifcanvas);
 }
 if (!EventSystem.current.IsPointerOverGameObject())
 {
 //W键前进
 if (Input.GetKey (KeyCode.W)) {
  Vector3 forward = transform.TransformDirection(Vector3.forward);
  ctrlor.Move(forward*movespeed*Time.deltaTime);

 }
 //S键后退
 if (Input.GetKey(KeyCode.S))
 {
  Vector3 back = transform.TransformDirection(Vector3.back);
  ctrlor.Move(back * movespeed * Time.deltaTime);

 }
 //A键移动
 if (Input.GetKey(KeyCode.A))
 {
  Vector3 left = transform.TransformDirection(Vector3.left);
  ctrlor.Move(left* movespeed * Time.deltaTime);
 }
 //D键后退
 if (Input.GetKey(KeyCode.D) && gameObject.transform.position.y > 0)
 {
  Vector3 right = transform.TransformDirection(Vector3.right);
  ctrlor.Move(right * movespeed * Time.deltaTime);
 }
 //E键升高
 if (Input.GetKey (KeyCode.E)) {
  Vector3 upward = transform.TransformDirection(Vector3.up);
  ctrlor.Move(upward * movespeed * Time.deltaTime);
 }
 SMAP.transform.localPosition = new Vector3(Cm.transform.position.x * widthScale - 50, Cm.transform.position.z * longthscal - 50, 0);
 if (Input.GetMouseButton (0)){
 //根据鼠标移动的快慢(增量), 获得相机左右旋转的角度(处理X)
 float rotationX = transform.localEulerAngles.y + Input.GetAxis ("Mouse X") * sensitivityX;

 //根据鼠标移动的快慢(增量), 获得相机上下旋转的角度(处理Y)
 rotationY += Input.GetAxis ("Mouse Y") * sensitivityY;
 //角度限制. rotationY小于min,返回min. 大于max,返回max. 否则返回value
 rotationY = Mathf.Clamp (rotationY, minimumY, maximumY);

 //总体设置一下相机角度
 transform.localEulerAngles = new Vector3 (-rotationY, rotationX, 0);
  UIzhinanpicture.transform.localEulerAngles = new Vector3(0,0,- rotationX);
  SMAP.transform.localEulerAngles = new Vector3(0, 0, -rotationX);
 }
 }
 }

 }
}
看完这篇关于用实例分析Unity如何制作小地图和方向导航的文章,如果觉得文章内容写得不错的话,可以把它分享出去给更多人看到。
免责声明:本站发布的内容(图片、视频和文字)以原创、转载和分享为主,文章观点不代表本网站立场,如果涉及侵权请联系站长邮箱:is@yisu.com进行举报,并提供相关证据,一经查实,将立刻删除涉嫌侵权内容。