您好,登录后才能下订单哦!
密码登录
登录注册
点击 登录注册 即表示同意《亿速云用户服务条款》
小编给大家分享一下jquery+css怎么实现侧边导航栏效果,希望大家阅读完这篇文章之后都有所收获,下面让我们一起去探讨吧!
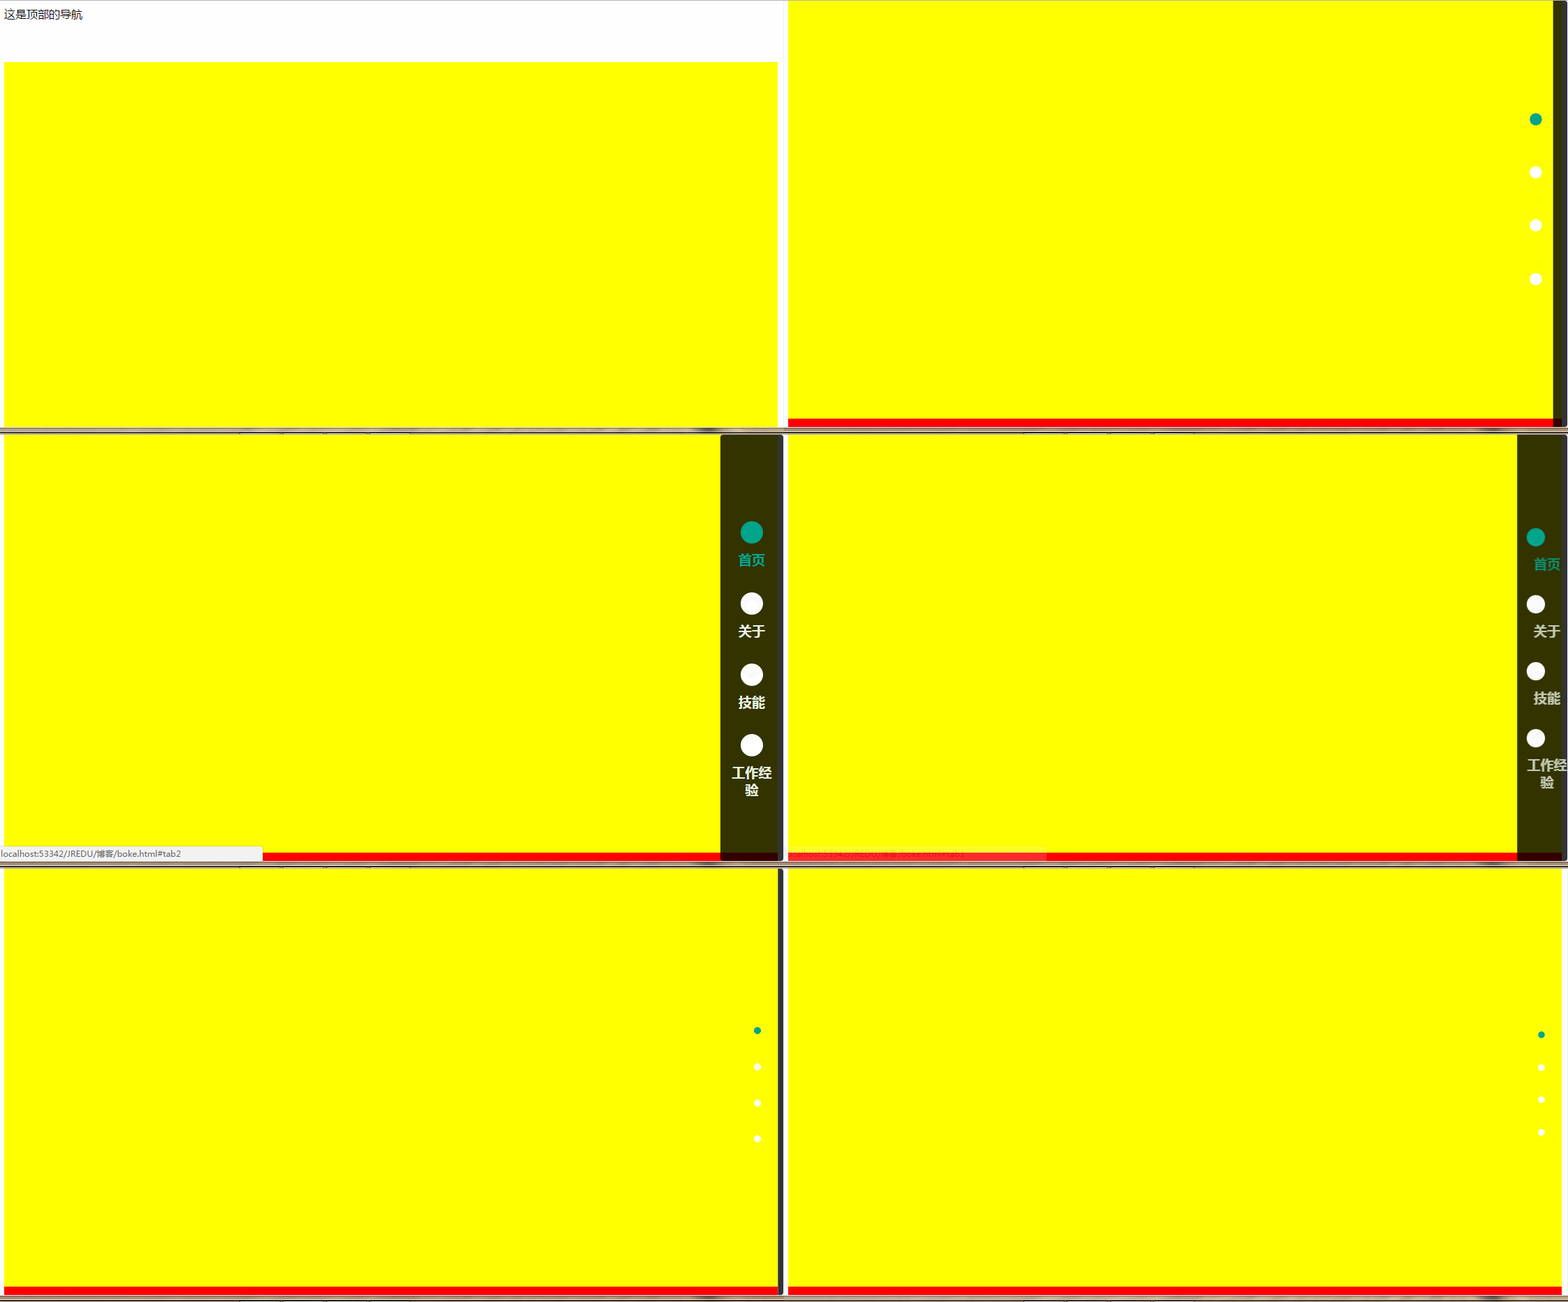
1、效果图

当有顶部导航栏的时候侧边导航栏会消失。

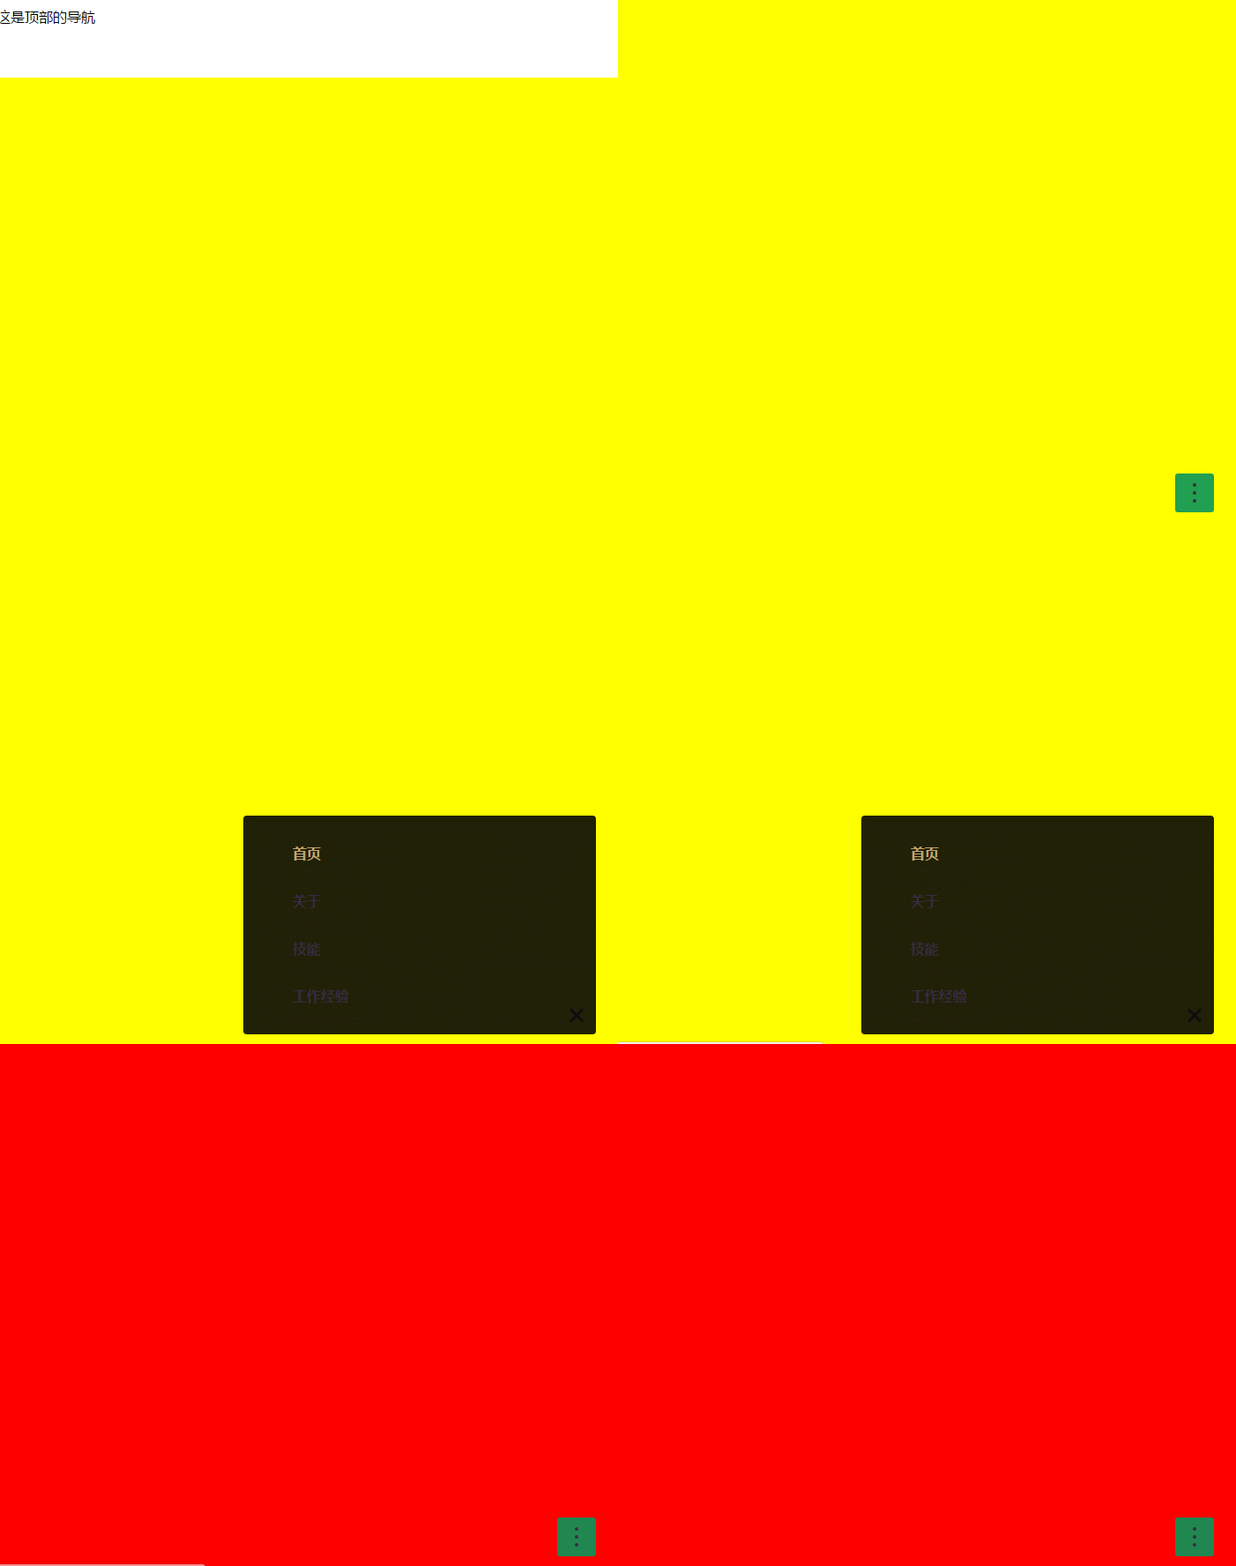
响应式方面,同样的顶部导航栏消失后右下角的图标才出现。点击出现导航,选中后消失;
这里是个demo ,没有做平滑滚动,需要的可以自己加上。
大体就介绍这么多吧,下面上代码。
2、css代码
这里是css代码,详情请看注释
<style>

  /*重置一些样式*/
  *, *::after, *::before {
   box-sizing: border-box;
   /*padding: 0;*/
   margin: 0;
   font-size: 14px;
  }
  .cd-vertical-nav ul{
   list-style: none;
  }
  a {
   color: #c0a672;
   text-decoration: none;
  }

  .nav{
   height: 80px;
  }

  .cd-image-replace {
   /* 小屏显示的图标 */
   display: inline-block;
   overflow: hidden;
   text-indent: 100%;
   white-space: nowrap;
   color: transparent;
  }

  /* --------------------------------

  小屏时的图标样式,和小图标响应式的显示与隐藏

  -------------------------------- */
  .cd-nav-trigger {
   display: block;
   position: fixed;
   z-index: 2;
   bottom: 30px;
   right: 5%;
   height: 44px;
   width: 44px;
   border-radius: 0.25em;
   background: rgba(9, 150,90, 0.9);
   /* reset button style */
   cursor: pointer;
   -webkit-appearance: none;
   -moz-appearance: none;
   -ms-appearance: none;
   -o-appearance: none;
   appearance: none;
   border: none;
   outline: none;
  }
  .cd-nav-trigger span {
   position: absolute;
   height: 4px;
   width: 4px;
   background-color: #3a2c41;
   border-radius: 50%;
   left: 50%;
   top: 50%;
   bottom: auto;
   right: auto;
   transform: translateX(-50%) translateY(-50%);
  }
  .cd-nav-trigger span::before, .cd-nav-trigger span::after {
   content: '';
   position: absolute;
   left: 0;
   height: 100%;
   width: 100%;
   background-color: #3a2c41;
   border-radius: inherit;
  }
  .cd-nav-trigger span::before {
   top: -9px;
  }
  .cd-nav-trigger span::after {
   bottom: -9px;
  }

  @media only screen and (min-width: 768px) {
   .cd-nav-trigger {
    display: none;
   }
  }

  /* --------------------------------

  导航条的背景等属性

  -------------------------------- */
  /*移动优先原则 这里是小屏时的导航*/
  .cd-vertical-nav {
   position: fixed;
   z-index: 1;
   right: 5%;
   bottom: 30px;
   width: 90%;
   max-width: 400px;
   max-height: 90%;
   overflow-y: auto;
   transform: scale(0);
   transform-origin: right bottom;
   transition: transform 0.2s;
   border-radius: 0.25em;
   background-color: rgba(9, 9, 9, 0.9);
  }
  .cd-vertical-nav li{
   height:auto;
  }
  .cd-vertical-nav a {
   display: block;
   padding: 1em;
   color: #3a2c41;
   font-weight: bold;
   border-bottom: 1px solid rgba(58, 44, 65, 0.1);
  }
  .cd-vertical-nav a.active {
   color: #c0a672;
  }
  .cd-vertical-nav.open {
   transform: scale(1);
   z-index: 10;
   -webkit-overflow-scrolling: touch;
  }
  .cd-vertical-nav.open + .cd-nav-trigger {
   background-color: transparent;
  }
  .cd-vertical-nav.open + .cd-nav-trigger span {
   background-color: rgba(58, 44, 65, 0);
  }
  .cd-vertical-nav.open + .cd-nav-trigger span::before, .cd-vertical-nav.open + .cd-nav-trigger span::after {
   /* 给点击后的按钮做叉号(×)样式 */
   height: 3px;
   width: 20px;
   border-radius: 0;
   left: -8px;
  }
  .cd-vertical-nav.open + .cd-nav-trigger span::before {
   -webkit-transform: rotate(45deg);
   -moz-transform: rotate(45deg);
   -ms-transform: rotate(45deg);
   -o-transform: rotate(45deg);
   transform: rotate(45deg);
   top: 1px;
  }
  .cd-vertical-nav.open + .cd-nav-trigger span::after {
   -webkit-transform: rotate(135deg);
   -moz-transform: rotate(135deg);
   -ms-transform: rotate(135deg);
   -o-transform: rotate(135deg);
   transform: rotate(135deg);
   bottom: 0;
  }
  @media only screen and (min-width: 768px) {
   .cd-vertical-nav {
    /* pc端展示的效果,首先重置一下样式 */
    right: 0;
    top: 0;
    bottom: auto;
    text-align: center;

    /*这里的vh是相对可视屏幕的高度,100vh表示高度始终等于浏览器可是高度*/
    height: 100vh;
    width: 90px;
    max-width: none;
    max-height: none;
    transform: scale(1);
    background-color: transparent;
    overflow: hidden;
    /* 下面通过flex弹性盒子,让内容的主轴线编程垂直的。
    然后通过修改主轴的元素排列方式让他们居中*/
    display: flex;
    flex-direction: column;
    justify-content: center;
   }

   /*下面通过调节内容的缩放比和padding,margin等属性来调节个选项间的距离,实现动画效果*/
   .cd-vertical-nav::before {
    /* 背景色 */
    content: '';
    position: absolute;
    top: 0;
    left: 0;
    width: 100%;
    height: 100%;
    background: rgba(0, 0, 0, 0.8);
    transform: translateX(100%);
    transition: transform 0.4s;
   }

   .cd-vertical-nav:hover::before {
    -webkit-transform: translateX(0);
    -moz-transform: translateX(0);
    -ms-transform: translateX(0);
    -o-transform: translateX(0);
    transform: translateX(0);
   }

   .cd-vertical-nav ul {
    vertical-align: middle;
    text-align: center;
    padding-left: 15px;
   }

   .cd-vertical-nav a {
    position: relative;
    padding: 0.5em 0 0;
    margin:0 auto;
    border-bottom: none;
    font-size: 1.2rem;
    color: #eaf2e3;
    transition: all .5s;
   }

   .cd-vertical-nav a.active i{
    background-color: #00a58c;
    color: #ffffff;
   }
   .cd-vertical-nav a.active span{
    color: #00a58c;
   }
   .cd-vertical-nav a.active::before, .cd-vertical-nav a:hover::before {
    background-color: #c0a672;
   }
   .cd-vertical-nav .label {
    display: block;
    opacity: 0;
    transform: translateX(150%);
    height: 0;
    transition: all 0.5s;
   }

   .cd-vertical-nav:hover .label {
    height:auto;
    opacity: 1;
    transform: translateX(0);
    padding-top: 5px;
   }
   .cd-vertical-nav:hover a {
    padding: 1em 0 0;
    margin-top: 0.8em;
    margin-right: 15px;
   }
   .cd-vertical-nav i{
    display: inline-block;
    width: 32px;
    height: 32px;
    font-size: 18px;
    line-height: 30px;
    -webkit-border-radius: 50%;
    -moz-border-radius: 50%;
    border-radius: 50%;
    color: #0a9dc7;
    background-color: #fff;
    transform: scale(0.3);
    transition: all 0.3s;
   }
   .cd-vertical-nav:hover i{
    transform: scale(1);
   }

  }
  /*配合页面css*/
  section{
   height: 100vh;
  }
  section:nth-of-type(2n){
   background-color: #ff0000;
  }
  section:nth-of-type(2n+1){
   background-color: #ffff00;
  }
 </style>
3、html代码
这里是html代码,很简单没什么好说的。
<div class="nav">这是顶部的导航</div>

<nav class="cd-vertical-nav navbar collapse">
 <ul>
  <li><a data-scroll href="#tab1" class="active"><i class="iconfont icon-shouyeshouye"></i><span class="label">首页</span></a></li>
  <li><a data-scroll href="#tab2"><i class="iconfont icon-guanyu"></i><span class="label">关于</span></a></li>
  <li><a data-scroll href="#tab3"><i class="iconfont icon-jineng"></i><span class="label">技能</span></a></li>
  <li><a data-scroll href="#tab4"><i class="iconfont icon-gongzuojingyan"></i><span class="label">工作经验</span></a></li>
 </ul>
</nav>
<button class="cd-nav-trigger cd-image-replace">Open navigation<span aria-hidden="true"></span></button>

<section id="tab1"></section>
<section id="tab2"></section>
<section id="tab3"></section>
<section id="tab4"></section>
4、js代码
下面我们看下js代码。注释很详细,就不多说了。
<script src="js/jquery-1.10.2.min.js"></script><!--导入jquery库-->
<script>
 $(function(){
  var a =$("section"); //获取每个大块的元素
  var b = [];
  for (i=0;i< a.length;i++){
   b[i]=a[i].offsetTop; //把每个大块距离页面最顶部的距离,赋给b数组
  }
  var c = $(window).scrollTop();//页面刷新是获取滚动条的位置
  if(c>=80){     //顶部导航栏高80;顶部导航消失的时候让侧边导航出来
   $(".cd-vertical-nav").show();
   if(window.innerWidth<768){  //小屏的情况下让按钮隐藏/出现
    $(".cd-nav-trigger").show();}
  }else {      //否则让它隐藏
   $(".cd-vertical-nav").hide();
   if(window.innerWidth<768) {
    $(".cd-nav-trigger").hide();
   }
  }

  $(window).scroll(function(){  //监听滚动条的滚动事件
   c = $(window).scrollTop();  //实时监听滚动条位置
   if(c>=80){      //页面滚动时,判断滚动条位置,控制侧边导航的隐显
    $(".cd-vertical-nav").show();
    if(window.innerWidth<768){
     $(".cd-nav-trigger").show();}
   }else {

    $(".cd-vertical-nav").hide();
    $(".cd-nav-trigger").hide();
   }

   //下面是判断页面所处位置,实时更新导航条,是导航栏选项跟页面同步
   for (i=0;i< a.length;i++){
    var d =c-b[i]; //c是滚动条位置,b是元素到页面顶部的距离,d表示当前浏览器顶部所处的位置。
    var e = a[i].offsetHeight; //获取元素的高度
    var f = a[i].id;   //获取元素的id
    var g = $(".cd-vertical-nav a[href='#"+f+"']"); //拼接字符串,通过属性选择器找到当前所处页面对应的超链接
    if (d>=0&&d<e){
     if(g.hasClass("active")){  //如果当前元素本就处于激活状态直接break
      break;
     }

     //如果当前页面没有处于激活状态,就将正在激活的移出激活的样式表
     $(".cd-vertical-nav .active").removeClass("active");
     g.addClass("active"); //给当前需要激活的属性添加激活样式表
     break;
    }
   }
  });
 })

 //下面为小屏时通过点击按钮开关导航栏,
 $(".cd-nav-trigger").on("click",function(){
  //处于open状态,就关闭
  if($(".cd-vertical-nav").hasClass("open")) $(".cd-vertical-nav").removeClass("open");
  //反之打开
  else $(".cd-vertical-nav").addClass("open");
 })
 //选中导航某一项后,关闭导航栏
 $(".cd-vertical-nav a").on("click",function(){
  $(".cd-vertical-nav").removeClass("open");

 })
</script>
看完了这篇文章,相信你对“jquery+css怎么实现侧边导航栏效果”有了一定的了解,如果想了解更多相关知识,欢迎关注亿速云行业资讯频道,感谢各位的阅读!
免责声明:本站发布的内容(图片、视频和文字)以原创、转载和分享为主,文章观点不代表本网站立场,如果涉及侵权请联系站长邮箱:is@yisu.com进行举报,并提供相关证据,一经查实,将立刻删除涉嫌侵权内容。