您好,登录后才能下订单哦!
密码登录
登录注册
点击 登录注册 即表示同意《亿速云用户服务条款》
Linux 文件系统在处理 Linux 系统出现的各种故障时,故障的症状是最易发现的,而导致这一故障的原因才是最终排除故障的关键。熟悉 Linux 系统中常见的日志文件,了解一般故障的分析与解决办法,将有助于管理员快速定位故障点、“对症下药”、并及时解决各种系统问题。
inode 与 block 详解文件存储再硬盘上,硬盘最小存储单位是“扇区”,每个扇区存储512字节
文件数据包括元信息与实际数据
元信息包含文件属性信息,文件打开来输入的内容为实际数据
block(块)
inode(索引节点)

inode的内容inode包含文件的元信息User IDGroup IDstat命令查看inode信息[root@localhost mnt]# stat abc.txt //查看abc文件inode信息
文件:"abc.txt"
大小:12 块:8 IO 块:4096 普通文件
设备:802h/2050d Inode:18123362 硬链接:1
权限:(0644/-rw-r--r--) Uid:( 0/ root) Gid:( 0/ root)
环境:unconfined_u:object_r:mnt_t:s0
最近访问:2019-09-02 04:12:18.210370997 +0800
最近更改:2019-09-02 04:12:18.210370997 +0800
最近改动:2019-09-02 04:12:18.210370997 +0800
创建时间:-Linux系统文件三个主要的时间属性ctime(change time):最后一次改变文件或目录(属性)的时间atime(access time):最后一次访问文件或目录的时间mtime(modify time):最后一次修改文件或目录(内容)的时间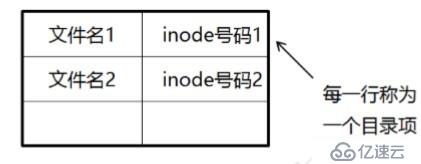
inode都有一个号码,操作系统用inode号码来识别不同的文件inode号命来识别文件inode号码便于识别的别称inode的号码用户通过文件名打开文件时,系统内部的过程
inode号码inode号码,获取inode信息inode信息,找到文件数据所在的block,读出数据inode号码的方法
ls -i命令:查看文件名对应的inde号码[root@localhost mnt]# ls -i abc.txt //查看文件节点信息
18123362 abc.txtinode的大小inode也会消耗硬盘空间,每个inode的大小,一般时128字节或256字节
格式化文件系统时确定inode的总数
[root@localhost mnt]# df -i               //查看分区节点信息
文件系统          Inode 已用(I)  可用(I) 已用(I)% 挂载点
/dev/sda2      10485760  121203 10364557       2% /
devtmpfs         229708     376   229332       1% /dev
tmpfs            233381       1   233380       1% /dev/shm
tmpfs            233381     560   232821       1% /run
tmpfs            233381      16   233365       1% /sys/fs/cgroup
/dev/sda5       5241856     146  5241710       1% /home
/dev/sda1       3145728     328  3145400       1% /boot
tmpfs            233381       6   233375       1% /run/user/42
tmpfs            233381      17   233364       1% /run/user/0
/dev/sr0 0 0 0 - /run/media/root/CentOS 7 x86_64inode的特殊作用inode号码与文件名分离,导致一些Linux系统具有以下的现象
inode,也可以删除文件find ./* -inum [节点号] -delete[root@localhost mnt]# ls -i
16777284 ac1.txt 18123362 ac2.txt 18123366 ac3.txt 18123370 ac4.txt 18123371 ac5.txt
[root@localhost mnt]# find ./* -inum 16777284 -delete
[root@localhost mnt]# ls -i
18123362 ac2.txt 18123366 ac3.txt 18123370 ac4.txt 18123371 ac5.txtinode号码[root@localhost mnt]# ls -i
18123362 ac2.txt 18123366 ac3.txt 18123370 ac4.txt 18123371 ac5.txt
[root@localhost mnt]# mv ac2.txt /opt
[root@localhost mnt]# ls -i /opt
18123362 ac2.txt 1389838 rhinode号码来识别该文件,不再考虑文件名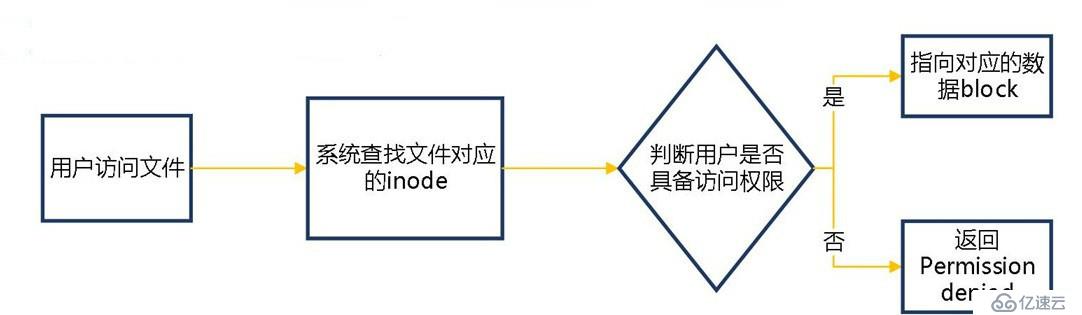
xfs 类型文件备份和恢复xfs文件的恢复需要我们先把文件备份到另一块磁盘,当文件损坏时可以通过备份的文件进行恢复(这里面的备份文件是通过对文件做固定格式的压缩来进行备份)。
xfs 类型的文件可使用 xfsdump 与 xfsrestore 工具进行备份恢复。若系统中未安装xfsdump 与 xfsrestore 工具,可以通过yum来安装工具。[root@localhost mnt]# yum install xfsdump -y
已加载插件:fastestmirror, langpacks
Loading mirror speeds from cached hostfile
* base: centos.ustc.edu.cn
* extras: centos.ustc.edu.cn
* updates: centos.ustc.edu.cn
正在解决依赖关系
--> 正在检查事务
---> 软件包 xfsdump.x86_64.0.3.1.4-1.el7 将被 升级
---> 软件包 xfsdump.x86_64.0.3.1.7-1.el7 将被 更新
...//省略部分内容...命令格式
xfsdump -f 备份存放位置 要备份的路径或设备文件
xfsdump 的备份级别有两种
0:表示完全备份(默认为0)1~9:表示增量备份-f:指定备份文件目录-L:指定标签 session label-M:指定设备标签 media label-s:备份单个文件,-s 后面不能直接跟路径。 [root@localhost ~]# fdisk /dev/sdb //创建新磁盘
欢迎使用 fdisk (util-linux 2.23.2)。
更改将停留在内存中,直到您决定将更改写入磁盘。
使用写入命令前请三思。
Device does not contain a recognized partition table
使用磁盘标识符 0x57599cea 创建新的 DOS 磁盘标签。
命令(输入 m 获取帮助):n
Partition type:
p primary (0 primary, 0 extended, 4 free)
e extended
Select (default p): p
分区号 (1-4,默认 1):
起始 扇区 (2048-41943039,默认为 2048):
将使用默认值 2048
Last 扇区, +扇区 or +size{K,M,G} (2048-41943039,默认为 41943039):
将使用默认值 41943039
分区 1 已设置为 Linux 类型,大小设为 20 GiB
命令(输入 m 获取帮助):w
The partition table has been altered!
Calling ioctl() to re-read partition table.
正在同步磁盘。
[root@localhost ~]# mkfs.xfs /dev/sdb1 //格式化磁盘
meta-data=/dev/sdb1 isize=512 agcount=4, agsize=1310656 blks
= sectsz=512 attr=2, projid32bit=1
= crc=1 finobt=0, sparse=0
data = bsize=4096 blocks=5242624, imaxpct=25
= sunit=0 swidth=0 blks
naming =version 2 bsize=4096 ascii-ci=0 ftype=1
log =internal log bsize=4096 blocks=2560, version=2
= sectsz=512 sunit=0 blks, lazy-count=1
realtime =none extsz=4096 blocks=0, rtextents=0
[root@localhost ~]# mkdir /opt/data //创建挂载点
[root@localhost ~]# mount /dev/sdb1 /opt/data //挂载创建的磁盘
[root@localhost ~]# cp /etc/passwd /opt/data //将passwdd目录复制到挂载的磁盘中
[root@localhost ~]# ls /opt/data //查看文件
passwd
[root@localhost ~]# xfsdump -f /mnt/xfs_dump /dev/sdb1 //使用命令备份文件
xfsdump: using file dump (drive_simple) strategy
xfsdump: version 3.1.7 (dump format 3.0) - type ^C for status and control
============================= dump label dialog ==============================
please enter label for this dump session (timeout in 300 sec)
-> xfs_dump //输入备份的文件名
session label entered: "xfs_dump"
--------------------------------- end dialog ---------------------------------
xfsdump: level 0 dump of localhost.localdomain:/opt/data
xfsdump: dump date: Mon Sep 2 05:27:29 2019
xfsdump: session id: 96c17954-e969-4041-9d9e-4bd59746ddab
xfsdump: session label: "xfs_dump"
xfsdump: ino map phase 1: constructing initial dump list
xfsdump: ino map phase 2: skipping (no pruning necessary)
xfsdump: ino map phase 3: skipping (only one dump stream)
xfsdump: ino map construction complete
xfsdump: estimated dump size: 25216 bytes
xfsdump: /var/lib/xfsdump/inventory created
============================= media label dialog =============================
please enter label for media in drive 0 (timeout in 300 sec)
-> sdb1 //输入要备份设备
media label entered: "sdb1"
--------------------------------- end dialog ---------------------------------
xfsdump: creating dump session media file 0 (media 0, file 0)
xfsdump: dumping ino map
xfsdump: dumping directories
xfsdump: dumping non-directory files
xfsdump: ending media file
xfsdump: media file size 24264 bytes
xfsdump: dump size (non-dir files) : 2592 bytes
xfsdump: dump complete: 13 seconds elapsed
xfsdump: Dump Summary:
xfsdump: stream 0 /mnt/xfs_dump OK (success)
xfsdump: Dump Status: SUCCESS //备份成功
[root@localhost ~]# rm -rf /opt/data/* //删除磁盘中文件
[root@localhost ~]# ls /opt/data //查看文件是否删除
[root@localhost ~]# xfsrestore -f /mnt/xfs_dump /opt/data //执行命令恢复文件
xfsrestore: using file dump (drive_simple) strategy
xfsrestore: version 3.1.7 (dump format 3.0) - type ^C for status and control
xfsrestore: searching media for dump
xfsrestore: examining media file 0
xfsrestore: dump description:
xfsrestore: hostname: localhost.localdomain
xfsrestore: mount point: /opt/data
xfsrestore: volume: /dev/sdb1
xfsrestore: session time: Mon Sep 2 05:27:29 2019
xfsrestore: level: 0
xfsrestore: session label: "xfs_dump"
xfsrestore: media label: "sdb1"
xfsrestore: file system id: 2e3df4e8-dd92-46f7-84ca-f254c4e579bd
xfsrestore: session id: 96c17954-e969-4041-9d9e-4bd59746ddab
xfsrestore: media id: d27aafc8-a405-4a8f-b7f0-1a018a7026ee
xfsrestore: using online session inventory
xfsrestore: searching media for directory dump
xfsrestore: reading directories
xfsrestore: 1 directories and 1 entries processed
xfsrestore: directory post-processing
xfsrestore: restoring non-directory files
xfsrestore: restore complete: 0 seconds elapsed
xfsrestore: Restore Summary:
xfsrestore: stream 0 /mnt/xfs_dump OK (success)
xfsrestore: Restore Status: SUCCESS
[root@localhost ~]# ls /opt/data //查看文件是否恢复
passwd //成功恢复文件xfsdump使用的限制
root的权限才能操作XFS文件系统xfsrestore解析UUID的文件系统内核及系统日志
syslog统一进行管理,日志格式基本相似用户日志
/var/log目录下内核及公共消息日志:/var/log/messages
计划任务日志:/var/log/cron
系统引导日志:/var/log/dmesg
邮件系统日志:/var/log/maillog
/var/log/lastlog、 /var/log/secure、 /var/log/wtmp、 /var/run/btmprsyslogd统一管理
reyelog-7.4.7-16.el7.x86_64/sbin/rsyslogd/etc/rsyslog.conf[root@localhost ~]# vim /etc/rsyslog.conf //查看日志文件配置信息
# rsyslog configuration file
# For more information see /usr/share/doc/rsyslog-*/rsyslog_conf.html
# If you experience problems, see http://www.rsyslog.com/doc/troubleshoot.html
#### MODULES ####
# The imjournal module bellow is now used as a message source instead of imuxsock.
$ModLoad imuxsock # provides support for local system logging (e.g. via logger command)
$ModLoad imjournal # provides access to the systemd journal
#$ModLoad imklog # reads kernel messages (the same are read from journald)
#$ModLoad immark # provides --MARK-- message capability
# Provides UDP syslog reception
#$ModLoad imudp
#$UDPServerRun 514
# Provides TCP syslog reception
#$ModLoad imtcp
#$InputTCPServerRun 514
#### GLOBAL DIRECTIVES ####
# Where to place auxiliary files
$WorkDirectory /var/lib/rsyslog
# Use default timestamp format
$ActionFileDefaultTemplate RSYSLOG_TraditionalFileFormat
...//省略部分内容...
[root@localhost ~]# cd /var/log //查看日志文件目录
[root@localhost log]# ls
anaconda dmesg libvirt rhsm tallylog Xorg.0.log
audit dmesg.old maillog sa tuned Xorg.0.log.old
boot.log firewalld messages samba vmware-vgauthsvc.log.0 Xorg.1.log
btmp gdm ntpstats secure vmware-vmsvc.log Xorg.9.log
chrony glusterfs pluto speech-dispatcher vmware-vmusr.log yum.log
cron grubby_prune_debug ppp spooler wpa_supplicant.log
cups lastlog qemu-ga sssd wtmp查看系统日志文件
[root@localhost log]# vim messages                  //查看系统日志文件

Aug 10 03:53:40 localhost journal: Runtime journal is using 8.0M (max allowed 91.1M, trying to leave 136.7M free of 903.6M available → current limit 91.1M).
Aug 10 03:53:40 localhost kernel: Initializing cgroup subsys cpuset
Aug 10 03:53:40 localhost kernel: Initializing cgroup subsys cpu
Aug 10 03:53:40 localhost kernel: Initializing cgroup subsys cpuacct
Aug 10 03:53:40 localhost kernel: Linux version 3.10.0-693.el7.x86_64 (builder@kbuilder.dev.centos.org) (gcc  version 4.8.5 20150623 (Red Hat 4.8.5-16) (GCC) ) #1 SMP Tue Aug 22 21:09:27 UTC 2017
Aug 10 03:53:40 localhost kernel: Command line: BOOT_IMAGE=/vmlinuz-3.10.0-693.el7.x86_64   root=UUID=729c9a26-dfdc-40f9-ae91-1ade55be51bb ro crashkernel=auto rhgb quiet LANG=zh_CN.UTF-8
Aug 10 03:53:40 localhost kernel: Disabled fast string operations
Aug 10 03:53:40 localhost kernel: e820: BIOS-provided physical RAM map:
Aug 10 03:53:40 localhost kernel: BIOS-e820: [mem 0x0000000000000000-0x000000000009ebff] usable
Aug 10 03:53:40 localhost kernel: BIOS-e820: [mem 0x000000000009ec00-0x000000000009ffff] reserved
Aug 10 03:53:40 localhost kernel: BIOS-e820: [mem 0x00000000000dc000-0x00000000000fffff] reserved
...//省略部分内容...last命令查看用户登录日志[root@localhost log]# last
root pts/0 192.168.144.1 Mon Sep 2 05:17 still logged in
reboot system boot 3.10.0-693.el7.x Mon Sep 2 05:17 - 05:58 (00:40)
root pts/0 192.168.144.1 Mon Sep 2 04:11 - crash (01:05)
root :0 :0 Mon Sep 2 04:11 - crash (01:05)
reboot system boot 3.10.0-693.el7.x Mon Sep 2 04:10 - 05:58 (01:47)
root pts/0 :0 Sun Aug 25 01:10 - 01:10 (00:00)
root :0 :0 Sun Aug 25 01:10 - crash (8+03:00)
...//省略部分内容...lastb查看用户登录次数日志[root@localhost log]# lastb
root :0 :0 Sun Aug 25 01:10 - 01:10 (00:00)
root :1 :1 Sat Aug 10 06:26 - 06:26 (00:00)
btmp begins Sat Aug 10 06:26:22 2019查看程序日志文件
1、安装httpd服务,搭建Apache网站服务;然后关闭防火墙,使宿主机可以访问
[root@localhost ~]# yum install httpd -y   //安装httpd服务
已加载插件:fastestmirror, langpacks
Loading mirror speeds from cached hostfile
 * base: centos.ustc.edu.cn
 * extras: centos.ustc.edu.cn
 * updates: centos.ustc.edu.cn
正在解决依赖关系
--> 正在检查事务
---> 软件包 httpd.x86_64.0.2.4.6-89.el7.centos.1 将被 安装
...//省略部分内容...
[root@localhost ~]# systemctl start httpd              //开启服务
[root@localhost ~]# systemctl stop firewalld.service    //关闭防火墙
[root@localhost ~]# setenforce 0
[root@localhost ~]# cd /var/log               //查看日志文件目录,看是否生成httpd日志闻文件目录
[root@localhost log]# ls
anaconda  dmesg               lastlog   qemu-ga            sssd                    wtmp
audit     dmesg.old           libvirt   rhsm               tallylog                Xorg.0.log
boot.log  firewalld           maillog   sa                 tuned                   Xorg.0.log.old
btmp      gdm                 messages  samba              vmware-vgauthsvc.log.0  Xorg.1.log
chrony    glusterfs           ntpstats  secure             vmware-vmsvc.log        Xorg.9.log
cron      grubby_prune_debug  pluto     speech-dispatcher  vmware-vmusr.log        yum.log
cups      httpd               ppp       spooler            wpa_supplicant.log
2、通过宿主机访问搭建的网站后,查看系统程序的日志文件
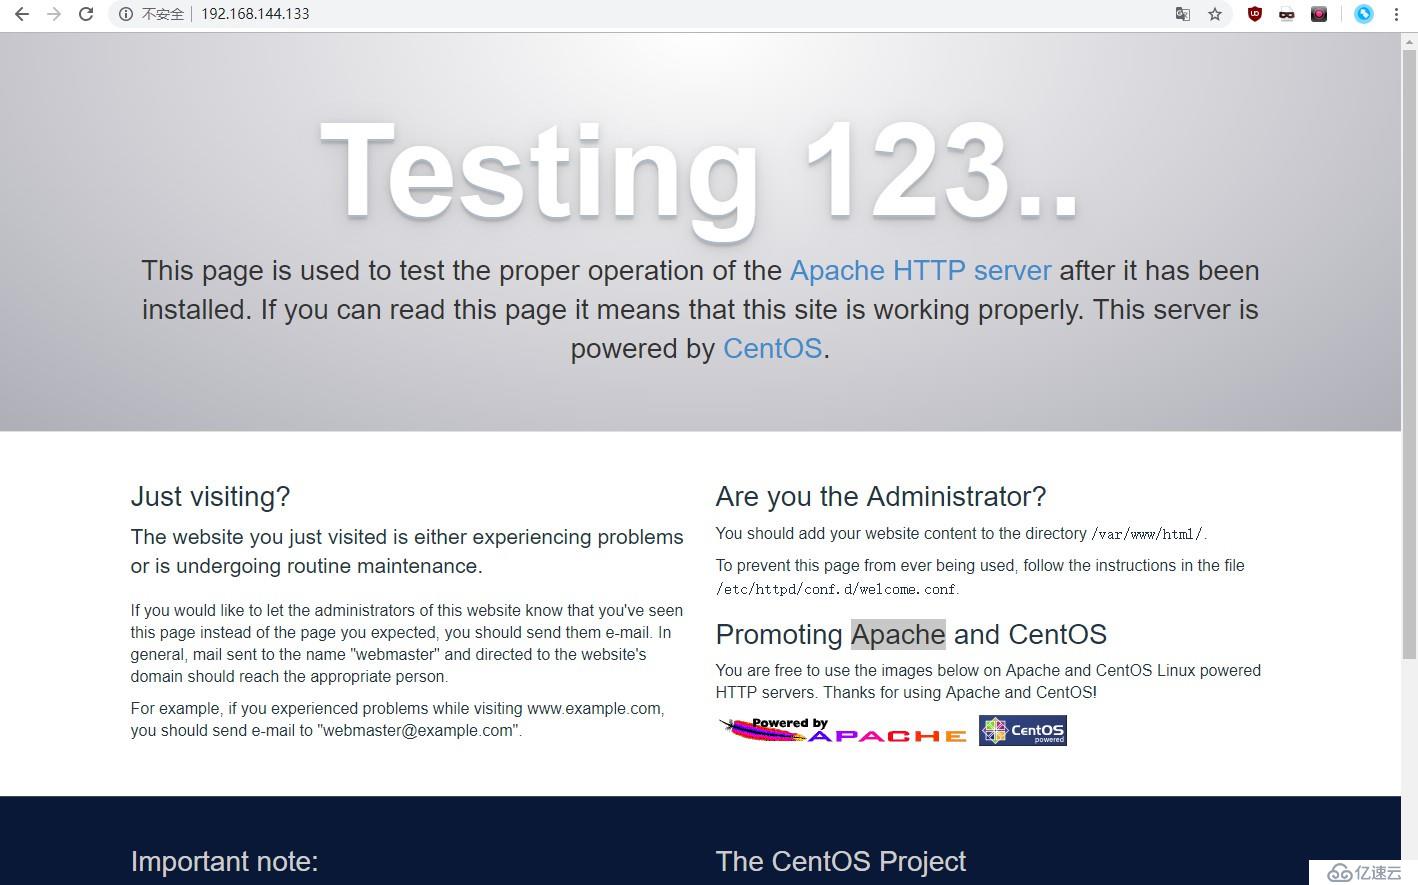
[root@localhost log]# cd httpd    //进入httpd程序目录
[root@localhost httpd]# ls
access_log  error_log
[root@localhost httpd]# vim access_log     //查看程序日志文件

192.168.144.1 - - [02/Sep/2019:06:12:48 +0800] "GET /noindex/css/bootstrap.min.css HTTP/1.1" 200 19341 "http://192.168.144.133/" "Mozilla/5.0 (Windows NT 10.0; Win64; x64) AppleWebKit/537.36 (KHTML, like Gecko) Chrome/76.0.3809.132 Safari/537.36"
192.168.144.1 - - [02/Sep/2019:06:12:48 +0800] "GET /noindex/css/open-sans.css HTTP/1.1" 200 5081 "http://192.168.144.133/" "Mozilla/5.0 (Windows NT 10.0; Win64; x64) AppleWebKit/537.36 (KHTML, like Gecko) Chrome/76.0.3809.132 Safari/537.36"
192.168.144.1 - - [02/Sep/2019:06:12:48 +0800] "GET /images/apache_pb.gif HTTP/1.1" 200 2326 "http://192.168.144.133/" "Mozilla/5.0 (Windows NT 10.0; Win64; x64) AppleWebKit/537.36 (KHTML, like Gecko) Chrome/76.0.3809.132 Safari/537.36"
192.168.144.1 - - [02/Sep/2019:06:12:48 +0800] "GET /images/poweredby.png HTTP/1.1" 200 3956 "http://192.168.144.133/" "Mozilla/5.0 (Windows NT 10.0; Win64; x64) AppleWebKit/537.36 (KHTML, like Gecko) Chrome/76.0.3809.132 Safari/537.36"
192.168.144.1 - - [02/Sep/2019:06:12:48 +0800] "GET /noindex/css/fonts/Light/OpenSans-Light.woff HTTP/1.1" 404 241 "http://192.168.144.133/noindex/css/open-sans.css" "Mozilla/5.0 (Windows NT 10.0; Win64; x64) AppleWebKit/537.36 (KHTML, like Gecko) Chrome/76.0.3809.132 Safari/537.36"
192.168.144.1 - - [02/Sep/2019:06:12:48 +0800] "GET /noindex/css/fonts/Bold/OpenSans-Bold.woff HTTP/1.1" 404 239 "http://192.168.144.133/noindex/css/open-sans.css" "Mozilla/5.0 (Windows NT 10.0; Win64; x64) AppleWebKit/537.36 (KHTML, like Gecko) Chrome/76.0.3809.132 Safari/537.36"
192.168.144.1 - - [02/Sep/2019:06:12:48 +0800] "GET /noindex/css/fonts/Bold/OpenSans-Bold.ttf HTTP/1.1" 404 238 "http://192.168.144.133/noindex/css/open-sans.css" "Mozilla/5.0 (Windows NT 10.0; Win64; x64) 将服务器的日志文件发到统一的日志文件服务器
免责声明:本站发布的内容(图片、视频和文字)以原创、转载和分享为主,文章观点不代表本网站立场,如果涉及侵权请联系站长邮箱:is@yisu.com进行举报,并提供相关证据,一经查实,将立刻删除涉嫌侵权内容。