您好,登录后才能下订单哦!
密码登录
登录注册
点击 登录注册 即表示同意《亿速云用户服务条款》
VS2010+Opencv+MFC读取图像和视频显示在Picture控件,供大家参考,具体内容如下
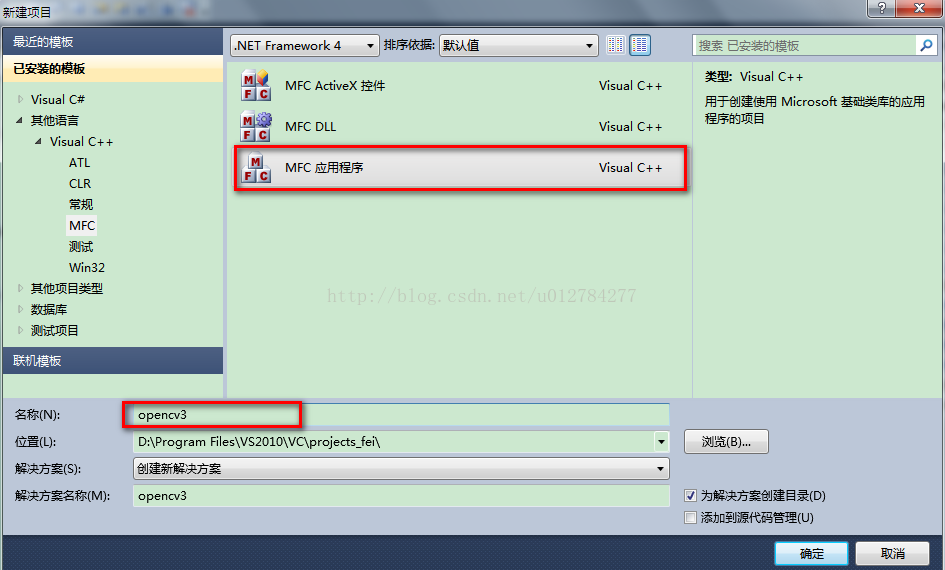
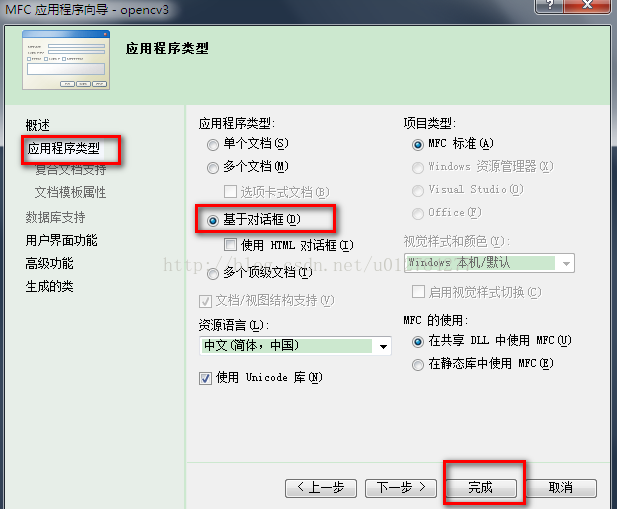
1.新建MFC对话框应用程序。
其余选项默认,单击完成,创建出对话框应用程序。删掉原来自带的一些控件,添加picture控件和两个按钮。
2.由于以后的代码会用到CvvImage类,而opencv2.3以后就去掉了对它的支持,这里先介绍添加CvvImage支持的方法,直接能用的可以略过这一步。
如下图添加相应的文件:
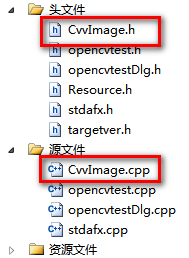
这里附上两个文件的源码方便使用。
#pragma once

#ifndef CVVIMAGE_CLASS_DEF
#define CVVIMAGE_CLASS_DEF
#include "opencv.hpp"

class CvvImage

{

public:

 CvvImage();

 virtual ~CvvImage();


 virtual bool Create( int width, int height, int bits_per_pixel, int image_origin = 0 );
 virtual bool Load( const char* filename, int desired_color = 1 );
 virtual bool LoadRect( const char* filename,
 int desired_color, CvRect r );

#if defined WIN32 || defined _WIN32
 virtual bool LoadRect( const char* filename,
 int desired_color, RECT r )

 {

 return LoadRect( filename, desired_color,
  cvRect( r.left, r.top, r.right - r.left, r.bottom - r.top ));

 }

#endif


 virtual bool Save( const char* filename );
 virtual void CopyOf( CvvImage& image, int desired_color = -1 );
 virtual void CopyOf( IplImage* img, int desired_color = -1 );
 IplImage* GetImage() { return m_img; };

 virtual void Destroy(void);

 int Width() { return !m_img ? 0 : !m_img->roi ? m_img->width : m_img->roi->width; };
 int Height() { return !m_img ? 0 : !m_img->roi ? m_img->height : m_img->roi->height;};
 int Bpp() { return m_img ? (m_img->depth & 255)*m_img->nChannels : 0; };

 virtual void Fill( int color );
 virtual void Show( const char* window );

#if defined WIN32 || defined _WIN32

 virtual void Show( HDC dc, int x, int y, int width, int height,
 int from_x = 0, int from_y = 0 );


 virtual void DrawToHDC( HDC hDCDst, RECT* pDstRect );
#endif
protected:
 IplImage* m_img;

};

typedef CvvImage CImage;

#endif
#include "StdAfx.h"
#include "CvvImage.h"
//////////////////////////////////////////////////////////////////////
// Construction/Destruction
//////////////////////////////////////////////////////////////////////
CV_INLINE RECT NormalizeRect( RECT r );
CV_INLINE RECT NormalizeRect( RECT r )
{
 int t;
 if( r.left > r.right )
 {
 t = r.left;
 r.left = r.right;
 r.right = t;
 }
 if( r.top > r.bottom )
 {
 t = r.top;
 r.top = r.bottom;
 r.bottom = t;
 }

 return r;
}
CV_INLINE CvRect RectToCvRect( RECT sr );
CV_INLINE CvRect RectToCvRect( RECT sr )
{
 sr = NormalizeRect( sr );
 return cvRect( sr.left, sr.top, sr.right - sr.left, sr.bottom - sr.top );
}
CV_INLINE RECT CvRectToRect( CvRect sr );
CV_INLINE RECT CvRectToRect( CvRect sr )
{
 RECT dr;
 dr.left = sr.x;
 dr.top = sr.y;
 dr.right = sr.x + sr.width;
 dr.bottom = sr.y + sr.height;

 return dr;
}
CV_INLINE IplROI RectToROI( RECT r );
CV_INLINE IplROI RectToROI( RECT r )
{
 IplROI roi;
 r = NormalizeRect( r );
 roi.xOffset = r.left;
 roi.yOffset = r.top;
 roi.width = r.right - r.left;
 roi.height = r.bottom - r.top;
 roi.coi = 0;

 return roi;
}
void FillBitmapInfo( BITMAPINFO* bmi, int width, int height, int bpp, int origin )
{
 assert( bmi && width >= 0 && height >= 0 && (bpp == 8 || bpp == 24 || bpp == 32));

 BITMAPINFOHEADER* bmih = &(bmi->bmiHeader);

 memset( bmih, 0, sizeof(*bmih));
 bmih->biSize = sizeof(BITMAPINFOHEADER);
 bmih->biWidth = width;
 bmih->biHeight = origin ? abs(height) : -abs(height);
 bmih->biPlanes = 1;
 bmih->biBitCount = (unsigned short)bpp;
 bmih->biCompression = BI_RGB;
 if( bpp == 8 )
 {
 RGBQUAD* palette = bmi->bmiColors;
 int i;
 for( i = 0; i < 256; i++ )
 {
  palette[i].rgbBlue = palette[i].rgbGreen = palette[i].rgbRed = (BYTE)i;
  palette[i].rgbReserved = 0;
 }
 }
}
CvvImage::CvvImage()
{
 m_img = 0;
}
void CvvImage::Destroy()
{
 cvReleaseImage( &m_img );
}
CvvImage::~CvvImage()
{
 Destroy();
}
bool CvvImage::Create( int w, int h, int bpp, int origin )
{
 const unsigned max_img_size = 10000;

 if( (bpp != 8 && bpp != 24 && bpp != 32) ||
 (unsigned)w >= max_img_size || (unsigned)h >= max_img_size ||
 (origin != IPL_ORIGIN_TL && origin != IPL_ORIGIN_BL))
 {
 assert(0); // most probably, it is a programming error
 return false;
 }
 if( !m_img || Bpp() != bpp || m_img->width != w || m_img->height != h )
 {
 if( m_img && m_img->nSize == sizeof(IplImage))
  Destroy();

 m_img = cvCreateImage( cvSize( w, h ), IPL_DEPTH_8U, bpp/8 );
 }
 if( m_img )
 m_img->origin = origin == 0 ? IPL_ORIGIN_TL : IPL_ORIGIN_BL;
 return m_img != 0;
}
void CvvImage::CopyOf( CvvImage& image, int desired_color )
{
 IplImage* img = image.GetImage();
 if( img )
 {
 CopyOf( img, desired_color );
 }
}
#define HG_IS_IMAGE(img)             \
 ((img) != 0 && ((const IplImage*)(img))->nSize == sizeof(IplImage) && \
 ((IplImage*)img)->imageData != 0)
void CvvImage::CopyOf( IplImage* img, int desired_color )
{
 if( HG_IS_IMAGE(img) )
 {
 int color = desired_color;
 CvSize size = cvGetSize( img );
 if( color < 0 )
  color = img->nChannels > 1;
 if( Create( size.width, size.height,
  (!color ? 1 : img->nChannels > 1 ? img->nChannels : 3)*8,
  img->origin ))
 {
  cvConvertImage( img, m_img, 0 );
 }
 }
}
bool CvvImage::Load( const char* filename, int desired_color )
{
 IplImage* img = cvLoadImage( filename, desired_color );
 if( !img )
 return false;

 CopyOf( img, desired_color );
 cvReleaseImage( &img );

 return true;
}
bool CvvImage::LoadRect( const char* filename,
     int desired_color, CvRect r )
{
 if( r.width < 0 || r.height < 0 ) return false;

 IplImage* img = cvLoadImage( filename, desired_color );
 if( !img )
 return false;
 if( r.width == 0 || r.height == 0 )
 {
 r.width = img->width;
 r.height = img->height;
 r.x = r.y = 0;
 }
 if( r.x > img->width || r.y > img->height ||
 r.x + r.width < 0 || r.y + r.height < 0 )
 {
 cvReleaseImage( &img );
 return false;
 }

 if( r.x < 0 )
 {
 r.width += r.x;
 r.x = 0;
 }
 if( r.y < 0 )
 {
 r.height += r.y;
 r.y = 0;
 }
 if( r.x + r.width > img->width )
 r.width = img->width - r.x;

 if( r.y + r.height > img->height )
 r.height = img->height - r.y;
 cvSetImageROI( img, r );
 CopyOf( img, desired_color );
 cvReleaseImage( &img );
 return true;
}
bool CvvImage::Save( const char* filename )
{
 if( !m_img )
 return false;
 cvSaveImage( filename, m_img );
 return true;
}
void CvvImage::Show( const char* window )
{
 if( m_img )
 cvShowImage( window, m_img );
}
void CvvImage::Show( HDC dc, int x, int y, int w, int h, int from_x, int from_y )
{
 if( m_img && m_img->depth == IPL_DEPTH_8U )
 {
 uchar buffer[sizeof(BITMAPINFOHEADER) + 1024];
 BITMAPINFO* bmi = (BITMAPINFO*)buffer;
 int bmp_w = m_img->width, bmp_h = m_img->height;
 FillBitmapInfo( bmi, bmp_w, bmp_h, Bpp(), m_img->origin );
 from_x = MIN( MAX( from_x, 0 ), bmp_w - 1 );
 from_y = MIN( MAX( from_y, 0 ), bmp_h - 1 );
 int sw = MAX( MIN( bmp_w - from_x, w ), 0 );
 int sh = MAX( MIN( bmp_h - from_y, h ), 0 );
 SetDIBitsToDevice(
  dc, x, y, sw, sh, from_x, from_y, from_y, sh,
  m_img->imageData + from_y*m_img->widthStep,
  bmi, DIB_RGB_COLORS );
 }
}
void CvvImage::DrawToHDC( HDC hDCDst, RECT* pDstRect )
{
 if( pDstRect && m_img && m_img->depth == IPL_DEPTH_8U && m_img->imageData )
 {
 uchar buffer[sizeof(BITMAPINFOHEADER) + 1024];
 BITMAPINFO* bmi = (BITMAPINFO*)buffer;
 int bmp_w = m_img->width, bmp_h = m_img->height;
 CvRect roi = cvGetImageROI( m_img );
 CvRect dst = RectToCvRect( *pDstRect );
 if( roi.width == dst.width && roi.height == dst.height )
 {
  Show( hDCDst, dst.x, dst.y, dst.width, dst.height, roi.x, roi.y );
  return;
 }
 if( roi.width > dst.width )
 {
  SetStretchBltMode(
   hDCDst,   // handle to device context
   HALFTONE );
 }
 else
 {
  SetStretchBltMode(
   hDCDst,   // handle to device context
   COLORONCOLOR );
 }
 FillBitmapInfo( bmi, bmp_w, bmp_h, Bpp(), m_img->origin );
 ::StretchDIBits(
  hDCDst,
  dst.x, dst.y, dst.width, dst.height,
  roi.x, roi.y, roi.width, roi.height,
  m_img->imageData, bmi, DIB_RGB_COLORS, SRCCOPY );
 }
}
void CvvImage::Fill( int color )
{
 cvSet( m_img, cvScalar(color&255,(color>>8)&255,(color>>16)&255,(color>>24)&255) );
}
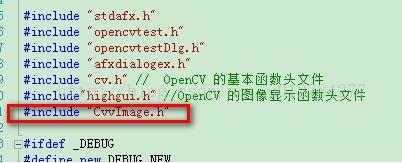
在需要引用该类的地方添加如下引用:
3.在Picture控件中显示图片
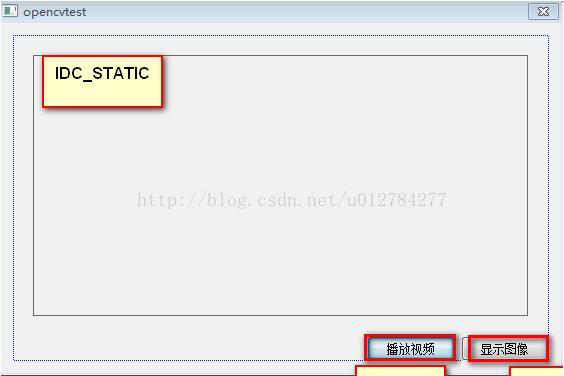
如图所示修改控件ID,并删除按钮已存在的响应代码。双击显示图片添加以下代码:
void CopencvtestDlg::OnBnClickedCancel()
{
 // TODO: 在此添加控件通知处理程序代码
 CDC *pDC = GetDlgItem(IDC_STATIC)->GetDC();//根据ID获得窗口指针再获取与该窗口关联的上下文指针
 HDC hdc= pDC->GetSafeHdc();      // 获取设备上下文句柄
 CRect rect;
// 矩形类
 GetDlgItem(IDC_STATIC)->GetClientRect(&rect); //获取box1客户区
 CvvImage cimg;
 IplImage *src; // 定义IplImage指针变量src
 src = cvLoadImage("D:\\me.bmp",-1); // 将src指向当前工程文件目录下的图像me.bmp
 cimg.CopyOf(src,src->nChannels);

 cimg.DrawToHDC(hdc,&rect);
//输出图像
 ReleaseDC( pDC );
 cimg.Destroy();
//销毁
}
4.播放视频
双击播放视频按钮,添加如下代码:
void CopencvtestDlg::OnBnClickedOk()
{
 // TODO: 在此添加控件通知处理程序代码
 //IplImage *src; // 定义IplImage指针变量src
 // src = cvLoadImage("D:\\me.bmp",-1); // 将src指向当前工程文件目录下的图像me.bmp
 // cvNamedWindow("me",0);//定义一个窗口名为lena的显示窗口
 // cvShowImage("me",src);//在lena窗口中,显示src指针所指向的图像
 // cvWaitKey(0);//无限等待,即图像总显示
 // cvDestroyWindow("me");//销毁窗口lena
 // cvReleaseImage(&src);//释放IplImage指针src

 CDC *pDC = GetDlgItem(IDC_STATIC)->GetDC();//根据ID获得窗口指针再获取与该窗口关联的上下文指针
 HDC hdc= pDC->GetSafeHdc();      // 获取设备上下文句柄
 CRect rect;
// 矩形类
 GetDlgItem(IDC_STATIC)->GetClientRect(&rect); //获取box1客户区


 CvCapture *capture = cvCreateFileCapture ("D:\\tree.avi"); //读取视频
 if(capture==NULL) {
  printf("NO capture"); //读取不成功,则标识
 //return 1;
 };
 double fps=cvGetCaptureProperty(capture, CV_CAP_PROP_FPS ); //读取视频的帧率
 int vfps = 1000 / fps;          //计算每帧播放的时间
 printf("%5.1f\t%5d\n",fps,vfps);
 double frames=cvGetCaptureProperty(capture,CV_CAP_PROP_FRAME_COUNT);//读取视频中有多少帧
 printf("frames is %f\n",frames);
 //cvNamedWindow("example",CV_WINDOW_AUTOSIZE);     //定义窗口
 IplImage *frame;

 CvvImage cimg;

 while(1){
 frame = cvQueryFrame( capture );       //抓取帧
 cimg.CopyOf(frame,frame->nChannels);
 cimg.DrawToHDC(hdc,&rect);
 float ratio = cvGetCaptureProperty(capture, CV_CAP_PROP_POS_AVI_RATIO);  //读取该帧在视频中的相对位置
 printf("%f\n",ratio);
 if(!frame)break;
 //cvShowImage("IDC_STATIC",frame);       //显示

 char c = cvWaitKey(vfps);
 if(c == 27 )break;
 }
 ReleaseDC( pDC );
 cvReleaseCapture(&capture);
 cvDestroyWindow("example");
}
最终效果:
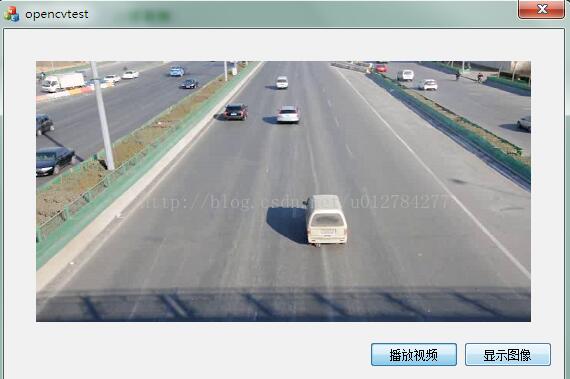
以上就是本文的全部内容,希望对大家的学习有所帮助,也希望大家多多支持亿速云。
免责声明:本站发布的内容(图片、视频和文字)以原创、转载和分享为主,文章观点不代表本网站立场,如果涉及侵权请联系站长邮箱:is@yisu.com进行举报,并提供相关证据,一经查实,将立刻删除涉嫌侵权内容。