您好,登录后才能下订单哦!
密码登录
登录注册
点击 登录注册 即表示同意《亿速云用户服务条款》
这篇文章主要介绍了基于SpringBoot整合oauth3实现token 认证,文中通过示例代码介绍的非常详细,对大家的学习或者工作具有一定的参考学习价值,需要的朋友可以参考下
session和token的区别:
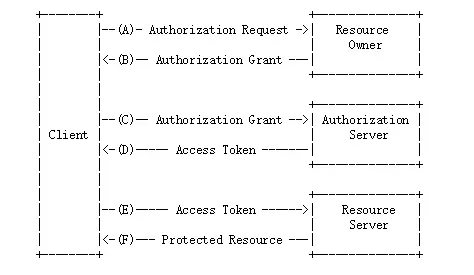
Oauth3 密码授权流程
在oauth3协议里,每一个应用都有自己的一个clientId和clientSecret(需要去认证方申请),所以一旦想通过认证,必须要有认证方下发的clientId和secret。
1. pom
<!--security-->
    <dependency>
      <groupId>org.springframework.boot</groupId>
      <artifactId>spring-boot-starter-security</artifactId>
    </dependency>
    <dependency>
      <groupId>org.springframework.security.oauth</groupId>
      <artifactId>spring-security-oauth3</artifactId>
    </dependency>
2. UserDetail实现认证第一步
MyUserDetailsService.java
@Autowired
  private PasswordEncoder passwordEncoder;

  /**
   * 根据进行登录
   * @param username
   * @return
   * @throws UsernameNotFoundException
   */
  @Override
  public UserDetails loadUserByUsername(String username) throws UsernameNotFoundException {
    log.info("登录用户名:"+username);
    String password = passwordEncoder.encode("123456");
    //User三个参数  (用户名+密码+权限)
    //根据查找到的用户信息判断用户是否被冻结
    log.info("数据库密码:"+password);
    return new User(username,password, AuthorityUtils.commaSeparatedStringToAuthorityList("admin"));
  }
3. 获取token的控制器
@RestController
public class OauthController {
@Autowired
private ClientDetailsService clientDetailsService;
@Autowired
private AuthorizationServerTokenServices authorizationServerTokenServices;
@Autowired
private AuthenticationManager authenticationManager;
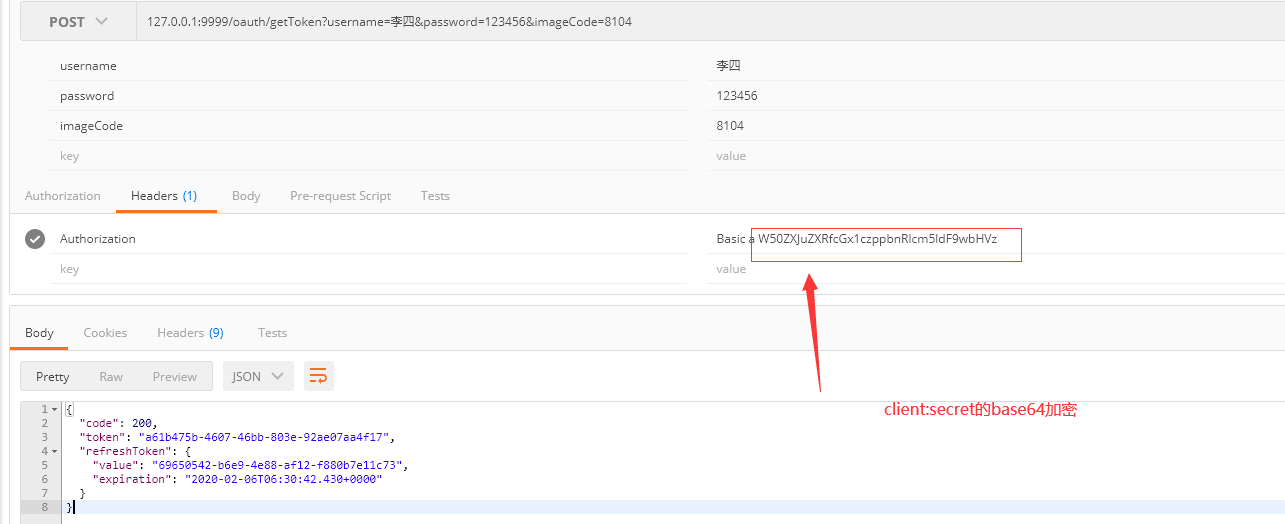
@PostMapping("/oauth/getToken")
public Object getToken(@RequestParam String username, @RequestParam String password, HttpServletRequest request) throws IOException {
Map<String,Object>map = new HashMap<>(8);
//进行验证
String header = request.getHeader("Authorization");
if (header == null && !header.startsWith("Basic")) {
map.put("code",500);
map.put("message","请求投中无client信息");
return map;
}
String[] tokens = this.extractAndDecodeHeader(header, request);
assert tokens.length == 2;
//获取clientId 和 clientSecret
String clientId = tokens[0];
String clientSecret = tokens[1];
//获取 ClientDetails
ClientDetails clientDetails = clientDetailsService.loadClientByClientId(clientId);
if (clientDetails == null){
map.put("code",500);
map.put("message","clientId 不存在"+clientId);
return map;
//判断 方言 是否一致
}else if (!StringUtils.equals(clientDetails.getClientSecret(),clientSecret)){
map.put("code",500);
map.put("message","clientSecret 不匹配"+clientId);
return map;
}
//使用username、密码进行登录
UsernamePasswordAuthenticationToken authentication = new UsernamePasswordAuthenticationToken(username, password);
//调用指定的UserDetailsService,进行用户名密码验证
Authentication authenticate = authenticationManager.authenticate(authentication);
HrUtils.setCurrentUser(authenticate);
//放到session中
//密码授权 模式, 组建 authentication
TokenRequest tokenRequest = new TokenRequest(new HashMap<>(),clientId,clientDetails.getScope(),"password");
OAuth3Request oAuth3Request = tokenRequest.createOAuth3Request(clientDetails);
OAuth3Authentication oAuth3Authentication = new OAuth3Authentication(oAuth3Request,authentication);
OAuth3AccessToken token = authorizationServerTokenServices.createAccessToken(oAuth3Authentication);
map.put("code",200);
map.put("token",token.getValue());
map.put("refreshToken",token.getRefreshToken());
return map;
}
/**
* 解码请求头
*/
private String[] extractAndDecodeHeader(String header, HttpServletRequest request) throws IOException {
byte[] base64Token = header.substring(6).getBytes("UTF-8");
byte[] decoded;
try {
decoded = Base64.decode(base64Token);
} catch (IllegalArgumentException var7) {
throw new BadCredentialsException("Failed to decode basic authentication token");
}
String token = new String(decoded, "UTF-8");
int delim = token.indexOf(":");
if (delim == -1) {
throw new BadCredentialsException("Invalid basic authentication token");
} else {
return new String[]{token.substring(0, delim), token.substring(delim + 1)};
}
}
}
4. 核心配置
(1)、Security 配置类 说明登录方式、登录页面、哪个url需要认证、注入登录失败/成功过滤器
@Configuration
public class BrowserSecurityConfig extends WebSecurityConfigurerAdapter {

  /**
   * 注入 自定义的 登录成功处理类
   */
  @Autowired
  private MyAuthenticationSuccessHandler mySuccessHandler;
  /**
   * 注入 自定义的 登录失败处理类
   */
  @Autowired
  private MyAuthenticationFailHandler myFailHandler;

  @Autowired
  private ValidateCodeFilter validateCodeFilter;

  /**
   * 重写PasswordEncoder 接口中的方法,实例化加密策略
   * @return 返回 BCrypt 加密策略
   */
  @Bean
  public PasswordEncoder passwordEncoder(){
    return new BCryptPasswordEncoder();
  }

  @Override
  protected void configure(HttpSecurity http) throws Exception {
    //在UsernamePasswordAuthenticationFilter 过滤器前 加一个过滤器 来搞验证码
    http.addFilterBefore(validateCodeFilter, UsernamePasswordAuthenticationFilter.class)
        //表单登录 方式
        .formLogin()
        .loginPage("/authentication/require")
        //登录需要经过的url请求
        .loginProcessingUrl("/authentication/form")
        .passwordParameter("pwd")
        .usernameParameter("user")
        .successHandler(mySuccessHandler)
        .failureHandler(myFailHandler)
        .and()
        //请求授权
        .authorizeRequests()
        //不需要权限认证的url
        .antMatchers("/oauth/*","/authentication/*","/code/image").permitAll()
        //任何请求
        .anyRequest()
        //需要身份认证
        .authenticated()
        .and()
        //关闭跨站请求防护
        .csrf().disable();
    //默认注销地址:/logout
    http.logout().
        //注销之后 跳转的页面
        logoutSuccessUrl("/authentication/require");
  }

  /**
   * 认证管理
   *
   * @return 认证管理对象
   * @throws Exception 认证异常信息
   */
  @Override
  @Bean
  public AuthenticationManager authenticationManagerBean() throws Exception {
    return super.authenticationManagerBean();
  }
}
(2)、认证服务器
@Configuration
@EnableAuthorizationServer
public class MyAuthorizationServerConfig extends AuthorizationServerConfigurerAdapter {
  @Autowired
  private AuthenticationManager authenticationManager;

  @Autowired
  private MyUserDetailsService userDetailsService;


  @Override
  public void configure(AuthorizationServerSecurityConfigurer security) throws Exception {
    super.configure(security);
  }

  /**
   * 客户端配置(给谁发令牌)
   * @param clients
   * @throws Exception
   */
  @Override
  public void configure(ClientDetailsServiceConfigurer clients) throws Exception {
    clients.inMemory().withClient("internet_plus")
        .secret("internet_plus")
        //有效时间 2小时
        .accessTokenValiditySeconds(72000)
        //密码授权模式和刷新令牌
        .authorizedGrantTypes("refresh_token","password")
        .scopes( "all");
  }

  @Override
  public void configure(AuthorizationServerEndpointsConfigurer endpoints) throws Exception {
    endpoints
        .authenticationManager(authenticationManager)
        .userDetailsService(userDetailsService);
  }
}
@EnableResourceServer这个注解就决定了这是个资源服务器。它决定了哪些资源需要什么样的权限。
5、测试
以上就是本文的全部内容,希望对大家的学习有所帮助,也希望大家多多支持亿速云。
免责声明:本站发布的内容(图片、视频和文字)以原创、转载和分享为主,文章观点不代表本网站立场,如果涉及侵权请联系站长邮箱:is@yisu.com进行举报,并提供相关证据,一经查实,将立刻删除涉嫌侵权内容。