жӮЁеҘҪпјҢзҷ»еҪ•еҗҺжүҚиғҪдёӢи®ўеҚ•е“ҰпјҒ
иҝҷзҜҮж–Үз« дё»иҰҒд»Ӣз»ҚдәҶMybatisеӨҡзәҝзЁӢдёӢдҪҝз”ЁExampleзҡ„зӨәдҫӢпјҢе…·жңүдёҖе®ҡеҖҹйүҙд»·еҖјпјҢж„ҹе…ҙи¶Јзҡ„жңӢеҸӢеҸҜд»ҘеҸӮиҖғдёӢпјҢеёҢжңӣеӨ§е®¶йҳ…иҜ»е®ҢиҝҷзҜҮж–Үз« д№ӢеҗҺеӨ§жңү收иҺ·пјҢдёӢйқўи®©е°Ҹзј–еёҰзқҖеӨ§е®¶дёҖиө·дәҶи§ЈдёҖдёӢгҖӮ
еүҚиЁҖ
жңҚеҠЎеҷЁжҜҸ收еҲ°дёҖдёӘиҜ·жұӮпјҢйғҪдјҡд»ҺзәҝзЁӢжұ дёӯи°ғеәҰдёҖдёӘз©әй—ІзәҝзЁӢжқҘеӨ„зҗҶпјҢspringж•ҙеҗҲзҡ„webж—¶пјҢcontrollerе’ҢserviceдёҖиҲ¬йғҪжҳҜеҚ•дҫӢзҡ„пјҢиҝҷж ·еҜјиҮҙж— и®әдҪ зҡ„Exampleж ҮжіЁзҡ„жҳҜеҚ•дҫӢиҝҳжҳҜеӨҡдҫӢпјҢеҗҢдёҖдёӘserviceдёӢзҡ„Exampleд№ҹеҸӘжңүдёҖдёӘпјҢеӨҡзәҝзЁӢи®ҝй—®ж—¶дә§з”ҹзҡ„
й—®йўҳеҰӮдёӢ
й—®йўҳиҜҰжғ…
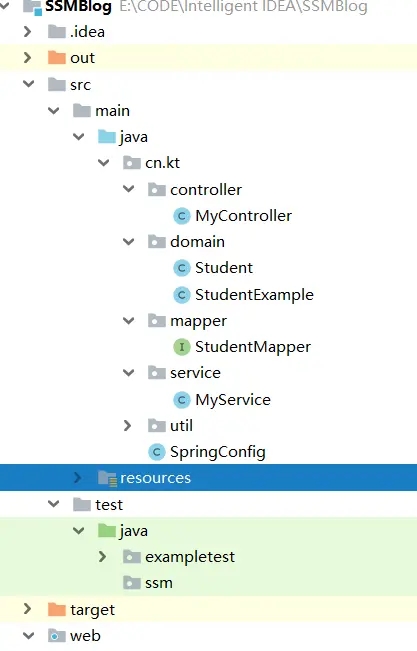
е·ҘзЁӢзӣ®еҪ•з»“жһ„еҰӮдёӢ
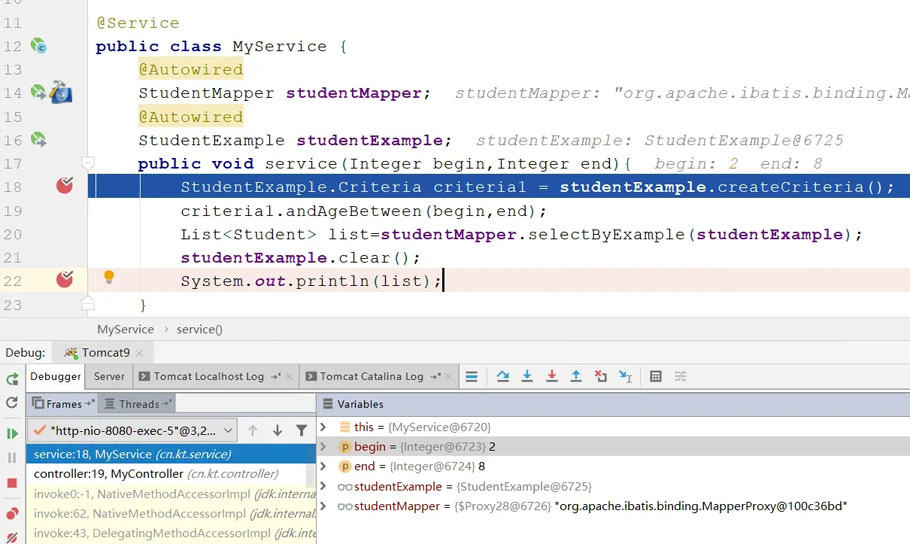
MyService зҡ„serviceпјҲпјүж–№жі•жҺҘ收дёӨдёӘеҸӮ数并жҚ®жӯӨжҹҘиҜўж•°жҚ®еә“
@Service
public class MyService {
 @Autowired
 StudentMapper studentMapper;
 @Autowired
 StudentExample studentExample;
 public void service(Integer begin,Integer end){
  StudentExample.Criteria criteria1 = studentExample.createCriteria();
  criteria1.andAgeBetween(begin,end);
  List<Student> list=studentMapper.selectByExample(studentExample);
  studentExample.clear();
  System.out.println(list);
 }
}еҪ“еҗҢж—¶жңүдёӨдёӘиҜ·жұӮж—¶пјҢдёӨдёӘиҜ·жұӮзҡ„StudentExampleзӣёеҗҢ
иҜ·жұӮ1еҰӮдёӢ
begin=2,end=8
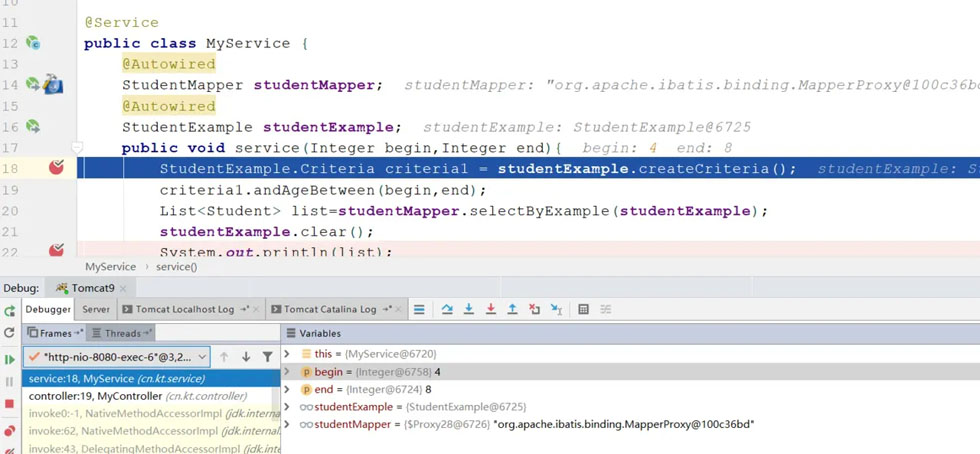
иҜ·жұӮ2еҰӮдёӢ
begin=4,end=8
е…Ҳж”ҫиЎҢиҜ·жұӮ1пјҢиҜ·жұӮ1жҲҗеҠҹж·»еҠ жқЎд»¶
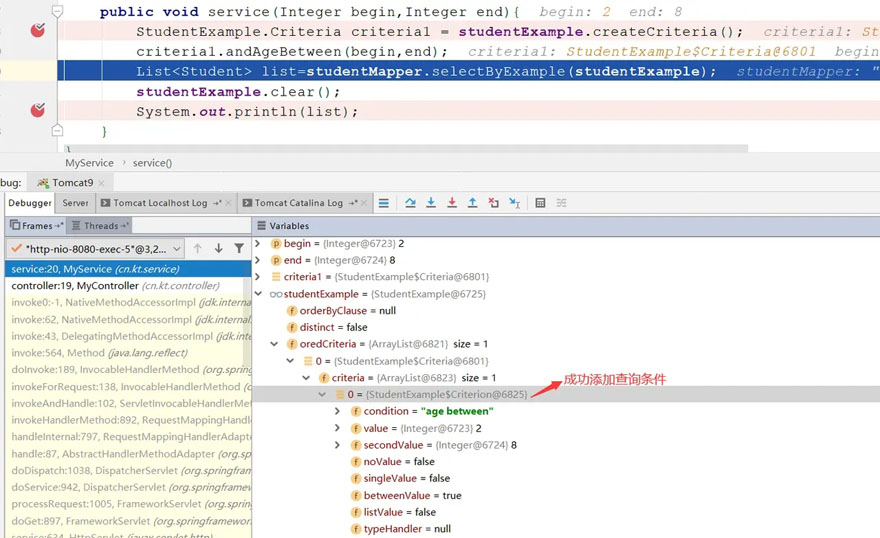
еҶҚж”ҫиЎҢиҜ·жұӮ2пјҢиҜ·жұӮ2ж·»еҠ еӨұиҙҘ
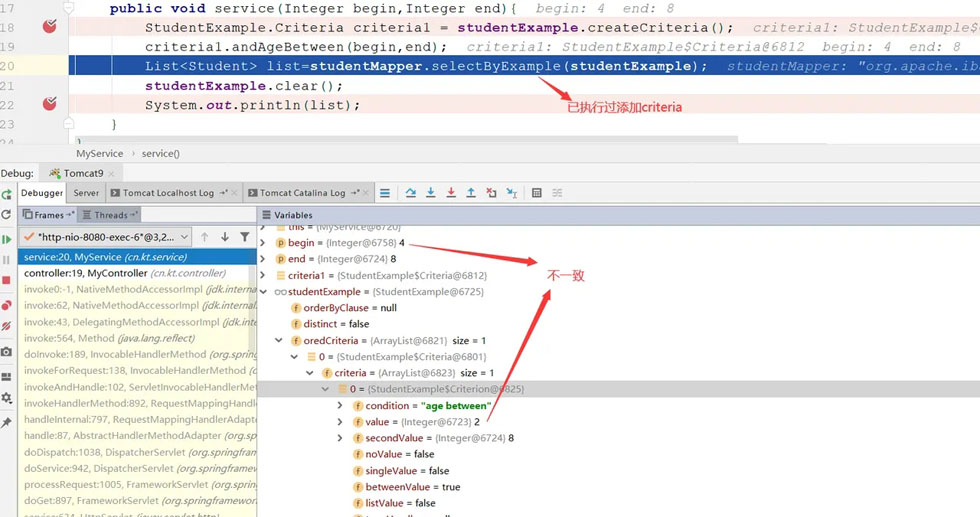
иҝҷж—¶еҰӮжһңиҜ·жұӮ2еңЁиҜ·жұӮ1жү§иЎҢжҹҘиҜўж“ҚдҪңеүҚе°ұе·Із»Ҹжү§иЎҢе®ҢstudentExample.clear (),иҜ·жұӮ1зҡ„жҹҘиҜўжқЎд»¶е°ұеӨұж•ҲдәҶ
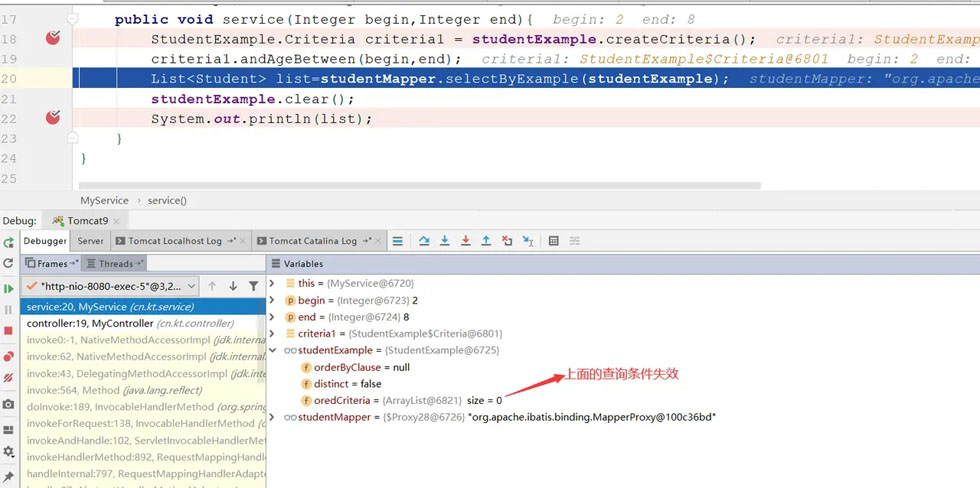
иҮіжӯӨдёӨдёӘиҜ·жұӮйғҪжІЎжңүеҫ—еҲ°жӯЈзЎ®зҡ„з»“жһңгҖӮ
и§ЈеҶіж–№жЎҲ
еҸҜд»ҘдҪҝз”ЁThreadLocalдёәжҜҸдёӘзәҝзЁӢй…ҚеӨҮеҚ•зӢ¬зҡ„ExampleпјҢдёәдҝқиҜҒжҜҸж¬ЎйғҪиғҪиҺ·еҸ–еҲ°еҖјпјҢиҝҷйҮҢеҜ№ThreadLocalз®ҖеҚ•жү©еұ•дёҖдёӢпјҢеҰӮжһңеҪ“еүҚзәҝзЁӢжІЎжңүеҜ№еә”зҡ„ExampleпјҲеӨҡдҫӢпјүпјҢе°ұд»Һspringе®№еҷЁдёӯиҺ·еҸ–дёҖдёӘ并дёҺиҝҷдёӘзәҝзЁӢз»‘е®ҡгҖӮ
ThreadLocalExtension
public class ThreadLocalExtension<T> extends ThreadLocal<T> {
//иҺ·еҸ–ApplicationContextж–№жі•и§ҒдёӢ
@Autowired
ApplicationContext applicationContext;
public ThreadLocalExtension(){
super();
}
public T get(Class<T> example){
T bean=super.get();
if(bean==null){
super.set((T) applicationContext.getBean(example));
}
return super.get();
}
}springжіӣеһӢдҫқиө–жіЁе…Ҙ
з”ұдәҺExampleдјҡжңүеҫҲеӨҡдёӘпјҢжүҖд»ҘиҝҷйҮҢдҪҝз”ЁдәҶжіӣеһӢпјҢspring4.0жҸҗдҫӣдәҶеҜ№жіӣеһӢдҫқиө–жіЁе…Ҙзҡ„ж”ҜжҢҒгҖӮ
йҰ–е…Ҳе®һйҷ…зұ»еһӢеҜ№еә”зҡ„ThreadLocalExtensionдәӨз”ұspringз®ЎзҗҶ
@Repository
public class StudentExampleThreadLocal extends ThreadLocalExtension<StudentExample> {
}然еҗҺзӣҙжҺҘеңЁд»Јз ҒдёӯжіЁе…Ҙ
@Autowired
ThreadLocalExtension<StudentExample> studentExampleThreadLocal;
дҝ®ж”№еҗҺзҡ„MyService
@Service
public class MyService {
  @Autowired
  StudentMapper studentMapper;
  @Autowired
  ThreadLocalExtension<StudentExample> studentExampleThreadLocal;
  public void service(Integer begin,Integer end){
    StudentExample studentExample = studentExampleThreadLocal.get(StudentExample.class);
    StudentExample.Criteria criteria1 = studentExample.createCriteria();
    criteria1.andAgeBetween(begin,end);
    List<Student> list=studentMapper.selectByExample(studentExample);
    studentExample.clear();
    System.out.println(list);
  }
}иҺ·еҸ–ApplicationContext
еҲӣе»әдёҖдёӘзұ»е®һзҺ°ApplicationContextAwareпјҢ并еҗ‘springе®№еҷЁдёӯжіЁе…ҘapplicationContext
@Component
public class ApplicationContextHelper implements ApplicationContextAware {
  private static ApplicationContext applicationContext;

  public ApplicationContextHelper() {
  }
  @Bean(name="applicationContext")
  public ApplicationContext getApplicationContext(){
    return applicationContext;
  }

  @Override
  public void setApplicationContext(ApplicationContext applicationContext) throws BeansException {
    ApplicationContextHelper.applicationContext = applicationContext;
  }

  public static Object getBean(String beanName) {
    return applicationContext != null?applicationContext.getBean(beanName):null;
  }
}з»“жһң
иҮіжӯӨпјҢж•ҙдёӘж”№йҖ е®ҢжҲҗпјҢзңӢзңӢж•Ҳжһң
иҜ·жұӮ1

иҜ·жұӮ2

жҜҸдёӘиҜ·жұӮиҺ·еҸ–еҲ°дәҶдёҚеҗҢзҡ„StudentExampleпјҢд№ҹе°ұдёҚеӯҳеңЁеҶІзӘҒзҡ„й—®йўҳпјҢ并且StudentExampleжІЎжңүеӨ§йҮҸзҡ„еҲӣе»әдёҺй”ҖжҜҒпјҢжңҖеӨҡеҸӘеҲӣе»әдәҶдёҺжңҚеҠЎеҷЁзәҝзЁӢжұ дёӯзәҝзЁӢзӣёеҗҢзҡ„дёӘж•°пјҢе®һзҺ°дәҶйҮҚеӨҚдҪҝз”Ё
ж„ҹи°ўдҪ иғҪеӨҹи®Өзңҹйҳ…иҜ»е®ҢиҝҷзҜҮж–Үз« пјҢеёҢжңӣе°Ҹзј–еҲҶдә«зҡ„вҖңMybatisеӨҡзәҝзЁӢдёӢдҪҝз”ЁExampleзҡ„зӨәдҫӢвҖқиҝҷзҜҮж–Үз« еҜ№еӨ§е®¶жңүеё®еҠ©пјҢеҗҢж—¶д№ҹеёҢжңӣеӨ§е®¶еӨҡеӨҡж”ҜжҢҒдәҝйҖҹдә‘пјҢе…іжіЁдәҝйҖҹдә‘иЎҢдёҡиө„и®Ҝйў‘йҒ“пјҢжӣҙеӨҡзӣёе…ізҹҘиҜҶзӯүзқҖдҪ жқҘеӯҰд№ !
е…ҚиҙЈеЈ°жҳҺпјҡжң¬з«ҷеҸ‘еёғзҡ„еҶ…е®№пјҲеӣҫзүҮгҖҒи§Ҷйў‘е’Ңж–Үеӯ—пјүд»ҘеҺҹеҲӣгҖҒиҪ¬иҪҪе’ҢеҲҶдә«дёәдё»пјҢж–Үз« и§ӮзӮ№дёҚд»ЈиЎЁжң¬зҪ‘з«ҷз«ӢеңәпјҢеҰӮжһңж¶үеҸҠдҫөжқғиҜ·иҒ”зі»з«ҷй•ҝйӮ®з®ұпјҡis@yisu.comиҝӣиЎҢдёҫжҠҘпјҢ并жҸҗдҫӣзӣёе…іиҜҒжҚ®пјҢдёҖз»ҸжҹҘе®һпјҢе°Ҷз«ӢеҲ»еҲ йҷӨж¶үе«ҢдҫөжқғеҶ…е®№гҖӮ
жӮЁеҘҪпјҢзҷ»еҪ•еҗҺжүҚиғҪдёӢи®ўеҚ•е“ҰпјҒ