您好,登录后才能下订单哦!
密码登录
登录注册
点击 登录注册 即表示同意《亿速云用户服务条款》
这篇文章给大家介绍怎么在iOS中使用CoreImage实现一个人脸识别功能,内容非常详细,感兴趣的小伙伴们可以参考借鉴,希望对大家能有所帮助。
前言
CoreImage是Cocoa Touch中一个强大的API,也是iOS SDK中的关键部分,不过它经常被忽视。在本篇教程中,我会带大家一起验证CoreImage的人脸识别特性。在开始之前,我们先要简单了解下CoreImage framework 组成
CoreImage framework组成
Apple 已经帮我们把image的处理分类好,来看看它的结构:
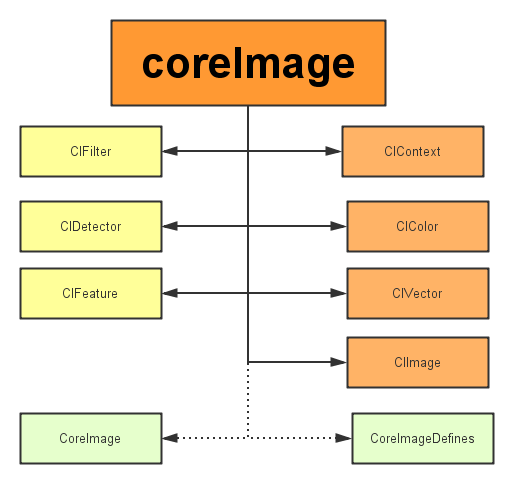
主要分为三个部分:
1、定义部分:CoreImage 和CoreImageDefines。见名思义,代表了CoreImage 这个框架和它的定义。
2、操作部分:
滤镜(CIFliter):CIFilter 产生一个CIImage。典型的,接受一到多的图片作为输入,经过一些过滤操作,产生指定输出的图片。
检测(CIDetector):CIDetector 检测处理图片的特性,如使用来检测图片中人脸的眼睛、嘴巴、等等。
特征(CIFeature):CIFeature 代表由 detector处理后产生的特征。
3、图像部分:
画布(CIContext):画布类可被用与处理Quartz 2D 或者 OpenGL。可以用它来关联CoreImage类。如滤镜、颜色等渲染处理。
颜色(CIColor): 图片的关联与画布、图片像素颜色的处理。
向量(CIVector): 图片的坐标向量等几何方法处理。
图片(CIImage): 代表一个图像,可代表关联后输出的图像。
在了解上述基本知识后,我们开始通过创建一个工程来带大家一步步验证Core Image的人脸识别特性。
将要构建的应用
iOS的人脸识别从iOS 5(2011)就有了,不过一直没怎么被关注过。人脸识别API允许开发者不仅可以检测人脸,也可以检测到面部的一些特殊属性,比如说微笑或眨眼。
首先,为了了解Core Image的人脸识别技术我们会创建一个app来识别照片中的人脸并用一个方框来标记它。在第二个demo中,让用户拍摄一张照片,检测其中的人脸并检索人脸位置。这样一来,就充分掌握了iOS中的人脸识别,并且学会如何利用这个强大却总被忽略的API。
话不多说,开搞!
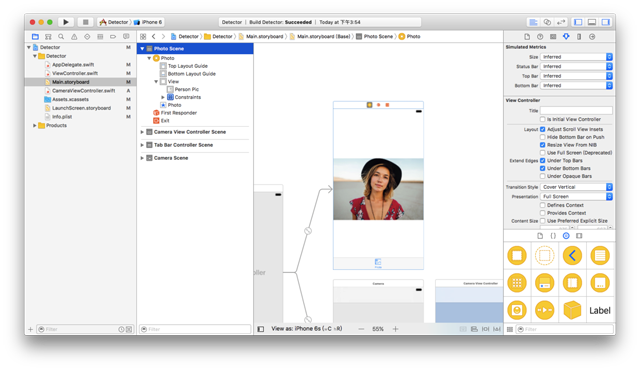
建立工程(我用的是Xcode8.0)
这里提供了初始工程,当然你也可以自己创建(主要是为了方便大家)点我下载 用Xcode打开下载后的工程,可以看到里面只有一个关联了IBOutlet和imageView的StoryBoard。
使用CoreImage识别人脸
在开始工程中,故事板中的imageView组件与代码中的IBOutlet已关联,接下来要编写实现人脸识别的代码部分。在ViewController.swift文件中写下如下代码:
import UIKit
import CoreImage // 引入CoreImage
class ViewController: UIViewController {
 @IBOutlet weak var personPic: UIImageView!

 override func viewDidLoad() {
 super.viewDidLoad()

 personPic.image = UIImage(named: "face-1")
 // 调用detect
 detect()

 }
 //MARK: - 识别面部
 func detect() {
 // 创建personciImage变量保存从故事板中的UIImageView提取图像并将其转换为CIImage,使用Core Image时需要用CIImage
 guard let personciImage = CIImage(image: personPic.image!) else {
  return
 }
 // 创建accuracy变量并设为CIDetectorAccuracyHigh,可以在CIDetectorAccuracyHigh(较强的处理能力)与CIDetectorAccuracyLow(较弱的处理能力)中选择,因为想让准确度高一些在这里选择CIDetectorAccuracyHigh
 let accuracy = [CIDetectorAccuracy: CIDetectorAccuracyHigh]
 // 这里定义了一个属于CIDetector类的faceDetector变量,并输入之前创建的accuracy变量
 let faceDetector = CIDetector(ofType: CIDetectorTypeFace, context: nil, options: accuracy)
 // 调用faceDetector的featuresInImage方法,识别器会找到所给图像中的人脸,最后返回一个人脸数组
 let faces = faceDetector?.features(in: personciImage)
 // 循环faces数组里的所有face,并将识别到的人脸强转为CIFaceFeature类型
 for face in faces as! [CIFaceFeature] {

  print("Found bounds are \(face.bounds)")
  // 创建名为faceBox的UIView,frame设为返回的faces.first的frame,绘制一个矩形框来标识识别到的人脸
  let faceBox = UIView(frame: face.bounds)
  // 设置faceBox的边框宽度为3
  faceBox.layer.borderWidth = 3
  // 设置边框颜色为红色
  faceBox.layer.borderColor = UIColor.red.cgColor
  // 将背景色设为clear,意味着这个视图没有可见的背景
  faceBox.backgroundColor = UIColor.clear
  // 最后,把这个视图添加到personPic imageView上
  personPic.addSubview(faceBox)
  // API不仅可以帮助你识别人脸,也可识别脸上的左右眼,我们不在图像中标识出眼睛,只是给你展示一下CIFaceFeature的相关属性
  if face.hasLeftEyePosition {
  print("Left eye bounds are \(face.leftEyePosition)")
  }

  if face.hasRightEyePosition {
  print("Right eye bounds are \(face.rightEyePosition)")
  }
 }
 }
}
编译并运行app,结果应如下图所示:
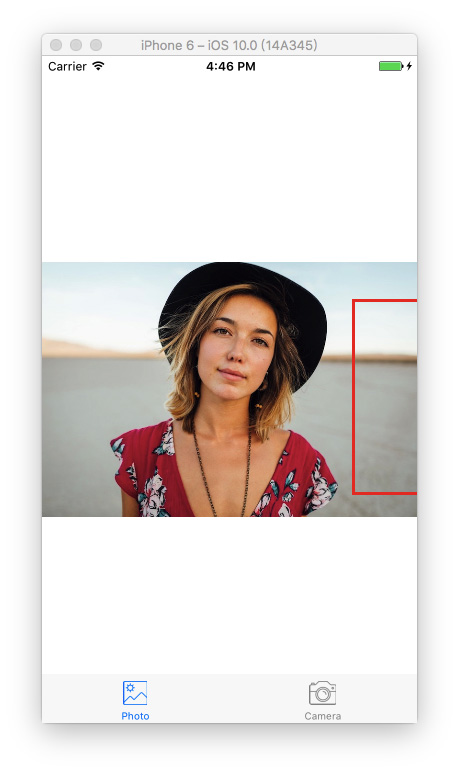
根据控制台的输出来看,貌似识别器识别到了人脸:
Found bounds are (314.0, 243.0, 196.0, 196.0)
当前的实现中没有解决的问题:
人脸识别是在原始图像上进行的,由于原始图像的分辨率比image view要高,因此需要设置image view的content mode为aspect fit(保持纵横比的情况下缩放图片)。为了合适的绘制矩形框,需要计算image view中人脸的实际位置与尺寸
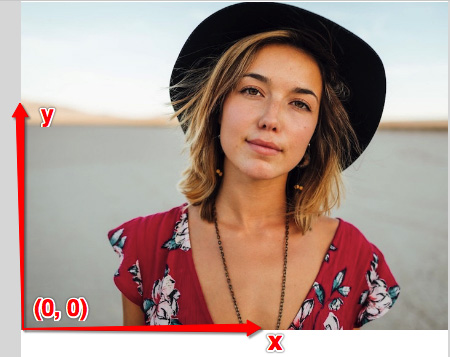
还要注意的是,CoreImage与UIView使用两种不同的坐标系统(看下图),因此要实现一个CoreImage坐标到UIView坐标的转换。
UIView坐标系:
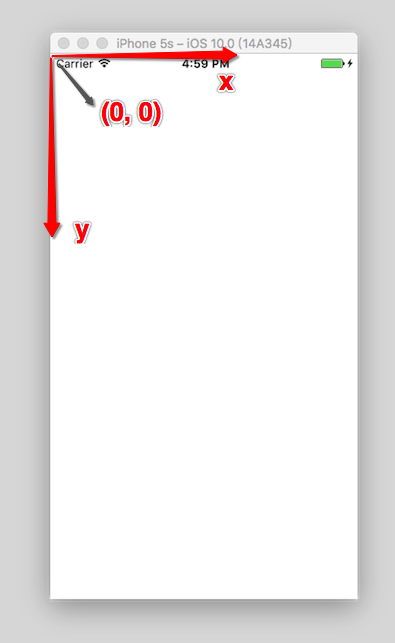
CoreImage坐标系:
现在使用下面的代码替换detect()方法:
func detect1() {

 guard let personciImage = CIImage(image: personPic.image!) else { return }
 let accuracy = [CIDetectorAccuracy: CIDetectorAccuracyHigh]
 let faceDetector = CIDetector(ofType: CIDetectorTypeFace, context: nil, options: accuracy)
 let faces = faceDetector?.features(in: personciImage)

 // 转换坐标系
 let ciImageSize = personciImage.extent.size
 var transform = CGAffineTransform(scaleX: 1, y: -1)
 transform = transform.translatedBy(x: 0, y: -ciImageSize.height)

 for face in faces as! [CIFaceFeature] {
 print("Found bounds are \(face.bounds)")
 // 应用变换转换坐标
 var faceViewBounds = face.bounds.applying(transform)
 // 在图像视图中计算矩形的实际位置和大小
 let viewSize = personPic.bounds.size
 let scale = min(viewSize.width / ciImageSize.width, viewSize.height / ciImageSize.height)
 let offsetX = (viewSize.width - ciImageSize.width * scale) / 2
 let offsetY = (viewSize.height - ciImageSize.height * scale) / 2

 faceViewBounds = faceViewBounds.applying(CGAffineTransform(scaleX: scale, y: scale))
 faceViewBounds.origin.x += offsetX
 faceViewBounds.origin.y += offsetY

 let faceBox = UIView(frame: faceViewBounds)
 faceBox.layer.borderWidth = 3
 faceBox.layer.borderColor = UIColor.red.cgColor
 faceBox.backgroundColor = UIColor.clear
 personPic.addSubview(faceBox)

 if face.hasLeftEyePosition {
  print("Left eye bounds are \(face.leftEyePosition)")
 }

 if face.hasRightEyePosition {
  print("Right eye bounds are \(face.rightEyePosition)")
 }
 }
}
上述代码中,首先使用仿射变换(AffineTransform)将Core Image坐标转换为UIKit坐标,然后编写了计算实际位置与矩形视图尺寸的代码。
再次运行app,应该会看到人的面部周围会有一个框。OK,你已经成功使用Core Image识别出了人脸。
但是有的童鞋在使用了上面的代码运行后可能会出现方框不存在(即没有识别人脸)这种情况,这是由于忘记关闭Auto Layout以及Size Classes了。 选中storyBoard中的ViewController,选中view下的imageView。然后在右边的面板中的第一个选项卡中找到use Auto Layout ,将前面的✔️去掉就可以了
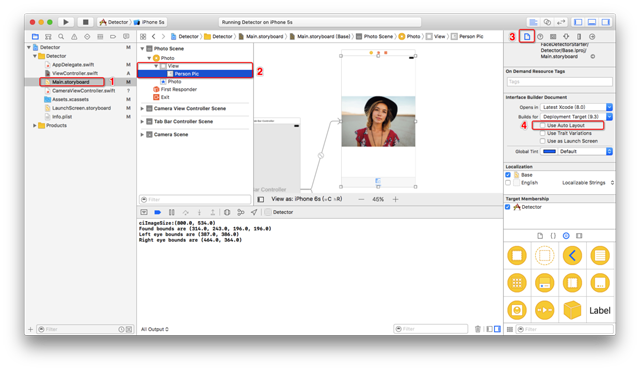
经过上面的设置后我们再次运行App,就会看到图三出现的效果了。
构建一个人脸识别的相机应用
想象一下你有一个用来照相的相机app,照完相后你想运行一下人脸识别来检测一下是否存在人脸。若存在一些人脸,你也许想用一些标签来对这些照片进行分类。我们不会构建一个保存照片后再处理的app,而是一个实时的相机app,因此需要整合一下UIImagePicker类,在照完相时立刻进行人脸识别。
在开始工程中已经创建好了CameraViewController类,使用如下代码实现相机的功能:
class CameraViewController: UIViewController, UIImagePickerControllerDelegate, UINavigationControllerDelegate {
 @IBOutlet var imageView: UIImageView!
 let imagePicker = UIImagePickerController()

 override func viewDidLoad() {
  super.viewDidLoad()
  imagePicker.delegate = self
 }

 @IBAction func takePhoto(_ sender: AnyObject) {

  if !UIImagePickerController.isSourceTypeAvailable(.camera) {
   return
  }

  imagePicker.allowsEditing = false
  imagePicker.sourceType = .camera

  present(imagePicker, animated: true, completion: nil)
 }

 func imagePickerController(_ picker: UIImagePickerController, didFinishPickingMediaWithInfo info: [String : Any]) {

  if let pickedImage = info[UIImagePickerControllerOriginalImage] as? UIImage {
   imageView.contentMode = .scaleAspectFit
   imageView.image = pickedImage
  }

  dismiss(animated: true, completion: nil)
  self.detect()
 }

 func imagePickerControllerDidCancel(_ picker: UIImagePickerController) {
  dismiss(animated: true, completion: nil)
 }
}
前面几行设置UIImagePicker委托为当前视图类,在didFinishPickingMediaWithInfo方法(UIImagePicker的委托方法)中设置imageView为在方法中所选择的图像,接着返回上一视图调用detect函数。
还没有实现detect函数,插入下面代码并分析一下:
func detect() {
let imageOptions = NSDictionary(object: NSNumber(value: 5) as NSNumber, forKey: CIDetectorImageOrientation as NSString)
let personciImage = CIImage(cgImage: imageView.image!.cgImage!)
let accuracy = [CIDetectorAccuracy: CIDetectorAccuracyHigh]
let faceDetector = CIDetector(ofType: CIDetectorTypeFace, context: nil, options: accuracy)
let faces = faceDetector?.features(in: personciImage, options: imageOptions as? [String : AnyObject])
if let face = faces?.first as? CIFaceFeature {
print("found bounds are \(face.bounds)")
let alert = UIAlertController(title: "提示", message: "检测到了人脸", preferredStyle: UIAlertControllerStyle.alert)
alert.addAction(UIAlertAction(title: "确定", style: UIAlertActionStyle.default, handler: nil))
self.present(alert, animated: true, completion: nil)
if face.hasSmile {
print("face is smiling");
}
if face.hasLeftEyePosition {
print("左眼的位置: \(face.leftEyePosition)")
}
if face.hasRightEyePosition {
print("右眼的位置: \(face.rightEyePosition)")
}
} else {
let alert = UIAlertController(title: "提示", message: "未检测到人脸", preferredStyle: UIAlertControllerStyle.alert)
alert.addAction(UIAlertAction(title: "确定", style: UIAlertActionStyle.default, handler: nil))
self.present(alert, animated: true, completion: nil)
}
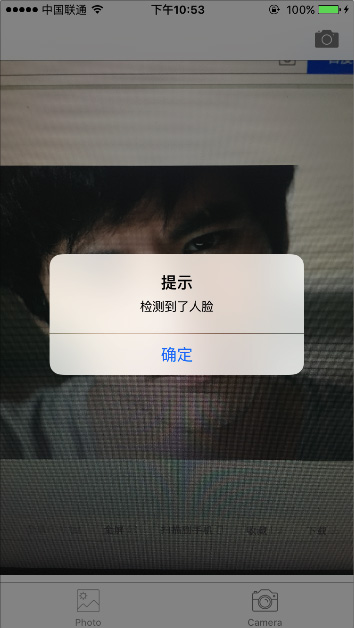
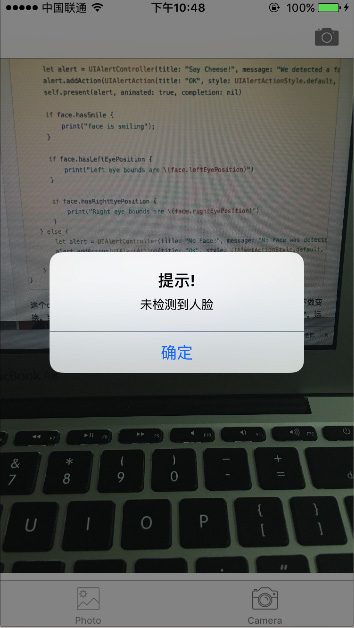
}这个detect()函数与之前实现的detect函数非常像,不过这次只用它来获取图像不做变换。当识别到人脸后显示一个警告信息“检测到了人脸!”,否则显示“未检测到人脸”。运行app测试一下:
我们已经使用到了一些CIFaceFeature的属性与方法,比如,若想检测人物是否微笑,可以调用.hasSmile,它会返回一个布尔值。可以分别使用.hasLeftEyePosition与.hasRightEyePosition检测是否存在左右眼。
同样,可以调用hasMouthPosition来检测是否存在嘴,若存在则可以使用mouthPosition属性,如下所示:
if (face.hasMouthPosition) {
 print("mouth detected")
}
如你所见,使用Core Image来检测面部特征是非常简单的。除了检测嘴、笑容、眼睛外,也可以调用leftEyeClosed与rightEyeClosed检测左右眼是否睁开,这里就不在贴出代码了。
关于怎么在iOS中使用CoreImage实现一个人脸识别功能就分享到这里了,希望以上内容可以对大家有一定的帮助,可以学到更多知识。如果觉得文章不错,可以把它分享出去让更多的人看到。
免责声明:本站发布的内容(图片、视频和文字)以原创、转载和分享为主,文章观点不代表本网站立场,如果涉及侵权请联系站长邮箱:is@yisu.com进行举报,并提供相关证据,一经查实,将立刻删除涉嫌侵权内容。