您好,登录后才能下订单哦!
密码登录
登录注册
点击 登录注册 即表示同意《亿速云用户服务条款》
本篇写的是实现环形进度条,并带动画效果,要实现这些,仅能通过自己画一个
方法直接看代码
为了方便多次调用,用继承UIView的方式
.m文件
#import <UIKit/UIKit.h>

@interface LoopProgressView : UIView

@property (nonatomic, assign) CGFloat progress;


@end
.h文件
NSTimer的调用并非精确,可以自行百度
这里因为每0.01s启动一次定时器,所以要同步进度条和数字,就将self.progress赋值给动画的duration属性就可以了,duration为动画时间。
在使用时我发现如果在tableviewcell中添加了这个环形进度条时有个缺点,就是定时器原本用的是系统的runloop,导致数据显示滞后,所以现更新为子线程里添加定时器,子线程的定时器必须添加[[NSRunLoop currentRunLoop] run];才可启动定时器,因为子线程的runloop里是不带nstimer的,要手动添加运行。
#import "LoopProgressView.h"
#import <QuartzCore/QuartzCore.h>

#define ViewWidth self.frame.size.width //环形进度条的视图宽度
#define ProgressWidth 2.5   //环形进度条的圆环宽度
#define Radius ViewWidth/2-ProgressWidth //环形进度条的半径

@interface LoopProgressView()
{
 CAShapeLayer *arcLayer;
 UILabel *label;
 NSTimer *progressTimer;
}
@property (nonatomic,assign)CGFloat i;

@end

@implementation LoopProgressView

-(id)initWithFrame:(CGRect)frame
{
 self = [super initWithFrame:frame];
 if (self) {
 self.backgroundColor = [UIColor clearColor];
 }
 return self;
}

-(void)drawRect:(CGRect)rect
{
 _i=0;
 CGContextRef progressContext = UIGraphicsGetCurrentContext();
 CGContextSetLineWidth(progressContext, ProgressWidth);
 CGContextSetRGBStrokeColor(progressContext, 209.0/255.0, 209.0/255.0, 209.0/255.0, 1);

 CGFloat xCenter = rect.size.width * 0.5;
 CGFloat yCenter = rect.size.height * 0.5;

 //绘制环形进度条底框
 CGContextAddArc(progressContext, xCenter, yCenter, Radius, 0, 2*M_PI, 0);
 CGContextDrawPath(progressContext, kCGPathStroke);

 // //绘制环形进度环
 CGFloat to = self.progress * M_PI * 2; // - M_PI * 0.5为改变初始位置

 // 进度数字字号,可自己根据自己需要,从视图大小去适配字体字号
 int fontNum = ViewWidth/6;
 49 label = [[UILabel alloc]initWithFrame:CGRectMake(0, 0,Radius+10, ViewWidth/6)];
 label.center = CGPointMake(xCenter, yCenter);
 label.textAlignment = NSTextAlignmentCenter;
 label.font = [UIFont boldSystemFontOfSize:fontNum];
 label.text = @"0%";
 [self addSubview:label];

 UIBezierPath *path=[UIBezierPath bezierPath];
 [path addArcWithCenter:CGPointMake(xCenter,yCenter) radius:Radius startAngle:0 endAngle:to clockwise:YES];
 arcLayer=[CAShapeLayer layer];
 arcLayer.path=path.CGPath;//46,169,230
 arcLayer.fillColor = [UIColor clearColor].CGColor;
 arcLayer.strokeColor=[UIColor colorWithRed:227.0/255.0 green:91.0/255.0 blue:90.0/255.0 alpha:0.7].CGColor;
 arcLayer.lineWidth=ProgressWidth;
 arcLayer.backgroundColor = [UIColor blueColor].CGColor;
 [self.layer addSublayer:arcLayer];


 dispatch_async(dispatch_get_global_queue(0, 0), ^{
 [self drawLineAnimation:arcLayer];
 });

 if (self.progress > 1) {
 NSLog(@"传入数值范围为 0-1");
 self.progress = 1;
 }else if (self.progress < 0){
 NSLog(@"传入数值范围为 0-1");
 self.progress = 0;
 return;
 }

 if (self.progress > 0) {
 NSThread *thread = [[NSThread alloc]initWithTarget:self selector:@selector(newThread) object:nil];
 [thread start];
 }

}

-(void)newThread
{
 @autoreleasepool {
 progressTimer = [NSTimer scheduledTimerWithTimeInterval:0.01 target:self selector:@selector(timeLabel) userInfo:nil repeats:YES];
 [[NSRunLoop currentRunLoop] run];
 }
}

//NSTimer不会精准调用
-(void)timeLabel
{
 _i += 0.01;
 label.text = [NSString stringWithFormat:@"%.0f%%",_i*100];

 if (_i >= self.progress) {
 [progressTimer invalidate];
 progressTimer = nil;

 }

}

//定义动画过程
-(void)drawLineAnimation:(CALayer*)layer
{
 CABasicAnimation *bas=[CABasicAnimation animationWithKeyPath:@"strokeEnd"];
 bas.duration=self.progress;//动画时间
 bas.delegate=self;
 bas.fromValue=[NSNumber numberWithInteger:0];
 bas.toValue=[NSNumber numberWithInteger:1];
 [layer addAnimation:bas forKey:@"key"];
}
@end
完成后在要调用的控制器里,仅需几段代码:传进的参数:为0-1
 LoopProgressView *custom = [[LoopProgressView alloc]initWithFrame:CGRectMake(50, 100, 100, 100)];
 custom.progress = 0.44;
 [self.view addSubview:custom];
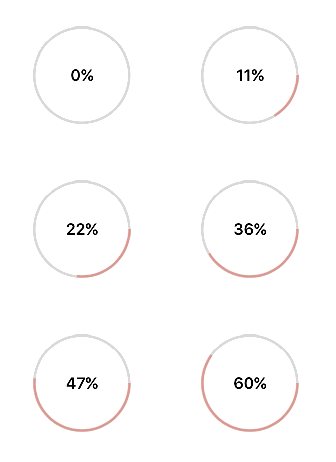
实现:
已经实现进度条和数字的同步:

以上就是本文的全部内容,希望对大家的学习有所帮助,也希望大家多多支持亿速云。
免责声明:本站发布的内容(图片、视频和文字)以原创、转载和分享为主,文章观点不代表本网站立场,如果涉及侵权请联系站长邮箱:is@yisu.com进行举报,并提供相关证据,一经查实,将立刻删除涉嫌侵权内容。