您好,登录后才能下订单哦!
密码登录
登录注册
点击 登录注册 即表示同意《亿速云用户服务条款》
在上篇文章,我们介绍了Get方法的设计过程和测试结果,现在我们需要对前面代码进行重构和修改,本篇需要完成以下目标。
1.重构Get方法
在前面文章,说过,之前写的Get方法比较繁琐,不光写了如何进行Get请求,还写了获取http响应状态码和JSON转换。现在我们需要抽取出来,设计Get请求方法,就只干一件事情,那就是如何发送get请求,其他的不要管。
我们知道,请求之后会返回一个HTTP的响应对象,所以,我们把get方法的返回值类型改成了响应对象,并带上返回语句,重构代码之后,get方法代码如下。
package com.qa.restclient;
import java.io.IOException;
import org.apache.http.client.ClientProtocolException;
import org.apache.http.client.methods.CloseableHttpResponse;
import org.apache.http.client.methods.HttpGet;
import org.apache.http.impl.client.CloseableHttpClient;
import org.apache.http.impl.client.HttpClients;
public class RestClient {
 //1. Get 请求方法
 public CloseableHttpResponse get(String url) throwsClientProtocolException, IOException {
  //创建一个可关闭的HttpClient对象
  CloseableHttpClienthttpclient = HttpClients.createDefault();
  //创建一个HttpGet的请求对象
  HttpGethttpget = newHttpGet(url);
  //执行请求,相当于postman上点击发送按钮,然后赋值给HttpResponse对象接收
  CloseableHttpResponsehttpResponse = httpclient.execute(httpget);
  return httpResponse;
 }
}
由于我们不想在代码里写死例如像HTTP响应状态码200这样的硬编码,所以,这里我们在TestBase.java里把状态码给用常量写出来,方便每一个TestNG测试用例去调用去断言。
package com.qa.base;
import java.io.FileInputStream;
import java.io.FileNotFoundException;
import java.io.IOException;
import java.util.Properties;
public class TestBase {
   public Properties prop;
   public int RESPNSE_STATUS_CODE_200 = 200;
   public int RESPNSE_STATUS_CODE_201 = 201;
   public int RESPNSE_STATUS_CODE_404 = 404;
   public int RESPNSE_STATUS_CODE_500 = 500;
   //写一个构造函数
   public TestBase() {
     try{
       prop= new Properties();
       FileInputStreamfis = new FileInputStream(System.getProperty("user.dir")+
"/src/main/java/com/qa/config/config.properties");
       prop.load(fis);
     }catch (FileNotFoundException e) {
       e.printStackTrace();
     }catch (IOException e) {
       e.printStackTrace();
     }
   }
}
现在我们的测试类代码修改之后如下。
package com.qa.tests;
import java.io.IOException;
importorg.apache.http.client.ClientProtocolException;
importorg.apache.http.client.methods.CloseableHttpResponse;
import org.testng.Assert;
import org.testng.annotations.BeforeClass;
import org.testng.annotations.Test;
import com.qa.base.TestBase;
import com.qa.restclient.RestClient;
public class GetApiTest extends TestBase{
   TestBase testBase;
   String host;
   String url;
   RestClient restClient;
   CloseableHttpResponse closeableHttpResponse;
   @BeforeClass
   public void setUp() {
    testBase = new TestBase();
    host = prop.getProperty("HOST");
    url = host + "/api/users";
   }
   @Test
   public void getAPITest() throws ClientProtocolException, IOException {
     restClient = new RestClient();
     closeableHttpResponse= restClient.get(url);
     //断言状态码是不是200
     int statusCode = closeableHttpResponse.getStatusLine().getStatusCode();
     Assert.assertEquals(statusCode,RESPNSE_STATUS_CODE_200, "response status code is not 200");
   }
}
测试运行通过,没毛病。
2.写一个JSON解析的工具类
在上面部分,我们只是写了执行Get请求和状态码是否200的断言。接下来,我们需要写有一个JSON解析工具类,这样就方便我们去json内容的断言。
下面这个JSON数据截图
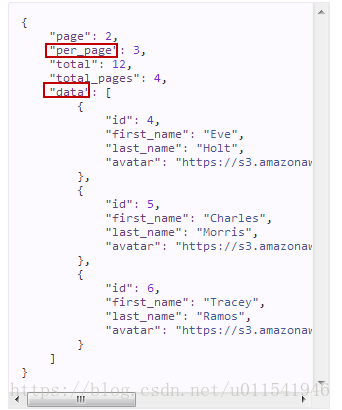
上面是一个标准的json的响应内容截图,第一个红圈”per_page”是一个json对象,我们可以根据”per_page”来找到对应值是3,而第二个红圈“data”是一个JSON数组,而不是对象,不能直接去拿到里面值,需要遍历数组。
下面,我们写一个JSON解析的工具方法类,如果是像第一个红圈的JSON对象,我们直接返回对应的值,如果是需要解析类似data数组里面的json对象的值,这里我们构造方法默认解析数组第一个元素的内容。
在src/main/java下新建一个包:com.qa.util,然后在新包下创建一个TestUtil.java类。
package com.qa.util;
import com.alibaba.fastjson.JSONArray;
import com.alibaba.fastjson.JSONObject;
public class TestUtil {
 /**
 *
 * @param responseJson ,这个变量是拿到响应字符串通过json转换成json对象
 * @param jpath,这个jpath指的是用户想要查询json对象的值的路径写法
 * jpath写法举例:1) per_page 2)data[1]/first_name ,data是一个json数组,[1]表示索引
 * /first_name 表示data数组下某一个元素下的json对象的名称为first_name
 * @return,返回first_name这个json对象名称对应的值
 */
 //1 json解析方法
 public static String getValueByJPath(JSONObject responseJson, String jpath){
  Objectobj = responseJson;
  for(String s : jpath.split("/")) {
  if(!s.isEmpty()) {
   if(!(s.contains("[") || s.contains("]"))) {
    obj = ((JSONObject) obj).get(s);
   }else if(s.contains("[") || s.contains("]")) {
    obj =((JSONArray)((JSONObject)obj).get(s.split("\\[")[0])).get(Integer.parseInt(s.split("\\[")[1].replaceAll("]", "")));
   }
  }
  }
  return obj.toString();
 }
}
简单解释下上面的代码,主要是查询两种json对象的的值,第一种最简单的,这个json对象在整个json串的第一层,例如上面截图中的per_page,这个per_page就是通过jpath这个参数传入,返回的结果就是3. 第二种jpath的查询,例如我想查询data下第一个用户信息里面的first_name的值,这个时候jpath的写法就是data[0]/first_name,查询结果应该是Eve。
3.TestNG测试用例
下面,我们TestNG测试用例代码如下
package com.qa.tests;
import java.io.IOException;
import org.apache.http.client.ClientProtocolException;
import org.apache.http.client.methods.CloseableHttpResponse;
import org.apache.http.util.EntityUtils;
import org.testng.Assert;
import org.testng.annotations.BeforeClass;
import org.testng.annotations.Test;
import com.alibaba.fastjson.JSON;
import com.alibaba.fastjson.JSONObject;
import com.qa.base.TestBase;
import com.qa.restclient.RestClient;
import com.qa.util.TestUtil;
public class GetApiTest extends TestBase{
	TestBase testBase;
	String host;
	String url;
	RestClient restClient;
	CloseableHttpResponse closeableHttpResponse;
	@BeforeClass
	public void setUp() {
		testBase = new TestBase();
		host = prop.getProperty("HOST");
		url = host + "/api/users?page=2";
	}
	@Test
	public void getAPITest() throws ClientProtocolException, IOException {
		restClient = new RestClient();
		closeableHttpResponse = restClient.get(url);
		//断言状态码是不是200
		int statusCode = closeableHttpResponse.getStatusLine().getStatusCode();
		Assert.assertEquals(statusCode, RESPNSE_STATUS_CODE_200, "response status code is not 200");
		//把响应内容存储在字符串对象
  String responseString = EntityUtils.toString(closeableHttpResponse.getEntity(),"UTF-8");
  //创建Json对象,把上面字符串序列化成Json对象
  JSONObject responseJson = JSON.parseObject(responseString);
  //System.out.println("respon json from API-->" + responseJson);
  //json内容解析
  String s = TestUtil.getValueByJPath(responseJson,"data[0]/first_name");
  System.out.println(s);
	}
}
运行测试结果:
[RemoteTestNG] detected TestNGversion 6.14.3

Eve

PASSED: getAPITest
你还可以多写几个jpath来测试这个json解析工具类。
String s = TestUtil.getValueByJPath(responseJson,"data[1]/id");
String s = TestUtil.getValueByJPath(responseJson,"per_page");
4.TestNG自带的测试断言方法
这里简单提一下TestNG的断言方法,我们一般测试都需要写断言的代码,否则这样的单元测试代码就没有意义。下面,我在statusCode和json解析的first_name进行断言。
package com.qa.tests;
import java.io.IOException;
import org.apache.http.client.ClientProtocolException;
import org.apache.http.client.methods.CloseableHttpResponse;
import org.apache.http.util.EntityUtils;
import org.testng.Assert;
import org.testng.annotations.BeforeClass;
import org.testng.annotations.Test;
import com.alibaba.fastjson.JSON;
import com.alibaba.fastjson.JSONObject;
import com.qa.base.TestBase;
import com.qa.restclient.RestClient;
import com.qa.util.TestUtil;
public class GetApiTest extends TestBase{
	TestBase testBase;
	String host;
	String url;
	RestClient restClient;
	CloseableHttpResponse closeableHttpResponse;
	@BeforeClass
	public void setUp() {
		testBase = new TestBase();
		host = prop.getProperty("HOST");
		url = host + "/api/users?page=2";
	}
	@Test
	public void getAPITest() throws ClientProtocolException, IOException {
		restClient = new RestClient();
		closeableHttpResponse = restClient.get(url);
		//断言状态码是不是200
		int statusCode = closeableHttpResponse.getStatusLine().getStatusCode();
		Assert.assertEquals(statusCode, RESPNSE_STATUS_CODE_200, "response status code is not 200");
		//把响应内容存储在字符串对象
  String responseString = EntityUtils.toString(closeableHttpResponse.getEntity(),"UTF-8");
  //创建Json对象,把上面字符串序列化成Json对象
  JSONObject responseJson = JSON.parseObject(responseString);
  //System.out.println("respon json from API-->" + responseJson);
  //json内容解析
  String s = TestUtil.getValueByJPath(responseJson,"data[0]/first_name");
  System.out.println(s);
  Assert.assertEquals(s, "Eve","first name is not Eve");
	}
}
经常使用的测试断言:
Assert.assertEquals(“现实结果”, "期待结果","断言失败时候打印日志消息");
以上就是本文的全部内容,希望对大家的学习有所帮助,也希望大家多多支持亿速云。
免责声明:本站发布的内容(图片、视频和文字)以原创、转载和分享为主,文章观点不代表本网站立场,如果涉及侵权请联系站长邮箱:is@yisu.com进行举报,并提供相关证据,一经查实,将立刻删除涉嫌侵权内容。