您好,登录后才能下订单哦!
密码登录
登录注册
点击 登录注册 即表示同意《亿速云用户服务条款》
这篇文章将为大家详细讲解有关springboot和redis实现单点登录的方法,小编觉得挺实用的,因此分享给大家做个参考,希望大家阅读完这篇文章后可以有所收获。
1、具体的加密和解密方法
package com.example.demo.util;

import com.google.common.base.Strings;
import sun.misc.BASE64Decoder;
import sun.misc.BASE64Encoder;

import javax.crypto.Cipher;
import javax.crypto.KeyGenerator;
import javax.crypto.spec.SecretKeySpec;
import java.security.SecureRandom;

/**
 * Create by zhuenbang on 2018/12/3 11:27
 */
public class AESUtil {
 private static final String defaultKey = "7bf72345-6266-4381-a4d3-988754c5f9d1";
 /**
 * @Description: 加密
 * @Param:
 * @returns: java.lang.String
 * @Author: zhuenbang
 * @Date: 2018/12/3 11:33
 */
 public static String encryptByDefaultKey(String content) throws Exception {
 return encrypt(content, defaultKey);
 }


 /**
 * @Description: 解密
 * @Param:
 * @returns: java.lang.String
 * @Author: zhuenbang
 * @Date: 2018/12/3 11:30
 */
 public static String decryptByDefaultKey(String encryptStr) throws Exception {
 return decrypt(encryptStr, defaultKey);
 }

 /**
 * AES加密为base 64 code
 *
 * @param content 待加密的内容
 * @param encryptKey 加密密钥
 * @return 加密后的base 64 code
 * @throws Exception
 */

 public static String encrypt(String content, String encryptKey) throws Exception {
 return base64Encode(aesEncryptToBytes(content, encryptKey));

 }

 /**
 * AES加密
 *
 * @param content 待加密的内容
 * @param encryptKey 加密密钥
 * @return 加密后的byte[]
 * @throws Exception
 */

 private static byte[] aesEncryptToBytes(String content, String encryptKey) throws Exception {

 KeyGenerator kgen = KeyGenerator.getInstance("AES");

 SecureRandom random;
 if (System.getProperty("os.name").toLowerCase().contains("linux")) {
 random = SecureRandom.getInstance("SHA1PRNG");
 } else {
 random = new SecureRandom();
 }

 random.setSeed(encryptKey.getBytes());
 kgen.init(128, random);

 Cipher cipher = Cipher.getInstance("AES");

 cipher.init(Cipher.ENCRYPT_MODE, new SecretKeySpec(kgen.generateKey().getEncoded(), "AES"));


 return cipher.doFinal(content.getBytes("utf-8"));

 }

 /**
 * base 64 加密
 *
 * @param bytes 待编码的byte[]
 * @return 编码后的base 64 code
 */

 private static String base64Encode(byte[] bytes) {

 return new BASE64Encoder().encode(bytes);

 }

 /**
 * 将base 64 code AES解密
 *
 * @param encryptStr 待解密的base 64 code
 * @param decryptKey 解密密钥
 * @return 解密后的string
 * @throws Exception
 */

 public static String decrypt(String encryptStr, String decryptKey) throws Exception {

 return Strings.isNullOrEmpty(encryptStr) ? null : aesDecryptByBytes(base64Decode(encryptStr), decryptKey);

 }

 /**
 * AES解密
 *
 * @param encryptBytes 待解密的byte[]
 * @param decryptKey 解密密钥
 * @return 解密后的String
 * @throws Exception
 */
 private static String aesDecryptByBytes(byte[] encryptBytes, String decryptKey) throws Exception {

 KeyGenerator kgen = KeyGenerator.getInstance("AES");

 SecureRandom random;
 if (System.getProperty("os.name").toLowerCase().contains("linux")) {
 random = SecureRandom.getInstance("SHA1PRNG");
 } else {
 random = new SecureRandom();
 }
 random.setSeed(decryptKey.getBytes());

 kgen.init(128, random);


 Cipher cipher = Cipher.getInstance("AES");

 cipher.init(Cipher.DECRYPT_MODE, new SecretKeySpec(kgen.generateKey().getEncoded(), "AES"));

 byte[] decryptBytes = cipher.doFinal(encryptBytes);


 return new String(decryptBytes);

 }

 /**
 * base 64 解密
 *
 * @param base64Code 待解码的base 64 code
 * @return 解码后的byte[]
 * @throws Exception
 */

 private static byte[] base64Decode(String base64Code) throws Exception {

 return Strings.isNullOrEmpty(base64Code) ? null : new BASE64Decoder().decodeBuffer(base64Code);

 }
}
2、这里获取的token很关键,每次登录都要生成新的token,token是根据userId和当前时间戳加密的
@Override
 public String getToken(String userId) throws Exception {
 String token = AESUtil.encryptByDefaultKey(Joiner.on("_").join(userId, System.currentTimeMillis()));
 logger.debugv("token= {0}", token);
 redisService.set(UserKey.userAccessKey, userId, token);
 return token;
 }
3、写一个解密的方法,解密把用户id拿出来,然后从拦截器里拿出token和当前登录token做对比
 @Override
 public String checkToken(String token) throws Exception {
 String userId = AESUtil.decryptByDefaultKey(token).split("_")[0];
 String currentToken = redisService.get(UserKey.userAccessKey, userId, String.class);
 logger.debugv("currentToken={0}", currentToken);
 if (StringUtils.isEmpty(currentToken)) {
  return null;
 }
 if (!token.equals(currentToken)) {
  return null;
 }
 return userId;
 }
4、拦截器里具体处理,这里采用注解拦截,当controller有@Secured拦截器才拦截
 @Autowired
 AuthTokenService authTokenService;
 @Override
 public boolean preHandle(HttpServletRequest request, HttpServletResponse response, Object handler) throws Exception {

 if (handler instanceof HandlerMethod) {
  HandlerMethod hm = (HandlerMethod) handler;
  Secured secured = hm.getMethodAnnotation(Secured.class);
  if (secured != null) {
  String authToken = request.getHeader(UserConstant.USER_TOKEN);
  if (StringUtils.isEmpty(authToken)) {
   render(response, CodeMsg.REQUEST_ILLEGAL);
   return false;
  }
  String userId = authTokenService.checkToken(authToken);
  if (StringUtils.isEmpty(userId)) {
   render(response, CodeMsg.LOGIN_FAILURE);
   return false;
  }
  }
  return true;
 }
 return true;
 }


private void render(HttpServletResponse response, CodeMsg cm) throws Exception {
 response.setContentType("application/json;charset=UTF-8");
 OutputStream out = response.getOutputStream();
 String str = JSON.toJSONString(Result.error(cm));
 out.write(str.getBytes("UTF-8"));
 out.flush();
 out.close();
 }
5、写一个测试登录接口和一个测试单点登录接口
 /**
 * @Description: 模拟登录
 * @Param:
 * @returns: com.example.demo.result.Result
 * @Author: zhuenbang
 * @Date: 2018/12/3 12:05
 */
 @GetMapping("/login")
 public Result login() throws Exception {
 return authTokenService.login();
 }


 /**
 * @Description: 模拟单点登录 @Secured这个方法拦截器会拦截
 * @Param:
 * @returns: com.example.demo.result.Result
 * @Author: zhuenbang
 * @Date: 2018/12/3 12:35
 */
 @Secured
 @GetMapping("/testSSO")
 public Result testSSO() {
 return authTokenService.testSSO();
 }

 具体的实现
 @Override
 public Result login() throws Exception {
 String userId = "123456";
 return Result.success(this.getToken(userId));
 }

 @Override
 public Result testSSO() {
 return Result.success("登录状态正常");
 }
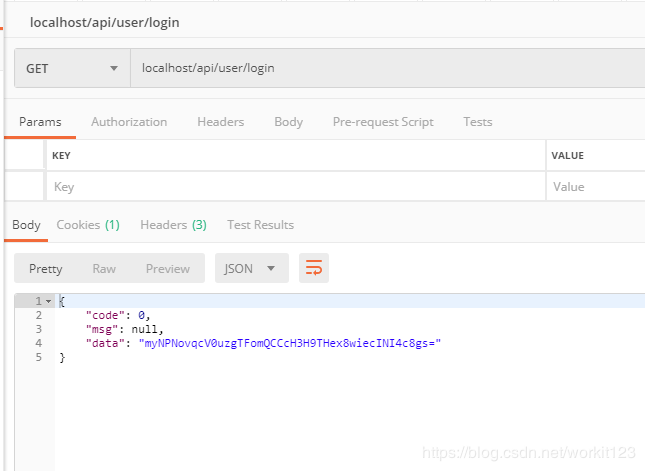
postman 测试

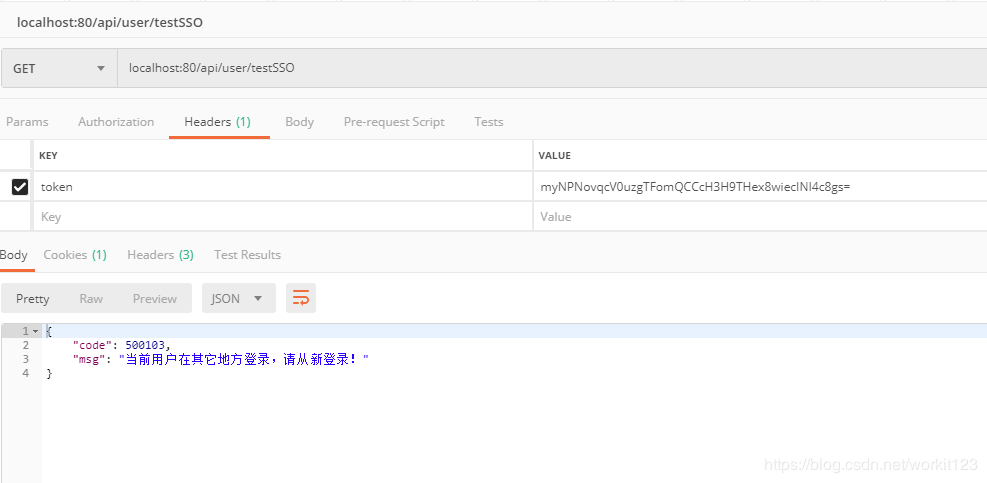
单点登录测试

再次请求登录接口,然后不改变token接口如图

这个方式实现单点登录的关键就是根据userId的加密和解密的实现。
关于springboot和redis实现单点登录的方法就分享到这里了,希望以上内容可以对大家有一定的帮助,可以学到更多知识。如果觉得文章不错,可以把它分享出去让更多的人看到。
免责声明:本站发布的内容(图片、视频和文字)以原创、转载和分享为主,文章观点不代表本网站立场,如果涉及侵权请联系站长邮箱:is@yisu.com进行举报,并提供相关证据,一经查实,将立刻删除涉嫌侵权内容。