您好,登录后才能下订单哦!
小编这次要给大家分享的是如何实现Flutter沉浸式状态栏/AppBar导航栏/仿咸鱼底部凸起导航栏,文章内容丰富,感兴趣的小伙伴可以来了解一下,希望大家阅读完这篇文章之后能够有所收获。
如下图:状态栏是指android手机顶部显示手机状态信息的位置。
android 自4.4开始新加入透明状态栏功能,状态栏可以自定义颜色背景,使titleBar能够和状态栏融为一体,增加沉浸感。

如上图Flutter状态栏默认为黑色半透明,那么如何去掉这个状态栏的黑色半透明背景色,让其和标题栏颜色一致,通栏沉浸式,实现如下图效果呢?且继续看下文讲述。


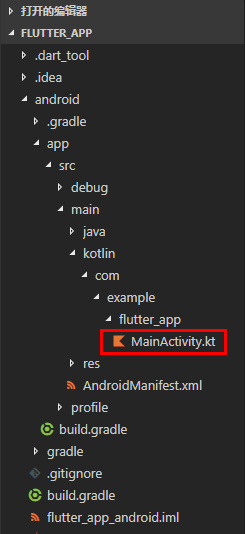
在flutter项目目录下找到android主入口页面MainActivity.kt或MainActivity.java,判断一下版本号然后将状态栏颜色修改设置成透明,因为他本身是黑色半透明。
MainActivity.kt路径:android\app\src\main\kotlin\com\example\flutter_app\MainActivity.kt

在MainActivity.kt页面新增如下高亮代码片段
package com.example.flutter_app

import androidx.annotation.NonNull;
import io.flutter.embedding.android.FlutterActivity
import io.flutter.embedding.engine.FlutterEngine
import io.flutter.plugins.GeneratedPluginRegistrant

//引入
import android.os.Build;
import android.os.Bundle;

class MainActivity: FlutterActivity() {
 override fun configureFlutterEngine(@NonNull flutterEngine: FlutterEngine) {
 GeneratedPluginRegistrant.registerWith(flutterEngine);
 }

 //设置状态栏沉浸式透明(修改flutter状态栏黑色半透明为全透明)
 override fun onCreate(savedInstanceState: Bundle?) {
 super.onCreate(savedInstanceState);
 if (Build.VERSION.SDK_INT >= Build.VERSION_CODES.LOLLIPOP) {
  window.statusBarColor = 0
 }
 }
}
注意:flutter项目默认是使用Kotlin语言
Kotlin 是一种在 Java 虚拟机上运行的静态类型编程语言,被称之为 Android 世界的Swift,由 JetBrains 设计开发并开源。
Kotlin 可以编译成Java字节码,也可以编译成 JavaScript,方便在没有 JVM 的设备上运行。
在Google I/O 2017中,Google 宣布 Kotlin 取代 Java 成为 Android 官方开发语言。
Kotlin详情见:https://www.kotlincn.net/
flutter create flutter_app 命令创建flutter项目时,默认是Kotlin语言模式,如果想要修改成Java语言,则运行如下命令创建项目即可
flutter create -a java flutter_app
如果是java语言模式下,修改沉浸式状态栏方法和上面同理
MainActivity.java路径:android\app\src\main\java\com\example\flutter_app\MainActivity.java
在MainActivity.java页面新增如下高亮代码片段
package com.example.demo1;

import androidx.annotation.NonNull;
import io.flutter.embedding.android.FlutterActivity;
import io.flutter.embedding.engine.FlutterEngine;
import io.flutter.plugins.GeneratedPluginRegistrant;

// 引入
import android.os.Build;
import android.os.Bundle;

public class MainActivity extends FlutterActivity {
 @Override
 public void configureFlutterEngine(@NonNull FlutterEngine flutterEngine) {
 GeneratedPluginRegistrant.registerWith(flutterEngine);
 }

 // 设置状态栏沉浸式透明(修改flutter状态栏黑色半透明为全透明)
 @Override
 protected void onCreate(Bundle savedInstanceState) {
 super.onCreate(savedInstanceState);
 if (Build.VERSION.SDK_INT >= Build.VERSION_CODES.LOLLIPOP) {
 getWindow().setStatusBarColor(0);
 }
 }
}
最后一步,去掉右上角banner提示
return MaterialApp(
 title: 'Flutter Demo',
 debugShowCheckedModeBanner: true,
 theme: ThemeData(
 primarySwatch: Colors.green,
 ),
 home: MyHomePage(title: 'Flutter Demo App'),
 ...
);
◆ Flutter中实现咸鱼底部导航凸起效果

如上图:BottomNavigationBar组件普通底部导航栏配置
int _selectedIndex = 0;
// 创建数组引入页面
List pglist = [HomePage(), FindPage(), CartPage(), ZonePage(), UcenterPage(),];

...

Scaffold(
 body: pglist[_selectedIndex],

 // 抽屉菜单
 // drawer: new Drawer(),

 // 普通底部导航栏
 bottomNavigationBar: BottomNavigationBar(
 fixedColor: Colors.red,
 type: BottomNavigationBarType.fixed,
 elevation: 5.0,
 unselectedFontSize: 12.0,
 selectedFontSize: 18.0,
 items: [
  BottomNavigationBarItem(icon: Icon(Icons.home), title: Text('Home')),
  BottomNavigationBarItem(icon: Icon(Icons.search), title: Text('Find')),
  BottomNavigationBarItem(icon: Icon(Icons.add), title: Text('Cart')),
  BottomNavigationBarItem(icon: Icon(Icons.photo_filter), title: Text('Zone')),
  BottomNavigationBarItem(icon: Icon(Icons.face), title: Text('Ucenter')),
 ],
 currentIndex: _selectedIndex,
 onTap: _onItemTapped,
 ),
)

void _onItemTapped(int index) {
 setState(() {
 _selectedIndex = index;
 });
}
如上图:BottomNavigationBar组件仿咸鱼凸起导航栏配置
int _selectedIndex = 0;
// 创建数组引入页面
List pglist = [HomePage(), FindPage(), CartPage(), ZonePage(), UcenterPage(),];

...

Scaffold(
 body: pglist[_selectedIndex],

 // 抽屉菜单
 // drawer: new Drawer(),

 // 普通底部导航栏
 bottomNavigationBar: BottomNavigationBar(
 fixedColor: Colors.red,
 type: BottomNavigationBarType.fixed,
 elevation: 5.0,
 unselectedFontSize: 12.0,
 selectedFontSize: 18.0,
 items: [
  BottomNavigationBarItem(icon: Icon(Icons.home), title: Text('Home')),
  BottomNavigationBarItem(icon: Icon(Icons.search), title: Text('Find')),
  BottomNavigationBarItem(icon: Icon(null), title: Text('Cart')),
  BottomNavigationBarItem(icon: Icon(Icons.photo_filter), title: Text('Zone')),
  BottomNavigationBarItem(icon: Icon(Icons.face), title: Text('Ucenter')),
 ],
 currentIndex: _selectedIndex,
 onTap: _onItemTapped,
 ),

 floatingActionButton: FloatingActionButton(
 backgroundColor: _selectedIndex == 2 ? Colors.red : Colors.grey,
 child: Column(
  mainAxisAlignment: MainAxisAlignment.center,
  children: [
  Icon(Icons.add)
  ]
 ),
 onPressed: (){
  setState(() {
  _selectedIndex = 2;
  });
 },
 ),
 floatingActionButtonLocation: FloatingActionButtonLocation.centerDocked,
)

void _onItemTapped(int index) {
 setState(() {
 _selectedIndex = index;
 });
}
如上图:BottomAppBar组件凸起凹陷导航栏配置
int _selectedIndex = 0;
// 创建数组引入页面
List pglist = [HomePage(), FindPage(), CartPage(), ZonePage(), UcenterPage(),];
...
Scaffold(
body: pglist[_selectedIndex],
// 抽屉菜单
// drawer: new Drawer(),
// 底部凸起凹陷导航栏
bottomNavigationBar: BottomAppBar(
color: Colors.white,
shape: CircularNotchedRectangle(),
child: Row(
mainAxisAlignment: MainAxisAlignment.spaceAround,
children: <Widget>[
IconButton(
icon: Icon(Icons.home),
color: _selectedIndex == 0 ? Colors.red : Colors.grey,
onPressed: (){
_onItemTapped(0);
},
),
IconButton(
icon: Icon(Icons.search),
color: _selectedIndex == 1 ? Colors.red : Colors.grey,
onPressed: (){
_onItemTapped(1);
},
),
SizedBox(width: 50,),
IconButton(
icon: Icon(Icons.photo_filter),
color: _selectedIndex == 3 ? Colors.red : Colors.grey,
onPressed: (){
_onItemTapped(3);
},
),
IconButton(
icon: Icon(Icons.face),
color: _selectedIndex == 4 ? Colors.red : Colors.grey,
onPressed: (){
_onItemTapped(4);
},
),
],
),
),
)
void _onItemTapped(int index) {
setState(() {
_selectedIndex = index;
});
}看完这篇关于如何实现Flutter沉浸式状态栏/AppBar导航栏/仿咸鱼底部凸起导航栏的文章,如果觉得文章内容写得不错的话,可以把它分享出去给更多人看到。
免责声明:本站发布的内容(图片、视频和文字)以原创、转载和分享为主,文章观点不代表本网站立场,如果涉及侵权请联系站长邮箱:is@yisu.com进行举报,并提供相关证据,一经查实,将立刻删除涉嫌侵权内容。