您好,登录后才能下订单哦!
本篇文章为大家展示了怎么在Spring Boot中设置使用缓存,内容简明扼要并且容易理解,绝对能使你眼前一亮,通过这篇文章的详细介绍希望你能有所收获。
几个缓存注解的作用:
@Cacheable:将方法的返回结果根据key指定的键保存在缓存中,以后要获取相同的数据直接从缓存中共获取
cacheNames/value:指定Cache组件名称
key:指定缓存时使用的key,默认使用方法参数值,可以使用#a0、#p0、#参数名等,支持SpEL表达式,root可省略
keyGenerator:指定key的生成器的组件id,如自定义的KeyGenerator
cacheManager:指定缓存管理器
cacheResolver:指定缓存解析器
condition:指定在哪种条件下缓存,如condition = “#id>=1”在参数>=1时缓存
unless:指定该条件为真时不缓存
sync:指定是否使用异步模式
@CachePut:不管缓存中是否有需要的数据,都会执行该注解标注的方法,并将结果更新到缓存,属性见上
@CacheEvit:执行方法后,清除key指定的缓存
allEntries:默认为false,值为true,删除所有缓存
beforeInvocation:默认为false,值为true,在方法调用之前清除缓存
@CacheConfig:定义一些通用或公共的规则,如cacheNames、keyGenerator等
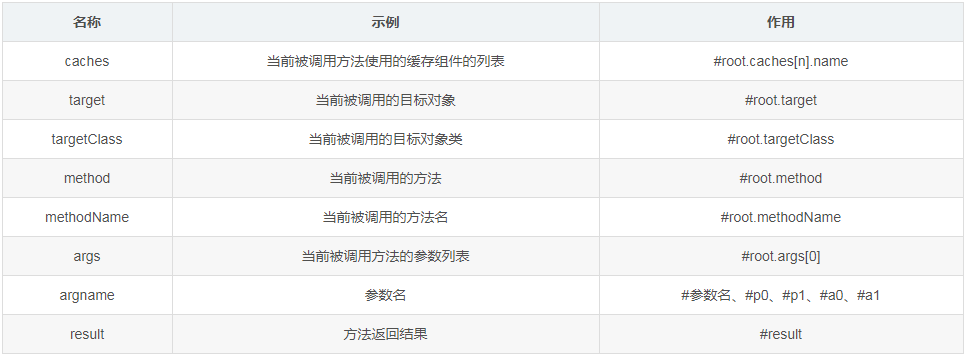
可使用的SpEL表达式:

使用缓存的步骤:
(1)创建一个Spring Boot应用,勾选Cache、Web、MySQL、Mybatis模块,在主程序类上添加注解,开启基于注解的缓存
@MapperScan(basePackages = "com.youngpain.cache.mapper")
@SpringBootApplication
@EnableCaching
(2)创建JavaBean,和数据库中的表对应,并配置数据源
spring:
 datasource:
  url: jdbc:mysql://localhost:3306/mybatis_database
  username: root
  password: 1741248769
  driver-class-name: com.mysql.jdbc.Driver
 redis:
  host: 39.108.114.57
#开启驼峰命名法
mybatis:
 configuration:
  map-underscore-to-camel-case: true
logging:
 level:
  com.youngpain.cache.mapper: debug
(3)创建mapper接口进行增删改查操作
/**
 * 部门表的增删改查操作
 */
public interface DepartmentMapper {
  @Insert("insert into department(id,depart_name,depart_build) values(#{id},#{depart_name},#{depart_build})")
  void insertDepartment(Department department);
  @Delete("delete from department where id=#{id}")
  void deleteDepartment(Integer id);
  @Update("update department set depart_name=#{departName},depart_build=#{departBuild} where id=#{id}")
  void updateDepartment(Department department);
  @Select("select * from department where id=#{id}")
  Department getDepartmentById(Integer id);
}
(4)创建service
@Service
@CacheConfig(cacheNames = {"departs"})
public class DepartmentService {
  @Autowired
  DepartmentMapper departmentMapper;
  @Cacheable(key = "#a0.id")
  public void insertDepartment(Department department) {
    departmentMapper.insertDepartment(department);
  }
  @CacheEvict(key = "#p0")
  public void deleteDepartment(Integer id) {
    departmentMapper.deleteDepartment(id);
  }
  @CachePut(key = "#a0.id")
  public Department updateDepartment(Department department) {
    departmentMapper.updateDepartment(department);
    return department;
  }
  @Cacheable(key = "#id", condition = "#p0>=1")
  public Department getDepartmentById(Integer id) {
    return departmentMapper.getDepartmentById(id);
  }
}
(5)创建controller
@Controller
public class DepartmentController {
  @Autowired
  DepartmentService departmentService;
  @GetMapping("/index")
  public String index() {
    return "index";
  }
  @GetMapping("/deleteDepart/{id}")
  public String deleteDepart(@PathVariable("id") Integer id, Model model) {
    model.addAttribute("condition", "delete");
    Department delete = departmentService.getDepartmentById(id);
    model.addAttribute("department", delete);
    departmentService.deleteDepartment(id);
    return "success";
  }
  @PostMapping("/updateDepart")
  public String updateDepart(Department department, Model model) {
    model.addAttribute("condition", "update");
    Department update = departmentService.updateDepartment(department);
    model.addAttribute("department", update);
    return "success";
  }
  @GetMapping("/getDepart/{id}")
  public String getDepartmentById(@PathVariable("id") Integer id, Model model) {
    model.addAttribute("condition", "delete");
    Department get = departmentService.getDepartmentById(id);
    model.addAttribute("department", get);
    return "success";
  }
}
(6)测试结果:
@Cacheable:第一次查询数据,控制台发出sql语句,之后再查询直接从缓存中获取
@CachePut:调用方法修改某个数据后,再次查询该数据是从缓存中获取的更新后的数据
@CacheEvict:调用该方法后,再次查询某个数据需要重新发出sql语句查询
springboot一种全新的编程规范,其设计目的是用来简化新Spring应用的初始搭建以及开发过程,SpringBoot也是一个服务于框架的框架,服务范围是简化配置文件。
上述内容就是怎么在Spring Boot中设置使用缓存,你们学到知识或技能了吗?如果还想学到更多技能或者丰富自己的知识储备,欢迎关注亿速云行业资讯频道。
免责声明:本站发布的内容(图片、视频和文字)以原创、转载和分享为主,文章观点不代表本网站立场,如果涉及侵权请联系站长邮箱:is@yisu.com进行举报,并提供相关证据,一经查实,将立刻删除涉嫌侵权内容。