您好,登录后才能下订单哦!
密码登录
登录注册
点击 登录注册 即表示同意《亿速云用户服务条款》
本篇文章为大家展示了怎么在Android中利用fragment实现一个底部标题栏,内容简明扼要并且容易理解,绝对能使你眼前一亮,通过这篇文章的详细介绍希望你能有所收获。
fragment特点
Fragment与Activity相似,有自己的生命周期,布局。相当于一个迷你的Activity
Fragment可以作为Activity的组成部分,一个Activity可以有多个Fragment
一个Fragment可以被多个Activity重用
在Activity运行时可动态地加入、移除、交换Fragment
一个具有自己生命周期的控件,有自己的处理输入事件的能力
依赖于Activity,能互相通信和托管。
一.activity_main.xml
<?xml version="1.0" encoding="utf-8"?>
<RelativeLayout xmlns:android="http://schemas.android.com/apk/res/android"
  xmlns:app="http://schemas.android.com/apk/res-auto"
  xmlns:tools="http://schemas.android.com/tools"
  android:layout_width="match_parent"
  android:layout_height="match_parent"
  tools:context=".MainActivity">
  <LinearLayout
    android:id="@+id/tab_linear"
    android:layout_width="match_parent"
    android:layout_height="wrap_content"
    android:layout_alignParentBottom="true"
    android:orientation="horizontal"
    android:background="@color/colorPrimary">
    <LinearLayout
      android:id="@+id/home"
      android:orientation="vertical"
      android:layout_weight="1"
      android:layout_width="0dp"
      android:layout_height="60dp">
      <ImageView
        android:layout_gravity="center"
        android:layout_width="40dp"
        android:layout_height="40dp"
        android:src="@drawable/home"/>
      <TextView
        android:layout_width="wrap_content"
        android:layout_height="wrap_content"
        android:layout_gravity="center"
        android:text="主页"
        android:textColor="@drawable/text_color_back" />
    </LinearLayout>
    <LinearLayout
      android:id="@+id/location"
      android:orientation="vertical"
      android:layout_weight="1"
      android:layout_width="0dp"
      android:layout_height="60dp">
      <ImageView
        android:layout_gravity="center"
        android:layout_width="40dp"
        android:layout_height="40dp"
        android:src="@drawable/location_view"/>
      <TextView
        android:layout_width="wrap_content"
        android:layout_height="wrap_content"
        android:layout_gravity="center"
        android:text="地点"
        android:textColor="@drawable/text_color_back" />
    </LinearLayout>
    <LinearLayout
      android:id="@+id/linear_polymer"
      android:orientation="vertical"
      android:layout_weight="1"
      android:layout_width="0dp"
      android:layout_height="60dp">
      <ImageView
        android:layout_gravity="center"
        android:layout_width="40dp"
        android:layout_height="40dp"
        android:src="@drawable/comment"/>
      <TextView
        android:layout_width="wrap_content"
        android:layout_height="wrap_content"
        android:layout_gravity="center"
        android:text="聊天"
        android:textColor="@drawable/text_color_back" />
    </LinearLayout>
    <LinearLayout
      android:orientation="vertical"
      android:id="@+id/linear_user"
      android:layout_weight="1"
      android:layout_width="0dp"
      android:layout_height="60dp">
      <ImageView
        android:layout_gravity="center"
        android:layout_width="40dp"
        android:layout_height="40dp"
        android:src="@drawable/contrast_view" />
      <TextView
        android:layout_gravity="center"
        android:text="设置"
        android:textColor="@drawable/text_color_back"
        android:layout_width="wrap_content"
        android:layout_height="wrap_content"/>
    </LinearLayout>
  </LinearLayout>
  <FrameLayout
    android:id="@+id/fragment_frame"
    android:layout_width="match_parent"
    android:layout_height="match_parent"
    android:layout_above="@+id/tab_linear">
  </FrameLayout>
</RelativeLayout>
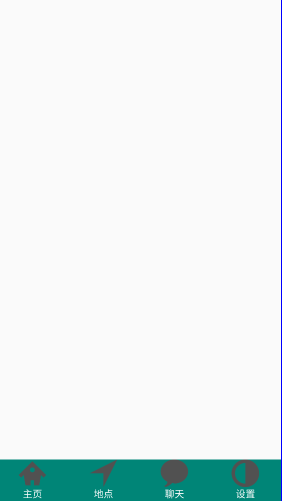
编写好的界面如下:
然后在我们最开始的演示视频当中大家也看到了我们每点击一次按钮,按钮的颜色就会发生变化,因此我们需要为每一个按钮编写选择器selector,这里就只展示第一个选择器"主页"的selector吧,还有三个按钮,咱们可以利用同样的方式建立selector,如果想要了解其他按钮的selector编写的话,请前往github:https://github.com/Geeksongs/ButtonTitile
二.home.xml
<?xml version="1.0" encoding="utf-8"?>
<selector xmlns:android="http://schemas.android.com/apk/res/android">
  <item android:state_selected="true" android:drawable="@drawable/home3"/>
  <item android:drawable="@drawable/home31"/>
</selector>
其中上面的图片我均放置在了drawble文件夹当中,这里强烈推荐阿里云矢量图标库,在这里可以找到你想要图标,网址如下:https://www.iconfont.cn/。然后找到你所需要的图标之后就可以进行下载啦!
三.fragment1.java
接下来是对碎片fragment1.java代码的编写,在这段代码的编写当中所需要注意的是我们将会返回整个fragment.xml的view布局,而不是直接返回一个textview或者imageview之类的控件,这样会让初学者感到十分困惑,为什么不返回整个fragment所对应的xml界面,代码如下:
import android.os.Bundle;
import androidx.annotation.Nullable;
import androidx.fragment.app.Fragment;
import android.view.LayoutInflater;
import android.view.View;
import android.view.ViewGroup;
import android.widget.TextView;
/**
 * A simple {@link Fragment} subclass.
 */
public class Fragment1 extends Fragment {
  private String fragmentText;
  private TextView fragmentTextView;
  @Nullable
  @Override
  public View onCreateView(LayoutInflater inflater, @Nullable ViewGroup container, @Nullable Bundle savedInstanceState) {
    View view=inflater.inflate(R.layout.fragment_fragment1,container,false);
    return view;//返回view布局
  }
  public Fragment1(String fragmentText) {
    this.fragmentText=fragmentText;
  }
}
其余几个fragment的代码也差不多,只是其构造方法的名称略有不同,所使用了fragment1(2/3/4),毕竟它们的类名不同嘛。编写了fragment的Java代码,是时候编写fragment的xml代码了,因为这样才可以将编写好的界面传递到主界面:activity_main.xml当中,代码如下:
四.fragment1.xml
<?xml version="1.0" encoding="utf-8"?>
<FrameLayout xmlns:android="http://schemas.android.com/apk/res/android"
  xmlns:tools="http://schemas.android.com/tools"
  android:layout_width="match_parent"
  android:layout_height="match_parent"
  tools:context=".Fragment1">
  <!-- TODO: Update blank fragment layout -->
  <TextView
    android:id="@+id/fragment1"
    android:layout_width="match_parent"
    android:layout_height="match_parent"
    android:textSize="30dp"
    android:text="这是第一个碎片" />
</FrameLayout>
由于安卓默认的字体比较小,我就略微修改了一下将字体的大小修改为了30dp,当然你也可以根据自己的需要进行改动,这个fragment文件我们一共需要建立4份,毕竟有四个底部标题栏的按钮。
五.MainActivity.java
下面是主活动的Java代码:
public class MainActivity extends AppCompatActivity implements View.OnClickListener{
  LinearLayout homeLinear;
  LinearLayout listLinear;
  LinearLayout polyLinear;
  LinearLayout userLinear;
  Fragment1 fragmentHome;
  Fragment2 fragmentList;
  Fragment3 fragmentPoly;
  Fragment4 fragmentUser;
  private FragmentManager mfragmentManger;
  @Override
  protected void onCreate(Bundle savedInstanceState) {
    super.onCreate(savedInstanceState);
    setContentView(R.layout.activity_main);
    homeLinear= (LinearLayout) findViewById(R.id.home);
    listLinear= (LinearLayout) findViewById(R.id.location);
    polyLinear= (LinearLayout) findViewById(R.id.linear_polymer);
    userLinear= (LinearLayout) findViewById(R.id.linear_user);
    homeLinear.setOnClickListener(this);
    listLinear.setOnClickListener(this);
    polyLinear.setOnClickListener(this);
    userLinear.setOnClickListener(this);
    mfragmentManger = getSupportFragmentManager();
    homeLinear.performClick();
  }
  @Override
  public void onClick(View view) {
    FragmentTransaction fragmentTransaction = mfragmentManger.beginTransaction();//只能是局部变量,不能为全局变量,否则不能重复commit
    //FragmentTransaction只能使用一次
    hideAllFragment(fragmentTransaction);
    switch (view.getId()){
      case R.id.home:
        setAllFalse();
        homeLinear.setSelected(true);
        if (fragmentHome==null){
          fragmentHome=new Fragment1("Home");
          fragmentTransaction.add(R.id.fragment_frame,fragmentHome);
        }else{
          fragmentTransaction.show(fragmentHome);
        }
        break;
      case R.id.location:
        setAllFalse();
        listLinear.setSelected(true);
        if(fragmentList==null){
          fragmentList=new Fragment2("List");
          fragmentTransaction.add(R.id.fragment_frame,fragmentList);
        }else {
          fragmentTransaction.show(fragmentList);
        }
        break;
      case R.id.linear_polymer:
        setAllFalse();
        polyLinear.setSelected(true);
        if(fragmentPoly==null){
          fragmentPoly=new Fragment3("Polymer");
          fragmentTransaction.add(R.id.fragment_frame,fragmentPoly);
        }else {
          fragmentTransaction.show(fragmentPoly);
        }
        break;
      case R.id.linear_user:
        setAllFalse();
        userLinear.setSelected(true);
        if(fragmentUser==null){
          fragmentUser=new Fragment4("User");
          fragmentTransaction.add(R.id.fragment_frame,fragmentUser);
        }else {
          fragmentTransaction.show(fragmentUser);
        }
        break;
    }
    fragmentTransaction.commit();//记得必须要commit,否则没有效果
}
  private void hideAllFragment(FragmentTransaction fragmentTransaction) {
    if(fragmentHome!=null){
      fragmentTransaction.hide(fragmentHome);
    }
    if(fragmentList!=null){
      fragmentTransaction.hide(fragmentList);
    }
    if(fragmentPoly!=null){
      fragmentTransaction.hide(fragmentPoly);
    }
    if(fragmentUser!=null){
      fragmentTransaction.hide(fragmentUser);
    }
  }
  private void setAllFalse() {
    homeLinear.setSelected(false);
    listLinear.setSelected(false);
    polyLinear.setSelected(false);
    userLinear.setSelected(false);
  }
}
上述内容就是怎么在Android中利用fragment实现一个底部标题栏,你们学到知识或技能了吗?如果还想学到更多技能或者丰富自己的知识储备,欢迎关注亿速云行业资讯频道。
免责声明:本站发布的内容(图片、视频和文字)以原创、转载和分享为主,文章观点不代表本网站立场,如果涉及侵权请联系站长邮箱:is@yisu.com进行举报,并提供相关证据,一经查实,将立刻删除涉嫌侵权内容。