您好,登录后才能下订单哦!
密码登录
登录注册
点击 登录注册 即表示同意《亿速云用户服务条款》
这篇文章将为大家详细讲解有关如何在Spring Boot中自定义starter,文章内容质量较高,因此小编分享给大家做个参考,希望大家阅读完这篇文章后对相关知识有一定的了解。
创建一个用maven构建的springboot项目

pom文件配置如下:
<?xml version="1.0" encoding="UTF-8"?>
<project xmlns="http://maven.apache.org/POM/4.0.0" xmlns:xsi="http://www.w3.org/2001/XMLSchema-instance"
  xsi:schemaLocation="http://maven.apache.org/POM/4.0.0 http://maven.apache.org/xsd/maven-4.0.0.xsd">
  <modelVersion>4.0.0</modelVersion>

  <groupId>com.xjw.springboot</groupId>
  <artifactId>hellostarter</artifactId>
  <version>0.0.1-SNAPSHOT</version>
  <packaging>jar</packaging>

  <name>hello-spring-boot-starter</name>
  <description>测试自定义starter</description>

  <parent>
    <groupId>org.springframework.boot</groupId>
    <artifactId>spring-boot-starter-parent</artifactId>
    <version>1.5.2.RELEASE</version>
    <relativePath/> <!-- lookup parent from repository -->
  </parent>

  <properties>
    <project.build.sourceEncoding>UTF-8</project.build.sourceEncoding>
    <project.reporting.outputEncoding>UTF-8</project.reporting.outputEncoding>
    <java.version>1.8</java.version>
  </properties>

  <dependencies>
    <dependency>
      <groupId>org.springframework.boot</groupId>
      <artifactId>spring-boot-starter</artifactId>
    </dependency>

    <dependency>
      <groupId>org.springframework.boot</groupId>
      <artifactId>spring-boot-starter-test</artifactId>
      <scope>test</scope>
    </dependency>
    <dependency>
      <groupId>org.springframework.boot</groupId>
      <artifactId>spring-boot-configuration-processor</artifactId>
      <optional>true</optional>
    </dependency>
  </dependencies>

  <build>
    <plugins>
      <plugin>
        <groupId>org.springframework.boot</groupId>
        <artifactId>spring-boot-maven-plugin</artifactId>
      </plugin>
    </plugins>
  </build>


</project>
定义一个pojo用来接收properties中配置的信息
package com.xjw;

import org.springframework.boot.context.properties.ConfigurationProperties;

@ConfigurationProperties(prefix = "hello")
public class HelloServiceProperteis {

  private String msg;

  public String getMsg() {
    return msg;
  }

  public void setMsg(String msg) {
    this.msg = msg;
  }

}
@ConfigurationProperties:用来标识这个pojo是一个用来接收指定前缀的资源配置值
prefix:表示在配置文件中配置项前缀[/code]
编写一个Service用来对外提供服务
package com.xjw;

public class HelloService {

  private String msg;

  public String sayHello() {
    return "Hello " + msg;
  }

  public String getMsg() {
    return msg;
  }

  public void setMsg(String msg) {
    this.msg = msg;
  }

}
配置一个pojo用来读取上面配置的HelloServiceProperteis
package com.xjw;

import org.springframework.beans.factory.annotation.Autowired;
import org.springframework.boot.autoconfigure.condition.ConditionalOnClass;
import org.springframework.boot.autoconfigure.condition.ConditionalOnMissingBean;
import org.springframework.boot.autoconfigure.condition.ConditionalOnProperty;
import org.springframework.boot.context.properties.EnableConfigurationProperties;
import org.springframework.context.annotation.Bean;
import org.springframework.context.annotation.Configuration;

@Configuration
@EnableConfigurationProperties(value = HelloServiceProperteis.class)
@ConditionalOnClass(HelloService.class)
@ConditionalOnProperty(prefix = "hello", value = "enable", matchIfMissing = true)
public class HelloAutoConfiguration {

  @Autowired
  private HelloServiceProperteis helloServiceProperteis;

  @Bean
  @ConditionalOnMissingBean(HelloService.class)
  public HelloService helloService() {
    HelloService helloService = new HelloService();
    helloService.setMsg(helloServiceProperteis.getMsg());
    return helloService;
  }
}
@Configuration:标识此类为一个spring配置类
@EnableConfigurationProperties(value = HelloServiceProperteis.class):启动配置文件,value用来指定我们要启用的配置类,可以有多个,多个时我们可以这么写value={xxProperties1.class,xxProperteis2.class....}
@ConditionalOnClass(HelloService.class):表示当classPath下存在HelloService.class文件时改配置文件类才有效
@ConditionalOnProperty(prefix = "hello", value = "enable", matchIfMissing = true):表示只有我们的配置文件是否配置了以hello为前缀的资源项值,并且在该资源项值为enable,如果没有配置我们默认设置为enable[/code]
最后在src/main/resources 文件夹下新建文件夹 META-INF,在新建的META-INF文件夹下新建spring.factories
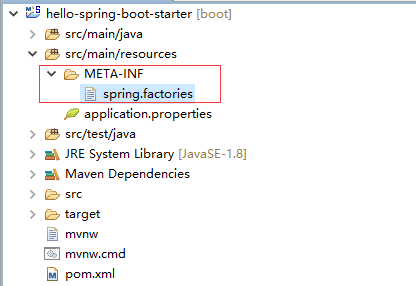
在新建的spring.factories文件中配置自动启动类为我们之前编写的HelloAutoConfiguration 类
org.springframework.boot.autoconfigure.EnableAutoConfiguration=com.xjw.HelloAutoConfiguration

然后就可以在其他的spring-boot项目中使用我们刚刚新建的starter了,我们来测试一下
在新建一个spring-boot项目,pom.xml配置如下:
<?xml version="1.0" encoding="UTF-8"?>
<project xmlns="http://maven.apache.org/POM/4.0.0" xmlns:xsi="http://www.w3.org/2001/XMLSchema-instance"
  xsi:schemaLocation="http://maven.apache.org/POM/4.0.0 http://maven.apache.org/xsd/maven-4.0.0.xsd">
  <modelVersion>4.0.0</modelVersion>

  <groupId>com.xjw.springboot</groupId>
  <artifactId>hellostarter.test</artifactId>
  <version>0.0.1-SNAPSHOT</version>
  <packaging>jar</packaging>

  <name>hello-spring-boot-starter-test</name>
  <description>测试自定义starter</description>

  <parent>
    <groupId>org.springframework.boot</groupId>
    <artifactId>spring-boot-starter-parent</artifactId>
    <version>1.5.2.RELEASE</version>
    <relativePath /> <!-- lookup parent from repository -->
  </parent>

  <properties>
    <project.build.sourceEncoding>UTF-8</project.build.sourceEncoding>
    <project.reporting.outputEncoding>UTF-8</project.reporting.outputEncoding>
    <java.version>1.8</java.version>
  </properties>

  <dependencies>
    <dependency>
      <groupId>org.springframework.boot</groupId>
      <artifactId>spring-boot-starter-web</artifactId>
    </dependency>

    <dependency>
      <groupId>org.springframework.boot</groupId>
      <artifactId>spring-boot-starter-test</artifactId>
      <scope>test</scope>
    </dependency>

    <dependency>
      <groupId>com.xjw.springboot</groupId>
      <artifactId>hellostarter</artifactId>
      <version>0.0.1-SNAPSHOT</version>
    </dependency>
    <dependency>
      <groupId>org.springframework.boot</groupId>
      <artifactId>spring-boot-devtools</artifactId>
    </dependency>
  </dependencies>

  <build>
    <plugins>
      <plugin>
        <groupId>org.springframework.boot</groupId>
        <artifactId>spring-boot-maven-plugin</artifactId>
      </plugin>
    </plugins>
  </build>


</project>
然后我们直接在咋们的启动类中中尝试使用以下我们上面定义的starter提供的HelloService:
package com.xjw;

import org.springframework.beans.factory.annotation.Autowired;
import org.springframework.boot.SpringApplication;
import org.springframework.boot.autoconfigure.SpringBootApplication;
import org.springframework.web.bind.annotation.RequestMapping;
import org.springframework.web.bind.annotation.RestController;

@RestController
@SpringBootApplication
public class HelloSpringBootStarterTestApplication {

  @Autowired
  private HelloService helloService;

  @RequestMapping("/")
  public String index() {
    return helloService.sayHello();
  }

  public static void main(String[] args) {
    SpringApplication.run(HelloSpringBootStarterTestApplication.class, args);
  }
}
接着我们修改测试项目中的application.properteis,加入如下配置:
debug=true
server.port=8888

#hello=enable
hello.msg=测试starter
最后启动项目,观察控制台输出的内容中依赖的starter,从Positive matches下我们可以看到有这么一句:
HelloAutoConfiguration matched:
- @ConditionalOnClass found required class 'com.xjw.HelloService'; @ConditionalOnMissingClass did not find unwanted class (OnClassCondition)
- @ConditionalOnProperty (hello.enable) matched (OnPropertyCondition)
或者我们打开项目依赖树也能找到我们的starter ,这说明spring已经自动的启动了我们的starter了,打开浏览器输入地址:http://localhost:8888/将会看到如下结果

关于如何在Spring Boot中自定义starter就分享到这里了,希望以上内容可以对大家有一定的帮助,可以学到更多知识。如果觉得文章不错,可以把它分享出去让更多的人看到。
免责声明:本站发布的内容(图片、视频和文字)以原创、转载和分享为主,文章观点不代表本网站立场,如果涉及侵权请联系站长邮箱:is@yisu.com进行举报,并提供相关证据,一经查实,将立刻删除涉嫌侵权内容。