您好,登录后才能下订单哦!
小编给大家分享一下Android如何创建外部lib库及自定义View,希望大家阅读完这篇文章之后都有所收获,下面让我们一起去探讨吧!
拆分创建 Library
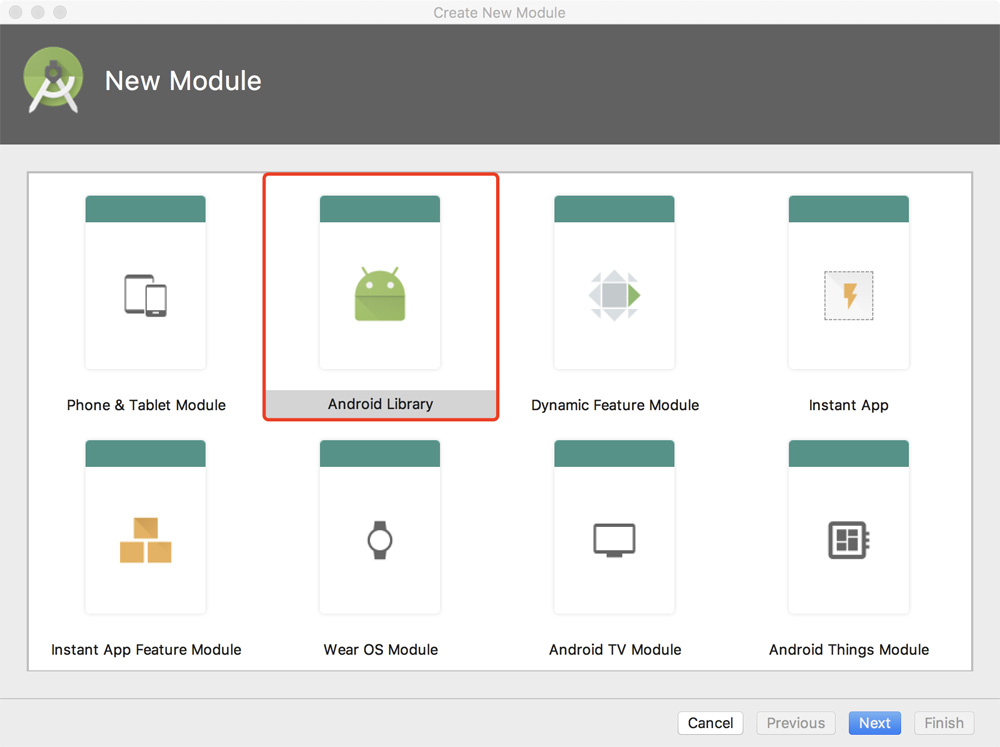
在当前 Project 下,File -> New Module,选择 Android Library,进行下一步;
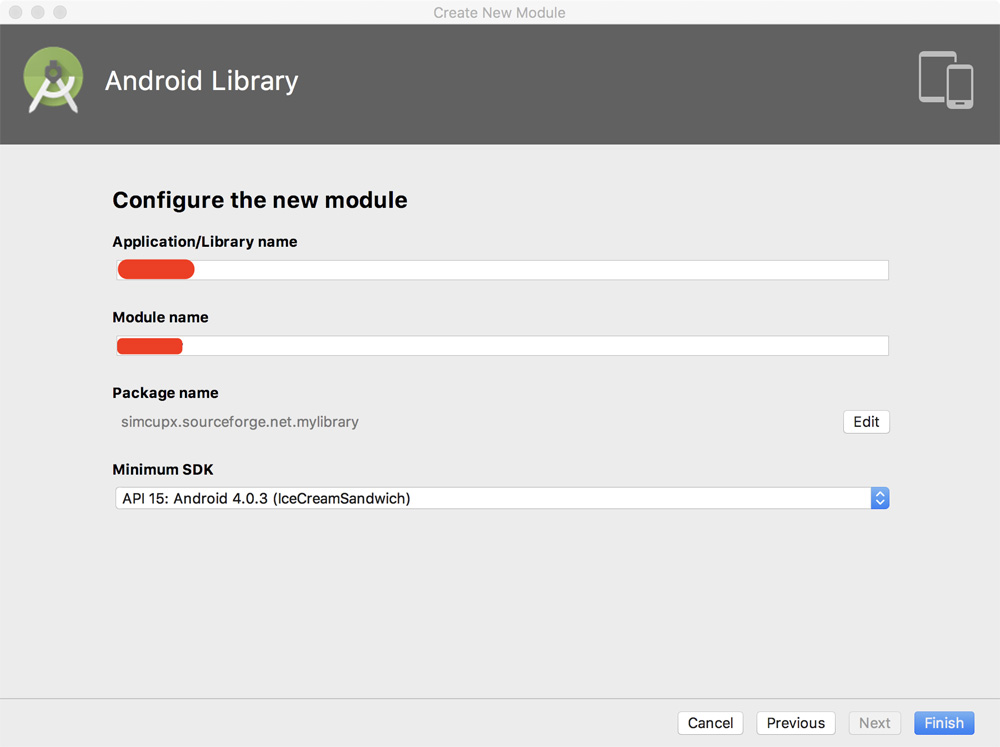
设置具体的 Library/Module/Package 等名称,注意:Module 名称与 Library 相匹配默认为小写,需要的话手动调整,进行下一步;
此时在当前 Project 中就已经创建好 Library;
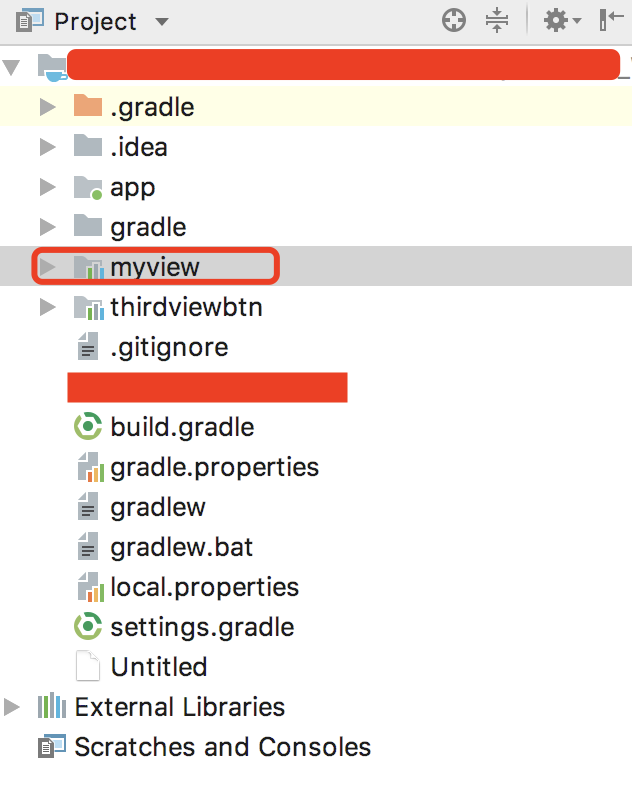
在当前 Project 的 settings.gradle 中就会自动生成创建的 Module;
Tips: :myview 中的 : 代表的与 app 同级目录下的 Module。

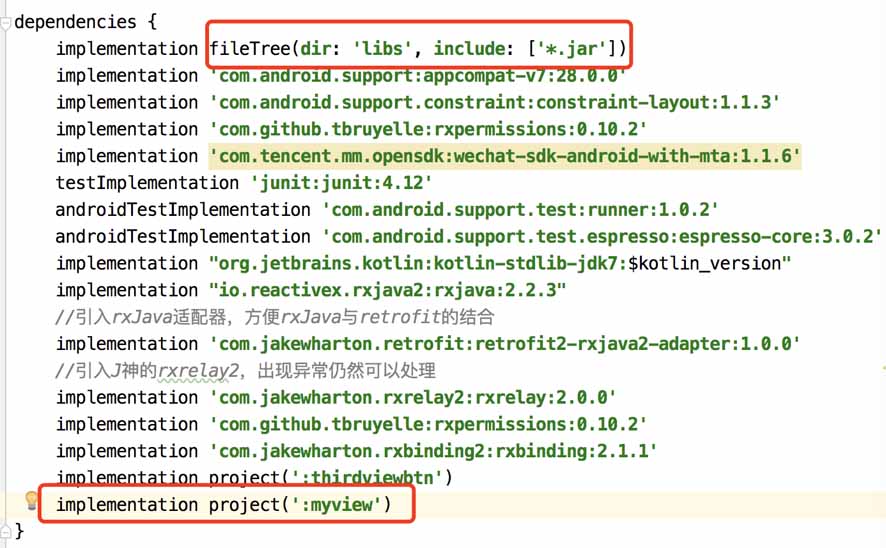
在当前 app 的 build.gradle 中 dependencies{} 中添加 implementation project(':myview') 即可正常接入。
自定义 View
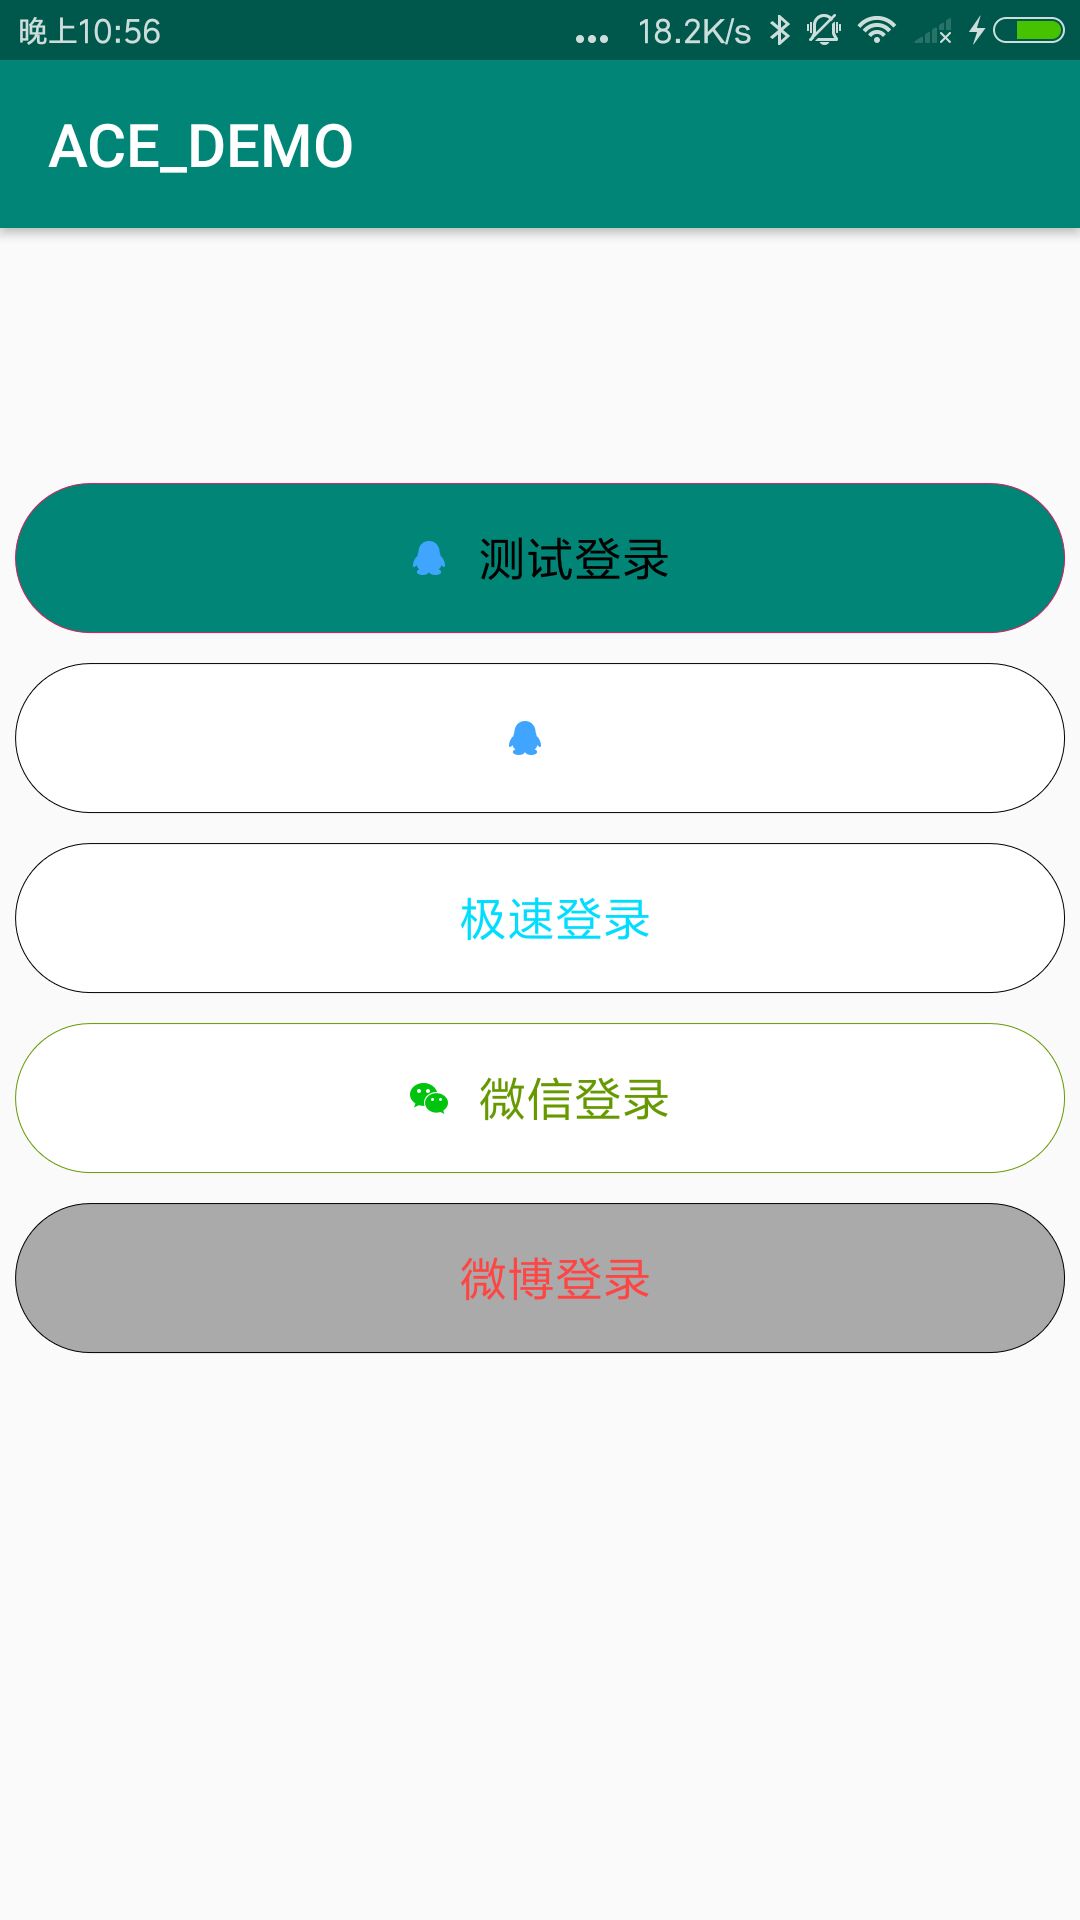
小菜在新建的 Library 中添加一个自定义按钮,可以添加配置图标和文字以及背景样式。因为只是为了测试 Library Module,所以功能很简单,实现方式也很简单,只是几个基本控件的组合。小菜只是简单的整理一下。
1、新建一个 MyView 继承自 RelativeLayout,实现基本的构造方法;
2、在构造方法中实现对布局的添加,控件的绑定以及一些基本的 setXX 方法;
3、至此 MyView 就可以应用,但所有但属性都需要通过 setXX 方法来设置;这当然是不合理的,于是小菜新建一个 attrs 文件,在资源文件中设置基本的样式,并在 MyView 的 obtainAttributes 方法中逐一绑定即可;
<?xml version="1.0" encoding="utf-8"?>
<resources xmlns:android="http://schemas.android.com/apk/res/android" xmlns:tools="http://schemas.android.com/tools">
<declare-styleable name="my_view" tools:ignore="MissingDefaultResource">
<!-- 中间文字颜色 -->
<attr name="tv_color" format="color" />
<!-- 中间文字显隐性 -->
<attr name="tv_show" format="boolean" />
<!-- 中间文字内容 -->
<attr name="tv_str" format="string" />
<!-- 中间文字大小 -->
<attr name="tv_size" format="float" />
<!-- 右侧文字颜色 -->
<attr name="right_tv_color" format="color" />
<!-- 右侧文字显隐性 -->
<attr name="right_tv_show" format="boolean" />
<!-- 右侧文字内容 -->
<attr name="right_tv_str" format="string" />
<!-- 右侧文字大小 -->
<attr name="right_tv_size" format="float" />
<!-- 整体背景颜色 -->
<attr name="bg_color" format="color" />
<!-- 整体边框颜色 -->
<attr name="strok_color" format="color" />
<!-- 整体边框圆角 -->
<attr name="bg_radius" format="float" />
<!-- 中间图片显隐性 -->
<attr name="iv_show" format="boolean" />
<!-- 中间图片资源 -->
<attr name="iv_src" format="reference" />
</declare-styleable>
</resources>
4、至此,MyView 自定义按钮以及完成,在 app 中也是正常调用即可。
public class MyView extends RelativeLayout {

private Context mContext;
private RelativeLayout mRlay;
private ImageView mIv;
private TextView mTv, mRightTv;
GradientDrawable drawable = new GradientDrawable();

int mTvColor, mRightTvColor, mRlayBgColor, mStrokeColor, mIvSrc;
boolean isTvShow, isRightTvShow, isIvShow;
float mTvSize, mRightTvSize, mRadiusSize;
String mTvStr, mRightTvStr;

public MyView(Context context) {
super(context);
mContext = context;
initView();
}

public MyView(Context context, AttributeSet attrs) {
super(context, attrs);
mContext = context;
initView();
obtainAttributes(context,attrs);
}

private void initView() {
LayoutInflater.from(mContext).inflate(R.layout.my_view_btn, this,true);
mRlay = findViewById(R.id.my_view_rly);
mIv = findViewById(R.id.my_view_iv);
mTv = findViewById(R.id.my_view_tv);
mRightTv = findViewById(R.id.my_view_rtv);
}

private void obtainAttributes(Context context, AttributeSet attrs) {
TypedArray ta = context.obtainStyledAttributes(attrs, R.styleable.my_view);

mTvColor = ta.getColor(R.styleable.my_view_tv_color, Color.BLACK);
mTv.setTextColor(mTvColor);
mRightTvColor = ta.getColor(R.styleable.my_view_right_tv_color, Color.BLACK);
mRightTv.setTextColor(mRightTvColor);
mRlayBgColor = ta.getColor(R.styleable.my_view_bg_color, Color.WHITE);
mRlay.setBackgroundColor(mRlayBgColor);
mStrokeColor = ta.getColor(R.styleable.my_view_strok_color, Color.BLACK);
isIvShow = ta.getBoolean(R.styleable.my_view_iv_show, true);
mIv.setVisibility(isIvShow?View.VISIBLE:View.GONE);
isRightTvShow = ta.getBoolean(R.styleable.my_view_right_tv_show, true);
mRightTv.setVisibility(isRightTvShow?View.VISIBLE:View.GONE);
isTvShow = ta.getBoolean(R.styleable.my_view_tv_show, true);
mTv.setVisibility(isTvShow?View.VISIBLE:View.GONE);
mTvSize = ta.getFloat(R.styleable.my_view_tv_size, 16.0f);
mTv.setTextSize(mTvSize);
mRightTvSize = ta.getFloat(R.styleable.my_view_right_tv_size, 14.0f);
mRightTv.setTextSize(mRightTvSize);
mRadiusSize = ta.getFloat(R.styleable.my_view_bg_color, 80.0f);
drawable = (GradientDrawable) getResources().getDrawable(R.drawable.user_login_corner_qq);
drawable.setCornerRadius(mRadiusSize);
drawable.setStroke(1, mStrokeColor);
drawable.setColor(mRlayBgColor);
mRlay.setBackground(drawable);
mTvStr = ta.getString(R.styleable.my_view_tv_str);
mTv.setText(mTvStr);
mRightTvStr = ta.getString(R.styleable.my_view_right_tv_str);
mRightTv.setText(mRightTvStr);
mIvSrc = ta.getResourceId(R.styleable.my_view_iv_src, R.mipmap.user_login_icon_qq);
mIv.setImageResource(mIvSrc);

ta.recycle();
}

public void setMyViewTv(String textStr) {
mTv.setText(textStr);
}

public void setMyViewTvColor(int color) {
mTv.setTextColor(color);
}

public void setMyViewTvSize(float size) {
mTv.setTextSize(size);
}

public void isMyViewTvShow(boolean state) {
mTv.setVisibility(state ? View.VISIBLE : View.GONE);
}

public void setMyViewIv(Drawable drawable) {
mIv.setImageDrawable(drawable);
}

public void isMyViewIvShow(boolean state) {
mIv.setVisibility(state ? View.VISIBLE : View.GONE);
}

public void isMyViewRightTvShow(boolean state) {
mRightTv.setVisibility(state ? View.VISIBLE : View.GONE);
}

public void setMyViewRightTvText(String textStr) {
mRightTv.setText(textStr);
}

public void setMyViewRightTvSize(float size) {
mRightTv.setTextSize(size);
}

public void setMyViewRightTvColor(int color) {
mRightTv.setTextColor(color);
}

public void setMyViewBgColor(int color) {
drawable.setColor(color);
mRlay.setBackground(drawable);
}

public void setMyViewBgRadius(float radius) {
drawable.setCornerRadius(radius);
mRlay.setBackground(drawable);
}

public void setMyViewBgStrokeColor(int color) {
drawable.setStroke(1, color);
mRlay.setBackground(drawable);
}

public void setMyViewBgDrawable(Drawable drawable) {
mRlay.setBackground(drawable);
}
}
Tips: attrs.xml 中如果需要用到资源文件,可以使用 format="reference",代表某一个资源ID。
看完了这篇文章,相信你对“Android如何创建外部lib库及自定义View”有了一定的了解,如果想了解更多相关知识,欢迎关注亿速云行业资讯频道,感谢各位的阅读!
免责声明:本站发布的内容(图片、视频和文字)以原创、转载和分享为主,文章观点不代表本网站立场,如果涉及侵权请联系站长邮箱:is@yisu.com进行举报,并提供相关证据,一经查实,将立刻删除涉嫌侵权内容。