您好,登录后才能下订单哦!
密码登录
登录注册
点击 登录注册 即表示同意《亿速云用户服务条款》
这篇文章将为大家详细讲解有关怎么在Android中使用PagerBottomTabStrip组件实现一个底部菜单功能,文章内容质量较高,因此小编分享给大家做个参考,希望大家阅读完这篇文章后对相关知识有一定的了解。
1、前言
(1)底部选择菜单功能应该是大多app都会用到的,实现方式也有很多种,比较笨的方法可以自定义一个xml,下方布局样式,每次点击不同按钮时跳转到不同activity,这个activity重新加载一下底部菜单
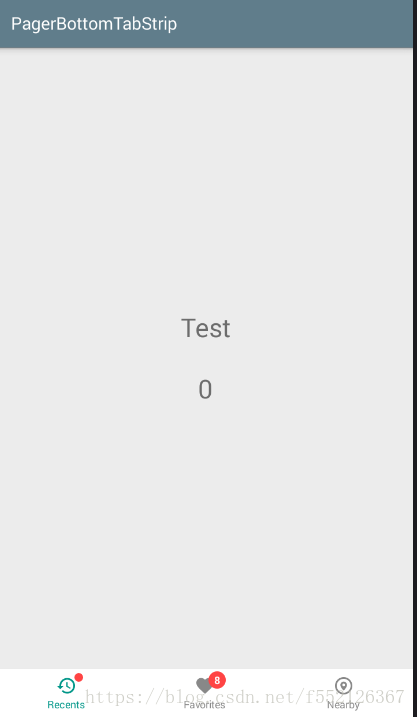
(2)今天介绍一个网上比较流行的底部菜单PagerBottomTabStrip功能,主要是这个菜单样式比价好看,而且点击时有点击效果,感觉还是不错的,而且也可以在菜单上加数字显示。功能算是比较全的吧。在GitHub上有2000多个star,所以选择它作为项目的底部菜单:https://github.com/tyzlmjj/PagerBottomTabStrip。
(3)当然还有一个框架也不错,可以参考:https://github.com/ogaclejapan/SmartTabLayout
(4)效果图:
2、底部导航菜单功能代码
1、首先需要引用包:
compile 'me.majiajie:pager-bottom-tab-strip:2.2.5'
2、然后写一个主的activity和底部点击进入的两个Fragment:
class MainBottomTabActivity : BaseActivity() {
 private val mFragments = ArrayList<Fragment>()
 var number:Int=8
 override fun onCreate(savedInstanceState: Bundle?) {
  super.onCreate(savedInstanceState)
  setContentView(R.layout.main_bottom_tab)
  //初始化Fragment
  initFragment()
  //初始化底部Button
  initBottomTab()
 }
 /**
  * 初始化四个导航页面
  */
 fun initFragment(){
  mFragments!!.add(TabBar1Fragment())
  mFragments!!.add(TabBar2Fragment())
  mFragments!!.add(TabBar1Fragment())
  //默认选中第一个
  val transaction = supportFragmentManager.beginTransaction()
  transaction!!.add(R.id.frameLayout, mFragments[0])
  transaction.commitAllowingStateLoss()
 }
 fun initBottomTab(){
  //这里要特别注意,pager_bottom_tab.custom()这句话就是选择自己需要的样式
  val navigationController = pager_bottom_tab.custom()
    .addItem(newItem(R.drawable.ic_restore_gray_24dp, R.drawable.ic_restore_teal_24dp, "消息"))
    .addItem(newItem(R.drawable.ic_favorite_gray_24dp, R.drawable.ic_favorite_teal_24dp, "工作"))
    .addItem(newItem(R.drawable.ic_nearby_gray_24dp, R.drawable.ic_nearby_teal_24dp, "我的"))
    .build()
  //设置消息数
  navigationController.setMessageNumber(1, number)
  //设置显示小圆点
  navigationController.setHasMessage(0, true)
  //底部按钮的点击事件监听
  navigationController.addTabItemSelectedListener(object : OnTabItemSelectedListener {
   override fun onSelected(index: Int, old: Int) {
    val transaction = supportFragmentManager.beginTransaction()
    transaction.replace(R.id.frameLayout, mFragments[index])
    transaction.commitAllowingStateLoss()
    if(index==0){
     navigationController.setHasMessage(0, false)
    }else if(index==1){
     navigationController.setMessageNumber(1, --number)
    }
   }
   override fun onRepeat(index: Int) {}
  })
 }
 //创建一个Item
 private fun newItem(drawable: Int, checkedDrawable: Int, text: String): BaseTabItem {
  val normalItemView = NormalItemView(this)
  normalItemView.initialize(drawable, checkedDrawable, text)
  normalItemView.setTextDefaultColor(Color.GRAY)
  normalItemView.setTextCheckedColor(-0xff6978)
  return normalItemView
 }
}
3、顶部导航功能
(1)定义activity的style
android:theme="@style/AppTheme"
<style name="AppTheme" parent="Theme.AppCompat.Light.NoActionBar">
 <!-- Customize your theme here. -->
 <item name="android:windowBackground">@drawable/splash_bg</item>
 <item name="colorPrimary">@color/white</item>
 <item name="colorPrimaryDark">@color/black</item>
 <item name="colorAccent">@color/blue</item>
 <item name="actionBarSize">48dip</item>
 <item name="android:textColorPrimary">@color/black</item>
 <item name="toolbarNavigationButtonStyle">@style/myToolbarNavigationButtonStyle</item>
</style>
(2)自定义顶部top.xml
<?xml version="1.0" encoding="utf-8"?>
<LinearLayout xmlns:android="http://schemas.android.com/apk/res/android"
 android:id="@+id/top_all"
 android:layout_width="match_parent"
 android:background="@color/white"
 android:orientation="vertical"
 android:focusable="true"
 android:focusableInTouchMode="true"
 android:layout_height="wrap_content">
 <LinearLayout
  android:id="@+id/top_navigation"
  android:layout_width="fill_parent"
  android:layout_height="40dp"
  android:orientation="horizontal"
  android:background="@color/grey"
  android:gravity="center_vertical">
  <!--上方导航条返回按钮-->
  <LinearLayout
   android:id="@+id/back_btn"
   android:layout_width="0dp"
   android:layout_weight="1"
   android:orientation="horizontal"
   android:gravity="center_vertical"
   android:layout_marginLeft="10dp"
   android:layout_height="match_parent">
   <ImageView
    android:layout_width="wrap_content"
    android:src="@drawable/back_btn"
    android:layout_marginLeft="5dp"
    android:layout_height="wrap_content" />
  </LinearLayout>
  <TextView
   android:id="@+id/navication_text"
   android:layout_width="0dp"
   android:layout_weight="5"
   android:layout_height="match_parent"
   android:layout_gravity="center"
   android:gravity="center"
   android:text="首页"
   android:textColor="@color/font_title"
   android:textSize="17dp"/>
  <!--文字显示-->
  <TextView
   android:id="@+id/second_transfer_text"
   android:layout_width="0dp"
   android:layout_weight="1"
   android:gravity="center"
   android:text="提交"
   android:textColor="@color/blue"
   android:visibility="invisible"
   android:textSize="@dimen/text_size_14"
   android:layout_height="match_parent" />
 </LinearLayout>
 <TextView
  android:layout_width="match_parent"
  android:background="@color/blue"
  android:layout_height="@dimen/px_2" />
</LinearLayout>
(3)在BaseActivity中写方法
protected void setTitle(Object title,Boolean right,Object rightContent) {
 try {
  TextView titleText=findViewById(R.id.navication_text);
  titleText.setText((String)title);
  //显示右侧的文字按钮
  if(right){
   TextView rightText=findViewById(R.id.second_transfer_text);
   rightText.setVisibility(View.VISIBLE);
   rightText.setText((String)rightContent);
  }
 } catch (Exception e) {
  e.printStackTrace();
 }
}
/**
 * 设置点击左上角的返回事件.默认是finish界面
 */
protected void registerBack() {
 LinearLayout llLeft = findViewById(R.id.back_btn);
 llLeft.setOnClickListener(new View.OnClickListener() {
  @Override
  public void onClick(View view) {
   BaseActivity.this.finish();
  }
 });
}
(4)继承BaseActivity,xml包含includetop.xml然后直接执行方法
<include layout="@layout/top"/>
setTitle("首頁",false,null)
registerBack()
关于怎么在Android中使用PagerBottomTabStrip组件实现一个底部菜单功能就分享到这里了,希望以上内容可以对大家有一定的帮助,可以学到更多知识。如果觉得文章不错,可以把它分享出去让更多的人看到。
免责声明:本站发布的内容(图片、视频和文字)以原创、转载和分享为主,文章观点不代表本网站立场,如果涉及侵权请联系站长邮箱:is@yisu.com进行举报,并提供相关证据,一经查实,将立刻删除涉嫌侵权内容。