您好,登录后才能下订单哦!
本篇文章主要介绍了SpringBoot+Maven 多模块项目的构建、运行、打包,分享给大家,具体如下:
项目使用的工具:
项目的目录:
一、使用IDEA创建一个SpringBoot项目 : File -> new -> Project 项目名称为springboot-multi
二、删除项目中的src目录,把pom.xml中的项目打包方式改为pom,如下:
<groupId>com.example</groupId>
<artifactId>springboot-multi</artifactId>
<version>0.0.1-SNAPSHOT</version>
<!-- 此处改为pom -->
<packaging>pom</packaging>
三、创建springboot-multi项目的子模块,在项目上右键单击,选择:new -> Module。
四、创建四个子模块后,删除子模块中 src/main/java、src/main/java下的所有文件(如果没有文件跳过此操作),只保留web子模块的SpringBoot的Application主启动类。
五、主项目pom.xml (注意<modules>标签是否指定了子模块)
<modelVersion>4.0.0</modelVersion>
  <groupId>com.example</groupId>
  <artifactId>springboot-multi</artifactId>
  <version>0.0.1-SNAPSHOT</version>
  <!-- 此处改为pom -->
  <packaging>pom</packaging>

  <name>springboot-multi</name>
  <description>Demo project for Spring Boot</description>

  <modules>
    <module>web</module>
    <module>service</module>
    <module>dao</module>
    <module>entity</module>
  </modules>

  <parent>
    <groupId>org.springframework.boot</groupId>
    <artifactId>spring-boot-starter-parent</artifactId>
    <version>1.5.10.RELEASE</version>
    <relativePath/> <!-- lookup parent from repository -->
  </parent>

  <properties>
    <project.build.sourceEncoding>UTF-8</project.build.sourceEncoding>
    <project.reporting.outputEncoding>UTF-8</project.reporting.outputEncoding>
    <java.version>1.8</java.version>
  </properties>

  <dependencies>
    <dependency>
      <groupId>org.springframework.boot</groupId>
      <artifactId>spring-boot-starter-web</artifactId>
    </dependency>
  </dependencies>

  <!--指定使用maven打包-->
  <build>
    <plugins>
      <plugin>
        <groupId>org.apache.maven.plugins</groupId>
        <artifactId>maven-compiler-plugin</artifactId>
        <version>3.1</version>
        <configuration>
          <source>${java.version}</source>
          <target>${java.version}</target>
        </configuration>
      </plugin>

      <plugin>
        <groupId>org.apache.maven.plugins</groupId>
        <artifactId>maven-surefire-plugin</artifactId>
        <version>2.19.1</version>
        <configuration>
          <skipTests>true</skipTests>  <!--默认关掉单元测试 -->
        </configuration>
      </plugin>
    </plugins>
  </build>
六、web子模块pom.xml(依赖service、dao、entity子模块)
<modelVersion>4.0.0</modelVersion>
  <groupId>com.example</groupId>
  <artifactId>web</artifactId>
  <version>0.0.1-SNAPSHOT</version>
  <packaging>jar</packaging>

  <name>web</name>
  <description>Demo project for Spring Boot</description>

  <parent>
    <groupId>com.example</groupId>
    <artifactId>springboot-multi</artifactId>
    <version>0.0.1-SNAPSHOT</version>
    <relativePath>../pom.xml</relativePath>
  </parent>

  <dependencies>
    <dependency>
      <groupId>com.example</groupId>
      <artifactId>service</artifactId>
      <version>0.0.1-SNAPSHOT</version>
    </dependency>
    <dependency>
      <groupId>com.example</groupId>
      <artifactId>dao</artifactId>
      <version>0.0.1-SNAPSHOT</version>
    </dependency>
    <dependency>
      <groupId>com.example</groupId>
      <artifactId>entity</artifactId>
      <version>0.0.1-SNAPSHOT</version>
    </dependency>
  </dependencies>

  <!--spring boot打包的话需要指定一个唯一的入门-->
  <build>
    <plugins>
      <plugin>
        <groupId>org.springframework.boot</groupId>
        <artifactId>spring-boot-maven-plugin</artifactId>
        <configuration>
          <!-- 指定该Main Class为全局的唯一入口 -->
          <mainClass>com.example.WebApplication</mainClass>
          <layout>ZIP</layout>
        </configuration>
        <executions>
          <execution>
            <goals>
              <goal>repackage</goal><!--可以把依赖的包都打包到生成的Jar包中-->
            </goals>
          </execution>
        </executions>
      </plugin>
    </plugins>
  </build>
七、service子模块pom.xml(依赖 dao 、entity子模块)
<modelVersion>4.0.0</modelVersion>

  <groupId>com.example</groupId>
  <artifactId>service</artifactId>
  <version>0.0.1-SNAPSHOT</version>
  <packaging>jar</packaging>

  <name>service</name>
  <description>Demo project for Spring Boot</description>

  <parent>
    <groupId>com.example</groupId>
    <artifactId>springboot-multi</artifactId>
    <version>0.0.1-SNAPSHOT</version>
    <relativePath>../pom.xml</relativePath>
  </parent>

  <dependencies>
    <dependency>
      <groupId>com.example</groupId>
      <artifactId>dao</artifactId>
      <version>0.0.1-SNAPSHOT</version>
    </dependency>
    <dependency>
      <groupId>com.example</groupId>
      <artifactId>entity</artifactId>
      <version>0.0.1-SNAPSHOT</version>
    </dependency>
  </dependencies>
八、dao子模块pom.xml (依赖entity子模块)
<modelVersion>4.0.0</modelVersion>

<groupId>com.example</groupId>
<artifactId>dao</artifactId>
<version>0.0.1-SNAPSHOT</version>
<packaging>jar</packaging>

<name>dao</name>
<description>Demo project for Spring Boot</description>

<parent>
  <groupId>com.example</groupId>
  <artifactId>springboot-multi</artifactId>
  <version>0.0.1-SNAPSHOT</version>
  <relativePath>../pom.xml</relativePath>
</parent>

<dependencies>
  <dependency>
    <groupId>com.example</groupId>
    <artifactId>entity</artifactId>
    <version>0.0.1-SNAPSHOT</version>
  </dependency>
</dependencies>
九、entity子模块
<modelVersion>4.0.0</modelVersion>

<groupId>com.example</groupId>
<artifactId>entity</artifactId>
<version>0.0.1-SNAPSHOT</version>
<packaging>jar</packaging>

<name>entity</name>
<description>Demo project for Spring Boot</description>

  <parent>
    <groupId>com.example</groupId>
    <artifactId>springboot-multi</artifactId>
    <version>0.0.1-SNAPSHOT</version>
    <relativePath>../pom.xml</relativePath>
  </parent>
十、pom.xml文件中需要注意的就是:
十一、web子模块的Application启动类:
@RestController
@SpringBootApplication
public class WebApplication {

  public static void main(String[] args) {
    SpringApplication.run(WebApplication.class, args);
  }

  @RequestMapping(value = "/test",method = RequestMethod.GET)
  public String test(){
    return "test success";
  }
}
十二、执行main方法启动项目,访问localhost:8080/test,出现如下页面表示项目搭建成功:

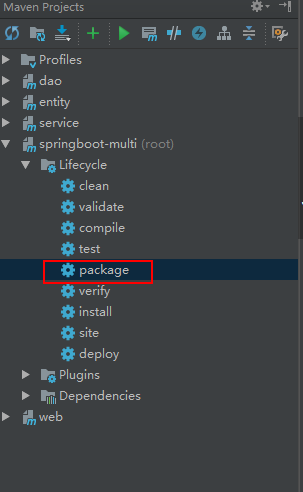
十三、项目打包命令: mvn clean package 或者 使用右边工具栏的图形化界面打包也可以:

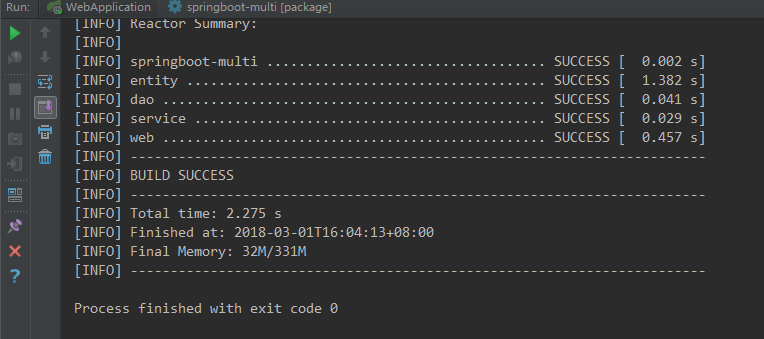
十四、打包成功日志:

以上就是本文的全部内容,希望对大家的学习有所帮助,也希望大家多多支持亿速云。
免责声明:本站发布的内容(图片、视频和文字)以原创、转载和分享为主,文章观点不代表本网站立场,如果涉及侵权请联系站长邮箱:is@yisu.com进行举报,并提供相关证据,一经查实,将立刻删除涉嫌侵权内容。