жӮЁеҘҪпјҢзҷ»еҪ•еҗҺжүҚиғҪдёӢи®ўеҚ•е“ҰпјҒ
жң¬зҜҮж–Үз« дё»иҰҒд»Ӣз»ҚеҰӮдҪ•дҪҝз”ЁиҮӘе®ҡд№үзҡ„GalleryжҺ§д»¶пјҢе®һзҺ°3Dж•Ҳжһңзҡ„еӣҫзүҮжөҸи§ҲеҷЁзҡ„ж•ҲжһңгҖӮ
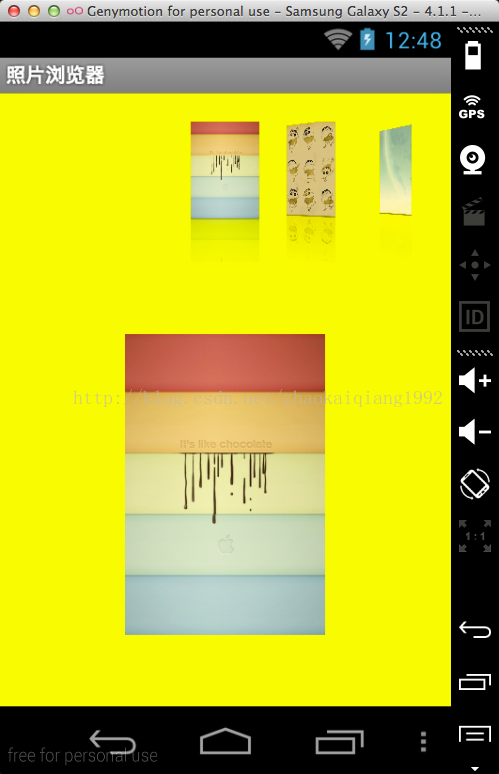
иҜқдёҚеӨҡиҜҙпјҢе…ҲзңӢж•ҲжһңгҖӮ

дёҠйқўжҳҜдёҖдёӘиҮӘе®ҡд№үзҡ„GalleryжҺ§д»¶пјҢе®һзҺ°еҖ’еҪұе’Ңд»ҝ3Dзҡ„ж•ҲжһңпјҢдёӢйқўжҳҜдёҖдёӘеӣҫзүҮжҹҘзңӢеҷЁпјҢзӮ№еҮ»дёҠйқўзҡ„е°ҸеӣҫзүҮпјҢеҸҜд»ҘеңЁдёӢйқўжҹҘзңӢеӨ§еӣҫзүҮгҖӮ
дёӢйқўйҮҚзӮ№иҜҙдёҖдёӢпјҢе®һзҺ°еӣҫзүҮжҹҘзңӢеҷЁзҡ„жҖқи·ҜгҖӮ
1.жүӢжңәдёӯеӣҫзүҮи·Ҝеҫ„зҡ„иҺ·еҸ–
йҰ–е…ҲпјҢе…ҲдёҚз®ЎеӣҫзүҮеҰӮдҪ•еұ•зӨәпјҢеҰӮжһңжҲ‘们жғіе®һзҺ°еӣҫзүҮжҹҘзңӢеҷЁзҡ„еҠҹиғҪпјҢжҲ‘们йҰ–е…ҲйңҖиҰҒеҒҡзҡ„жҳҜиҺ·еҸ–еҲ°жүҖжңүзҡ„еӣҫзүҮзҡ„и·Ҝеҫ„дҝЎжҒҜпјҢеҸӘжңүиҝҷж ·пјҢжҲ‘们жүҚиғҪе®һзҺ°еҜ№еӣҫзүҮзҡ„жҹҘзңӢгҖӮ
жҲ‘们еҸҜд»ҘдҪҝз”ЁдёӢйқўзҡ„д»Јз Ғе®һзҺ°
private List<String> getImagesFromSD() {
    List<String> imageList = new ArrayList<String>();
    File f = Environment.getExternalStorageDirectory();
    if (Environment.getExternalStorageState().equals(Environment.MEDIA_MOUNTED)) {
      f = new File(Environment.getExternalStorageDirectory().toString());
    } else {
      Toast.makeText(MainActivity.this, R.string.sdcarderror, Toast.LENGTH_LONG).show();
      return imageList;
    }

    File[] files = f.listFiles();
    if (files == null || files.length == 0)
      return imageList;

    for (int i = 0; i < files.length; i++) {
      File file = files[i];
      if (isImageFile(file.getPath()))
        imageList.add(file.getPath());
    }
    return imageList;
  }
дёҠйқўиҝҷдёӘж–№жі•зҡ„дҪңз”ЁпјҢе°ұжҳҜиҺ·еҸ–SDеҚЎдёӯпјҢжүҖжңүж–Ү件зҡ„еҗҺзјҖеҗҚж»Ўи¶іеӣҫзүҮеҗҺзјҖеҗҚзҡ„ж–Ү件зҡ„и·Ҝеҫ„пјҢ然еҗҺж”ҫеҲ°Listе®№еҷЁдёӯиҝ”еӣһгҖӮ
isImageFileж–№жі•жҳҜиҝҷж ·е®һзҺ°зҡ„
private boolean isImageFile(String fName) {
    String end = fName.substring(fName.lastIndexOf(".") + 1, fName.length()).toLowerCase();
    if (end.equals("jpg") || end.equals("gif") || end.equals("png") || end.equals("jpeg") || end.equals("bmp")) {
      return true;
    }
    return false;

  }
2.дёҠж–№е°ҸеӣҫзүҮ3Dж•Ҳжһңеұ•зӨәзҡ„е®һзҺ°
еңЁе®ҢжҲҗдәҶеӣҫзүҮи·Ҝеҫ„зҡ„иҺ·еҸ–д№ӢеҗҺпјҢжҲ‘们дёӢйқўиҰҒеҒҡзҡ„е°ұжҳҜе°ҶеӣҫзүҮеұ•зӨәеңЁдёҠйқўзҡ„жңү3Dж•Ҳжһңзҡ„иҮӘе®ҡд№үGalleryжҺ§д»¶дёҠйқўгҖӮзҺ°еңЁзүҲжң¬дёӯGalleryжҺ§д»¶е·Із»ҸдёҚеҶҚжҺЁиҚҗдҪҝз”ЁпјҢеҸ–иҖҢд»Јд№Ӣзҡ„ViewPagerе’ҢHorizonalScrollViewжҺ§д»¶гҖӮ
дёӢйқўд»Ӣз»Қе…·жңүиҮӘе®ҡд№үGalleryжҺ§д»¶зҡ„е®һзҺ°
/**
* 3Dж•ҲжһңGalleryе®һзҺ°
*
* @time 2014е№ҙ6жңҲ26ж—Ҙ дёӢеҚҲ9:10:47
*/
@SuppressWarnings("deprecation")
public class GalleryFlow extends Gallery {
private Camera mCamera = new Camera();
// дёӨдҫ§еӣҫзүҮжңҖеӨ§ж—ӢиҪ¬и§’еәҰ
private int mMaxRotationAngle = 60;
private int mMaxZoom = -120;
private int mCoveflowCenter;
public GalleryFlow(Context context) {
super(context);
this.setStaticTransformationsEnabled(true);
}
public GalleryFlow(Context context, AttributeSet attrs) {
super(context, attrs);
this.setStaticTransformationsEnabled(true);
}
public GalleryFlow(Context context, AttributeSet attrs, int defStyle) {
super(context, attrs, defStyle);
this.setStaticTransformationsEnabled(true);
}
// и®ҫзҪ®жңҖеӨ§ж—ӢиҪ¬и§’
public void setMaxRotationAngle(int maxRotationAngle) {
mMaxRotationAngle = maxRotationAngle;
}
// иҺ·еҸ–еҪ“еүҚжҺ§д»¶дёӯеҝғзӮ№xиҪҙдҪҚзҪ®
private int getCenterOfCoverflow() {
return (getWidth() - getPaddingLeft() - getPaddingRight()) / 2 + getPaddingLeft();
}
// иҺ·еҸ–viewжҺ§д»¶зҡ„xиҪҙдҪҚзҪ®
private static int getCenterOfView(View view) {
return view.getLeft() + view.getWidth() / 2;
}
// й»ҳи®Өиҝ”еӣһеҖјжҳҜfalseпјҢиӢҘи®ҫзҪ®еҹҺtrueпјҢеҲҷжҜҸж¬Ўgalleryз”ҹжҲҗеӯҗжҺ§д»¶зҡ„ж—¶еҖҷпјҢйғҪдјҡи°ғз”ЁиҝҷдёӘж–№жі•пјҢжүҖд»ҘжҲ‘们еҸҜд»Ҙе°Ҷиҝ”еӣһеҖји®ҫзҪ®дёәtrue,然еҗҺе®ҢжҲҗchildзҡ„ж—ӢиҪ¬зӯүеҸҳеҪўж“ҚдҪң
protected boolean getChildStaticTransformation(View child, Transformation t) {
final int childCenter = getCenterOfView(child);
final int childWidth = child.getWidth();
int rotationAngle = 0;
t.clear();
t.setTransformationType(Transformation.TYPE_MATRIX);
// еҰӮжһңchildжҺ§д»¶еңЁдёӯеҝғдҪҚзҪ®пјҢеҲҷдёҚж—ӢиҪ¬
if (childCenter == mCoveflowCenter) {
transformImageBitmap((ImageView) child, t, 0);
} else {
// еҗҰеҲҷпјҢе°ҶеҪ“еүҚchildжҺ§д»¶ж—ӢиҪ¬дёҖе®ҡи§’еәҰ
rotationAngle = (int) (((float) (mCoveflowCenter - childCenter) / childWidth) * mMaxRotationAngle);
if (Math.abs(rotationAngle) > mMaxRotationAngle) {
rotationAngle = (rotationAngle < 0) ? -mMaxRotationAngle : mMaxRotationAngle;
}
transformImageBitmap((ImageView) child, t, rotationAngle);
}
return true;
}
//йҮҚж–°и®Ўз®—жҺ§д»¶зҡ„xиҪҙдҪҚзҪ®
protected void onSizeChanged(int w, int h, int oldw, int oldh) {
mCoveflowCenter = getCenterOfCoverflow();
super.onSizeChanged(w, h, oldw, oldh);
}
// е°ҶchildжҺ§д»¶ж—ӢиҪ¬rotationAngleж–№жі•зҡ„е®һзҺ°
private void transformImageBitmap(ImageView child, Transformation t, int rotationAngle) {
mCamera.save();
final Matrix imageMatrix = t.getMatrix();
final int imageHeight = child.getLayoutParams().height;
final int imageWidth = child.getLayoutParams().width;
final int rotation = Math.abs(rotationAngle);
// еңЁZиҪҙдёҠжӯЈеҗ‘移еҠЁcameraзҡ„и§Ҷи§’пјҢе®һйҷ…ж•Ҳжһңдёәж”ҫеӨ§еӣҫзүҮгҖӮ еҰӮжһңеңЁYиҪҙдёҠ移еҠЁпјҢеҲҷеӣҫзүҮдёҠдёӢ移еҠЁпјӣXиҪҙдёҠеҜ№еә”еӣҫзүҮе·ҰеҸіз§»еҠЁгҖӮ
mCamera.translate(0.0f, 0.0f, 100.0f);
if (rotation < mMaxRotationAngle) {
float zoomAmount = (float) (mMaxZoom + (rotation * 1.5));
mCamera.translate(0.0f, 0.0f, zoomAmount);
}
// еңЁYиҪҙдёҠж—ӢиҪ¬пјҢеҜ№еә”еӣҫзүҮз«–еҗ‘еҗ‘йҮҢзҝ»иҪ¬гҖӮеҰӮжһңеңЁXиҪҙдёҠж—ӢиҪ¬пјҢеҲҷеҜ№еә”еӣҫзүҮжЁӘеҗ‘еҗ‘йҮҢзҝ»иҪ¬гҖӮ
mCamera.rotateY(rotationAngle);
mCamera.getMatrix(imageMatrix);
imageMatrix.preTranslate(-(imageWidth / 2), -(imageHeight / 2));
imageMatrix.postTranslate((imageWidth / 2), (imageHeight / 2));
// жҒўеӨҚзӣёжңәеҺҹзҠ¶жҖҒ
mCamera.restore();
}
}
йҖҡиҝҮиҮӘе®ҡд№үgalleryжҺ§д»¶пјҢзҺ°еңЁжҲ‘们已з»Ҹе®һзҺ°дәҶеҪ“ж»‘еҠЁGalleryйҮҢйқўзҡ„еӣҫзүҮж—¶пјҢдёӨдҫ§зҡ„еӣҫзүҮдјҡеҸ‘з”ҹдёҖе®ҡи§’еәҰзҡ„ж—ӢиҪ¬пјҢд№ҹе°ұжҳҜе®ҢжҲҗдәҶ3Dж•Ҳжһңзҡ„第дёҖйғЁпјҢдёӢдёҖжӯҘпјҢе°ұйңҖиҰҒжҲ‘们еңЁGalleryзҡ„AdapterйҮҢйқўпјҢеҜ№getViewж–№жі•пјҢиҝӣиЎҢж”№йҖ пјҢд»ҺиҖҢе®ҢжҲҗйў„и§Ҳе°ҸеӣҫзүҮзҡ„еҖ’еҪұж•Ҳжһң
3.е®һзҺ°AdapterпјҢе®ҢжҲҗеҖ’еҪұж•Ҳжһң
иҰҒе®ҢжҲҗеҖ’жҳ ж•ҲжһңпјҢжҲ‘们йңҖиҰҒеңЁgetViewж–№жі•дёӯпјҢеҜ№з©ҝиҝӣжқҘзҡ„еӣҫзүҮиҝӣиЎҢеӨ„зҗҶпјҢе…·дҪ“д»Јз ҒеҰӮдёӢ
@SuppressWarnings({ "deprecation", "unused" })
public class ImageAdapter extends BaseAdapter {
private Context mContext;
//з”ЁдәҺеӯҳж”ҫеӣҫзүҮзҡ„и·Ҝеҫ„
private List<String> imageFileList;
//еҺҹе§ӢеӣҫзүҮ
private Bitmap originalImage;
//еҸҚе°„зҡ„еҖ’еҪұеӣҫзүҮпјҢй«ҳеәҰдёәеҺҹе§ӢеӣҫзүҮдёҖеҚҠ
private Bitmap reflectionImage;
//з”ЁдәҺеӯҳж”ҫеӨ„зҗҶеҗҺзҡ„ж•ҙдёӘеӣҫзүҮпјҢй«ҳеәҰдёәеҺҹе§ӢеӣҫзүҮзҡ„1.5еҖҚ
private Bitmap bitmapWithReflection;
//еӣҫзүҮзҡ„е®Ҫй«ҳ
private int width;
private int height;
//зҹ©йҳө
private Matrix matrix;
//з”»еёғ
private Canvas canvas;
//еҺҹе§ӢеӣҫеғҸдёҺеҸҚе°„зҡ„еҖ’еҪұеӣҫеғҸд№Ӣй—ҙзҡ„й—ҙйҡ”й«ҳеәҰ
final int reflectionGap = 4;
//з”ЁдәҺgetViewиҝ”еӣһ
private ImageView imageView;
//еҖ’еҪұзҡ„йҳҙеҪұжЁЎзіҠж•Ҳжһң
private LinearGradient shader;
public ImageAdapter(Context c, List<String> _imageFileList) {
mContext = c;
imageFileList = _imageFileList;
matrix = new Matrix();
//и®ҫзҪ®дёәxиҪҙзҝ»иҪ¬
matrix.preScale(1, -1);
}
@Override
public int getCount() {
return imageFileList.size();
}
@Override
public Object getItem(int position) {
return position;
}
@Override
public long getItemId(int position) {
return position;
}
//иҝ”еӣһз»ҸиҝҮеӨ„зҗҶзҡ„ImageViewеҜ№иұЎ
@Override
public View getView(int position, View convertView, ViewGroup parent) {
return createReflectedImages(imageFileList.get(position));
}
//иҝҷжҳҜжңҖдё»иҰҒзҡ„ж–№жі•пјҢе®ҢжҲҗдәҶеҜ№еӣҫзүҮзҡ„еҖ’жҳ ж•ҲжһңеӨ„зҗҶ
public ImageView createReflectedImages(String filePath) {
//иҺ·еҸ–еҺҹе§ӢеӣҫзүҮ
originalImage = BitmapFactory.decodeFile(filePath);
width = originalImage.getWidth();
height = originalImage.getHeight();
//еҲӣе»әеҖ’еҪұеӣҫеғҸпјҢй«ҳеәҰжҳҜеҺҹе§ӢеӣҫеғҸзҡ„дёҖеҚҠпјҢ并且дҪҝз”Ёзҹ©йҳөиҝӣиЎҢдәҶxиҪҙеҸҚиҪ¬пјҢд№ҹе°ұжҳҜеҖ’еҪұж•Ҳжһң
reflectionImage = Bitmap.createBitmap(originalImage, 0, height / 2, width, height / 2, matrix, false);
//еҲқе§ӢеҢ–BitmapеҜ№иұЎпјҢз”ЁдәҺеӯҳж”ҫеӨ„зҗҶеҗҺзҡ„еӣҫзүҮпјҢй«ҳеәҰдёәеҺҹе§ӢеӣҫзүҮзҡ„1.5еҖҚ
bitmapWithReflection = Bitmap.createBitmap(width, (height + height / 2), Config.ARGB_8888);
//ж №жҚ®bitmapWithReflectionеҜ№иұЎпјҢеҲӣе»әдёҖдёӘз”»еёғ
canvas = new Canvas(bitmapWithReflection);
//е…ҲжҠҠеҺҹе§ӢеӣҫеғҸз”»дёҠ
canvas.drawBitmap(originalImage, 0, 0, null);
Paint paint = new Paint();
//з”»еҮәеҺҹе§ӢеӣҫеғҸдёҺеҸҚе°„еӣҫеғҸд№Ӣй—ҙзҡ„е°Ҹз©әйҡҷпјҢй«ҳеәҰдёәreflectionGap
canvas.drawRect(0, height, width, height + reflectionGap, paint);
//з”»еҮәеҖ’еҪұ
canvas.drawBitmap(reflectionImage, 0, height + reflectionGap, null);
//и®ҫзҪ®з”»з¬”зҡ„йҳҙеҪұж•Ҳжһң
shader = new LinearGradient(0, originalImage.getHeight(), 0, bitmapWithReflection.getHeight() + reflectionGap, 0x70ffffff, 0x00ffffff,
TileMode.CLAMP);
paint.setShader(shader);
paint.setXfermode(new PorterDuffXfermode(Mode.DST_IN));
//еңЁеҖ’еҪұеӣҫдёҠз”ЁеёҰйҳҙеҪұзҡ„画笔з»ҳеҲ¶зҹ©еҪў
canvas.drawRect(0, height, width, bitmapWithReflection.getHeight() + reflectionGap, paint);
//еҲқе§ӢеҢ–дёҖдёӘImageViewеҜ№иұЎ
imageView = new ImageView(mContext);
//е°ҶеӨ„зҗҶеҗҺзҡ„еӣҫеғҸи®ҫзҪ®дёәеӣҫзүҮиө„жәҗ
imageView.setImageBitmap(bitmapWithReflection);
imageView.setLayoutParams(new Gallery.LayoutParams(120, 160));
imageView.setScaleType(ScaleType.CENTER_INSIDE);
return imageView;
}
}
жңҖдё»иҰҒзҡ„иҝҳжҳҜзҗҶи§ЈеҰӮдҪ•е®һзҺ°зҡ„еҖ’еҪұж•ҲжһңгҖӮжіЁйҮҠеә”иҜҘжҳҜеҫҲиҜҰз»ҶдәҶпјҢдёҚиҝҮеӨҡи§ЈйҮҠгҖӮ
4.еҰӮдҪ•дҪҝз”ЁиҮӘе®ҡд№үзҡ„GalleryжҺ§д»¶е®һзҺ°жңҖз»Ҳзҡ„еӣҫзүҮжҹҘзңӢеҷЁ
дёӢйқўпјҢжҲ‘们зңӢдёҖдёӢпјҢеҰӮдҪ•дҪҝз”ЁиҝҷдёӘжҺ§д»¶пјҢе®һзҺ°жҲ‘们жңҖз»Ҳзҡ„ж•ҲжһңгҖӮ
еёғеұҖж–Ү件
<?xml version="1.0" encoding="utf-8"?>
<LinearLayout xmlns:android="http://schemas.android.com/apk/res/android"
  android:layout_width="fill_parent"
  android:layout_height="fill_parent"
  android:background="#F9F900"
  android:gravity="center_horizontal"
  android:orientation="vertical" >

  <com.examole.gallery.GalleryFlow
    android:id="@+id/mygallery"
    android:layout_width="match_parent"
    android:layout_height="100dp"
    android:layout_marginTop="20dp"
    android:gravity="center_vertical" />

  <ImageSwitcher
    android:id="@+id/switcher"
    android:layout_width="wrap_content"
    android:layout_height="match_parent"
    android:layout_gravity="center_horizontal" />

</LinearLayout>
жҲ‘们еңЁиҝҷйҮҢдҪҝз”ЁдәҶдёҖдёӘеҫҲйҷҢз”ҹзҡ„зұ»пјҢйӮЈе°ұжҳҜImageSwicherпјҢжҲ‘们зңӢдёҖдёӢпјҢеңЁActivityеҰӮдҪ•дҪҝз”Ё
public class MainActivity extends Activity implements AdapterView.OnItemSelectedListener, ViewSwitcher.ViewFactory {
private List<String> ImageList;
private ImageSwitcher mSwitcher;
private Gallery gallery;
@Override
public void onCreate(Bundle savedInstanceState) {
super.onCreate(savedInstanceState);
setContentView(R.layout.activity_main);
// иҺ·еҸ–еӣҫзүҮи·Ҝеҫ„
ImageList = getImagesFromSD();
mSwitcher = (ImageSwitcher) findViewById(R.id.switcher);
gallery = (Gallery) findViewById(R.id.mygallery);
// ImageSwitcherжҺ§д»¶еҝ…йЎ»е®һзҺ°ViewSwitcher.ViewFactoryжҺҘеҸЈпјҢ然еҗҺеңЁmakeViewж–№жі•дёӯпјҢиҝ”еӣһжҲ‘们йңҖиҰҒжҳҫзӨәзҡ„жҺ§д»¶еҚіеҸҜ
mSwitcher.setFactory(this);
// и®ҫзҪ®еӣҫзүҮзҡ„иҝӣе…Ҙе’ҢзҰ»ејҖзҡ„еҠЁз”»ж•Ҳжһң
mSwitcher.setInAnimation(AnimationUtils.loadAnimation(this, android.R.anim.slide_in_left));
mSwitcher.setOutAnimation(AnimationUtils.loadAnimation(this, android.R.anim.slide_out_right));
// з»ҷgalleryи®ҫзҪ®йҖӮй…ҚеҷЁ
gallery.setAdapter(new ImageAdapter(this, ImageList));
gallery.setOnItemSelectedListener(this);
}
private List<String> getImagesFromSD() {
List<String> imageList = new ArrayList<String>();
File f = Environment.getExternalStorageDirectory();
if (Environment.getExternalStorageState().equals(Environment.MEDIA_MOUNTED)) {
f = new File(Environment.getExternalStorageDirectory().toString());
} else {
Toast.makeText(MainActivity.this, R.string.sdcarderror, Toast.LENGTH_LONG).show();
return imageList;
}
File[] files = f.listFiles();
if (files == null || files.length == 0)
return imageList;
for (int i = 0; i < files.length; i++) {
File file = files[i];
if (isImageFile(file.getPath()))
imageList.add(file.getPath());
}
return imageList;
}
@SuppressLint("DefaultLocale")
private boolean isImageFile(String fName) {
String end = fName.substring(fName.lastIndexOf(".") + 1, fName.length()).toLowerCase();
if (end.equals("jpg") || end.equals("gif") || end.equals("png") || end.equals("jpeg") || end.equals("bmp")) {
return true;
}
return false;
}
@Override
public void onItemSelected(AdapterView<?> parent, View view, int position, long id) {
// еҪ“зӮ№еҮ»дёҠйқўзҡ„е°ҸеӣҫзүҮзҡ„ж—¶еҖҷпјҢиҺ·еҸ–еӣҫзүҮзҡ„з»қеҜ№и·Ҝеҫ„пјҢ然еҗҺи®ҫзҪ®з»ҷmSwitcher
String photoURL = ImageList.get(position);
mSwitcher.setImageURI(Uri.parse(photoURL));
}
@Override
public void onNothingSelected(AdapterView<?> parent) {
}
@Override
public View makeView() {
ImageView i = new ImageView(this);
i.setBackgroundColor(0x00000000);
i.setScaleType(ImageView.ScaleType.CENTER_INSIDE);
i.setLayoutParams(new ImageSwitcher.LayoutParams(LayoutParams.MATCH_PARENT, LayoutParams.MATCH_PARENT));
return i;
}
}
йҷӨдәҶImageSwitcherиҝҷдёӘжҺ§д»¶пјҢе…¶д»–зҡ„еә”иҜҘйғҪеҫҲзҶҹжӮүдәҶпјҢз»ҸиҝҮиҝҷеҮ дёӘжӯҘйӘӨпјҢжҲ‘们з»ҲдәҺе®һзҺ°дәҶдёҖдёӘз®ҖеҚ•зҡ„д»ҝ3Dж•Ҳжһңзҡ„еӣҫзүҮжҹҘзңӢеҷЁгҖӮ
д»ҘдёҠе°ұжҳҜжң¬ж–Үзҡ„е…ЁйғЁеҶ…е®№пјҢеёҢжңӣеҜ№еӨ§е®¶зҡ„еӯҰд№ жңүжүҖеё®еҠ©пјҢд№ҹеёҢжңӣеӨ§е®¶еӨҡеӨҡж”ҜжҢҒдәҝйҖҹдә‘гҖӮ
е…ҚиҙЈеЈ°жҳҺпјҡжң¬з«ҷеҸ‘еёғзҡ„еҶ…е®№пјҲеӣҫзүҮгҖҒи§Ҷйў‘е’Ңж–Үеӯ—пјүд»ҘеҺҹеҲӣгҖҒиҪ¬иҪҪе’ҢеҲҶдә«дёәдё»пјҢж–Үз« и§ӮзӮ№дёҚд»ЈиЎЁжң¬зҪ‘з«ҷз«ӢеңәпјҢеҰӮжһңж¶үеҸҠдҫөжқғиҜ·иҒ”зі»з«ҷй•ҝйӮ®з®ұпјҡis@yisu.comиҝӣиЎҢдёҫжҠҘпјҢ并жҸҗдҫӣзӣёе…іиҜҒжҚ®пјҢдёҖз»ҸжҹҘе®һпјҢе°Ҷз«ӢеҲ»еҲ йҷӨж¶үе«ҢдҫөжқғеҶ…е®№гҖӮ
жӮЁеҘҪпјҢзҷ»еҪ•еҗҺжүҚиғҪдёӢи®ўеҚ•е“ҰпјҒ