您好,登录后才能下订单哦!
密码登录
登录注册
点击 登录注册 即表示同意《亿速云用户服务条款》
这篇文章将为大家详细讲解有关spring boot如何使用RabbitMQ实现topic主题,小编觉得挺实用的,因此分享给大家做个参考,希望大家阅读完这篇文章后可以有所收获。
主题交换器
使用主题交换器时不能采用任意写法的路由键,路由键的形式应该是由点分割的单词。用什么词都行,通常都是能表明意义的。例如"stock.usd.nyse", "nyse.vmw", "quick.orange.rabbit"。但字数大小被限制在最多255字节。
使用主题交换器定义路由键需要注意点2点
*星号代表一个单词。
#井号代表0个或多个单词。
定义符合主题交换器的路由键
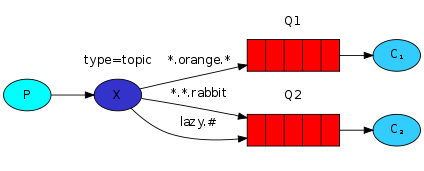
在这个例子中,我们将发送所有描述动物的消息。这个消息将会和由3个单词2个点构成的路由键一起发送。第一个单词是表述速度,第二个描述颜色,第三个描述种类:"<speed>.<colour>.<species>"。
创建三种绑定,Q1和键"*.orange.*"绑定,Q2和"*.*.rabbit" 、"lazy.#"绑定。
三种绑定关系的概述为:
Q1 对橙色的动物感兴趣。(队列1)
Q2 对所有关于兔子和所有关于慢速的动物感兴趣。(队列2)
一个和路由键被设置成"quick.orange.rabbit"的消息将会被传递到Q1、Q2这两个队列中。"lazy.orange.elephant" 也会这样。"quick.orange.fox"会去第一个队列,"lazy.brown.fox"会去第二个队列,"lazy.pink.rabbit"会去第二个队列及时它匹配了2次绑定。"quick.brown.fox"因为不匹配哪也去不了,会被丢弃。
那么像"orange" 、 "quick.orange.male.rabbit"这样的呢?因为没有匹配到任何绑定也会被丢弃。
那么像"lazy.orange.male.rabbit"也是四个词的路由键呢?,由于匹配到了lazy.#这个将会被传递到第二个队列中。
主题交换器的小技巧
主题交换器是牛逼的并且表现的与其它交换器相似。
当一个队列和 "#" 绑定键绑定时,该队列能收到所有的消息,这点与扇形(fanout)交换器类似。
当不使用 "*" and "#" 时,主题交换器就与直连交换器没啥两样。
代码示例
代码与之前的路由代码没啥两样,请看
Config.java
package com.zb.rabbitMQtest.t5topics.config;

import org.springframework.amqp.core.*;
import org.springframework.context.annotation.Bean;
import org.springframework.context.annotation.Configuration;

/**
 * @author 张博
 */
@Configuration(value = "t5Config")
public class Config {

  /**
   * 创建人:张博
   * 时间:2018/3/5 上午10:45
   * @apiNote 定义主题交换器
   */
  @Bean
  public TopicExchange topicExchange() {
    return new TopicExchange("topic-exchange");
  }

  /**
   * 创建人:张博
   * 时间:2018/3/5 上午10:48
   * @apiNote 定义自动删除匿名队列
   */
  @Bean
  public Queue autoDeleteQueue0() {
    return new AnonymousQueue();
  }

  /**
   * 创建人:张博
   * 时间:2018/3/5 上午10:48
   * @apiNote 定义自动删除匿名队列
   */
  @Bean
  public Queue autoDeleteQueue1() {
    return new AnonymousQueue();
  }

  /**
   * 创建人:张博
   * 时间:2018/3/5 上午10:48
   * @param topicExchange 主题交换器
   * @param autoDeleteQueue0 自动删除队列
   * @apiNote 绑定使用路由键为 orange 的 autoDeleteQueue0 队列到主题交换器上
   * @return Binding
   */
  @Bean
  public Binding binding0a(TopicExchange topicExchange, Queue autoDeleteQueue0) {
    return BindingBuilder.bind(autoDeleteQueue0).to(topicExchange).with("*.orange.*");
  }

  /**
   * 创建人:张博
   * 时间:2018/3/5 上午10:48
   * @param topicExchange 主题交换器
   * @param autoDeleteQueue1 自动删除队列
   * @apiNote 绑定使用路由键为 black 的 autoDeleteQueue1 队列到主题交换器上
   * @return Binding
   */
  @Bean
  public Binding binding1a(TopicExchange topicExchange, Queue autoDeleteQueue1) {
    return BindingBuilder.bind(autoDeleteQueue1).to(topicExchange).with("*.*.rabbit");
  }

  /**
   * 创建人:张博
   * 时间:2018/3/5 上午10:48
   * @param topicExchange 主题交换器
   * @param autoDeleteQueue1 自动删除队列
   * @apiNote 绑定使用路由键为 green 的 autoDeleteQueue1 队列到主题交换器上
   * @return Binding
   */
  @Bean
  public Binding binding1b(TopicExchange topicExchange, Queue autoDeleteQueue1) {
    return BindingBuilder.bind(autoDeleteQueue1).to(topicExchange).with("lazy.#");
  }
}
Receiver.java
package com.zb.rabbitMQtest.t5topics.receiver;

import org.springframework.amqp.rabbit.annotation.RabbitListener;
import org.springframework.stereotype.Component;

/**
 * @author 张博
 */
@Component(value = "t5Receiver")
public class Receiver {

  @RabbitListener(queues = "#{autoDeleteQueue0.name}")
  public void receiver0(String str) {
    System.out.println("receiver0++++++++++:" + str);
    //try {
    //  Thread.sleep(1000);
    //} catch (InterruptedException e) {
    //  e.printStackTrace();
    //}
  }

  @RabbitListener(queues = "#{autoDeleteQueue1.name}")
  public void receiver1(String str) {
    System.out.println("receiver1++++++++++:" + str);
    //try {
    //  Thread.sleep(1000);
    //} catch (InterruptedException e) {
    //  e.printStackTrace();
    //}
  }
}
Send.java
package com.zb.rabbitMQtest.t5topics.send;

import org.springframework.amqp.core.TopicExchange;
import org.springframework.amqp.rabbit.core.RabbitTemplate;
import org.springframework.beans.factory.annotation.Autowired;
import org.springframework.stereotype.Component;

/**
 * @author 张博
 */
@Component(value = "t5Send")
public class Send {

  @Autowired
  private TopicExchange topicExchange;

  @Autowired
  private RabbitTemplate rabbitTemplate;

  private String[] keys = {"quick.orange.rabbit",
      "lazy.orange.elephant", "quick.orange.fox",
      "lazy.brown.fox", "lazy.pink.rabbit", "quick.brown.fox"};

  public void send() {
    String message = "哈哈哈";
    for (int i = 0; i < 5; i++) {
      System.out.println("send++++++++++:".concat(message));
      rabbitTemplate.convertAndSend(topicExchange.getName(), keys[5], message);
    }
  }
}
SendTest.java
package com.zb.rabbitMQtest.t5topics.send;

import org.junit.Test;
import org.junit.runner.RunWith;
import org.springframework.beans.factory.annotation.Autowired;
import org.springframework.boot.test.context.SpringBootTest;
import org.springframework.test.context.junit4.SpringRunner;

/**
 * @author 张博
 */
@RunWith(SpringRunner.class)
@SpringBootTest
public class SendTest {

  @Autowired
  private Send send;
  @Test
  public void send() throws Exception {
    send.send();
  }
}
关于“spring boot如何使用RabbitMQ实现topic主题”这篇文章就分享到这里了,希望以上内容可以对大家有一定的帮助,使各位可以学到更多知识,如果觉得文章不错,请把它分享出去让更多的人看到。
免责声明:本站发布的内容(图片、视频和文字)以原创、转载和分享为主,文章观点不代表本网站立场,如果涉及侵权请联系站长邮箱:is@yisu.com进行举报,并提供相关证据,一经查实,将立刻删除涉嫌侵权内容。