жӮЁеҘҪпјҢзҷ»еҪ•еҗҺжүҚиғҪдёӢи®ўеҚ•е“ҰпјҒ
жҖҺд№ҲеңЁSpringBootдёӯдҪҝз”ЁEditor.mdжһ„е»әдёҖдёӘMarkdownеҜҢж–Үжң¬зј–иҫ‘еҷЁпјҹзӣёдҝЎеҫҲеӨҡжІЎжңүз»ҸйӘҢзҡ„дәәеҜ№жӯӨжқҹжүӢж— зӯ–пјҢдёәжӯӨжң¬ж–ҮжҖ»з»“дәҶй—®йўҳеҮәзҺ°зҡ„еҺҹеӣ е’Ңи§ЈеҶіж–№жі•пјҢйҖҡиҝҮиҝҷзҜҮж–Үз« еёҢжңӣдҪ иғҪи§ЈеҶіиҝҷдёӘй—®йўҳгҖӮ
Editor.md жҳҜдёҖж¬ҫејҖжәҗзҡ„гҖҒеҸҜеөҢе…Ҙзҡ„ Markdown еңЁзәҝзј–иҫ‘еҷЁпјҲ组件пјүпјҢеҹәдәҺ CodeMirrorгҖҒjQuery е’Ң Marked жһ„е»әгҖӮжң¬з« е°ҶдҪҝз”ЁSpringBootж•ҙеҗҲEditor.mdжһ„е»әMarkdownзј–иҫ‘еҷЁгҖӮ
дёӢиҪҪжҸ’件
йЎ№зӣ®ең°еқҖпјҡEditor.md
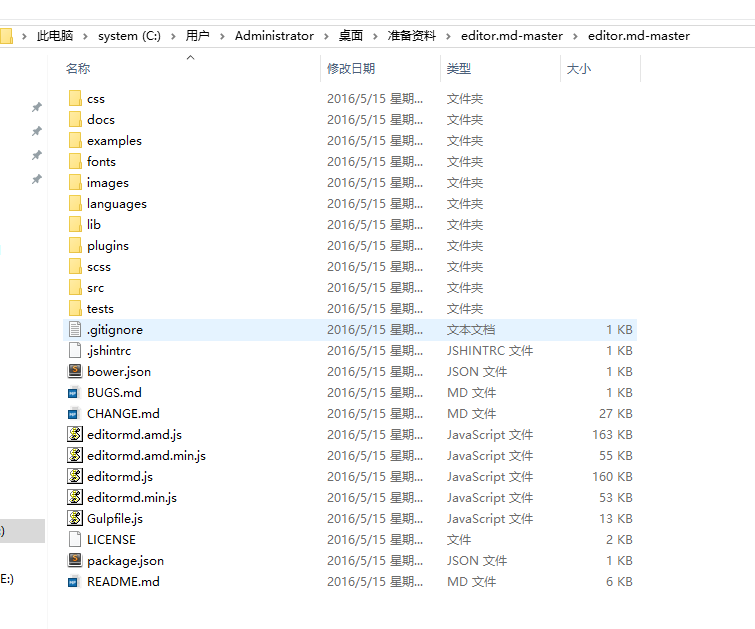
и§ЈеҺӢзӣ®еҪ•з»“жһ„пјҡ

й…ҚзҪ®Editor.md
е°Ҷexapmlesж–Ү件еӨ№дёӯзҡ„simple.htmlж”ҫзҪ®еҲ°йЎ№зӣ®дёӯпјҢ并й…ҚзҪ®еҜ№еә”зҡ„cssе’Ңjsж–Ү件
й…ҚзҪ®зј–иҫ‘еҷЁ
......
<script src="${re.contextPath}/jquery.min.js"></script>
<script src="${re.contextPath}/editor/editormd.min.js"></script>
<link rel="stylesheet" href="${re.contextPath}/editor/css/style.css" rel="external nofollow" />
<link rel="stylesheet" href="${re.contextPath}/editor/css/editormd.css" rel="external nofollow" rel="external nofollow" />
<link rel="shortcut icon" href="https://pandao.github.io/editor.md/favicon.ico" rel="external nofollow" type="image/x-icon"/>
......
<!-- еӯҳж”ҫжәҗж–Ү件用дәҺзј–иҫ‘ -->
<textarea id="textContent" name="textContent">
</textarea>
<!-- 第дәҢдёӘйҡҗи—Ҹж–Үжң¬еҹҹпјҢз”ЁжқҘжһ„йҖ з”ҹжҲҗзҡ„HTMLд»Јз ҒпјҢж–№дҫҝиЎЁеҚ•POSTжҸҗдәӨпјҢиҝҷйҮҢзҡ„nameеҸҜд»Ҙд»»ж„ҸеҸ–пјҢеҗҺеҸ°жҺҘеҸ—ж—¶д»ҘиҝҷдёӘnameй”®дёәеҮҶ -->
<textarea id="text" class="editormd-html-textarea" name="text"></textarea>
</div>еҲқе§ӢеҢ–зј–иҫ‘еҷЁ
var testEditor;
$(function () {
testEditor = editormd("test-editormd", {
width: "90%",
height: 640,
syncScrolling: "single",
path: "${re.contextPath}/editor/lib/",
imageUpload: true,
imageFormats: ["jpg", "jpeg", "gif", "png", "bmp", "webp"],
imageUploadURL: "/file",
//иҝҷдёӘй…ҚзҪ®еңЁsimple.htmlдёӯ并没жңүпјҢдҪҶжҳҜдёәдәҶиғҪеӨҹжҸҗдәӨиЎЁеҚ•пјҢдҪҝз”ЁиҝҷдёӘй…ҚзҪ®еҸҜд»Ҙи®©жһ„йҖ еҮәжқҘзҡ„HTMLд»Јз ҒзӣҙжҺҘеңЁз¬¬дәҢдёӘйҡҗи—Ҹзҡ„textareaеҹҹдёӯпјҢж–№дҫҝpostжҸҗдәӨиЎЁеҚ•гҖӮ
saveHTMLToTextarea: true
// previewTheme : "dark"
});
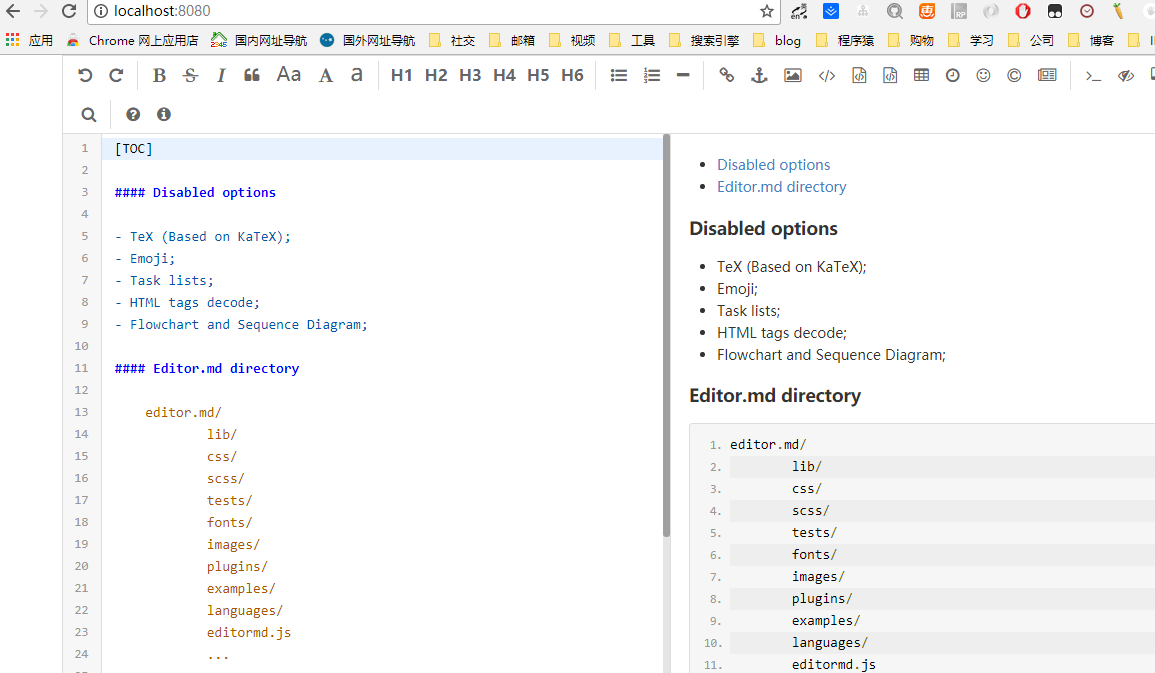
});иҝҷж ·е°ұе®һзҺ°дәҶжңҖз®ҖеҚ•зҡ„editor.mdзј–иҫ‘еҷЁпјҢж•ҲжһңеҰӮдёӢпјҡ

и®ҝй—®ең°еқҖпјҡhttp://localhost:8080/
еӣҫзүҮдёҠдј
з”ұдәҺеңЁеҲқе§ӢеҢ–зј–иҫ‘еҷЁдёӯй…ҚзҪ®зҡ„еӣҫзүҮдёҠдј ең°еқҖдёәimageUploadURL: "/file",пјҢдёҺд№ӢеҜ№еә”пјҢжҲ‘们еңЁ/fileеӨ„зҗҶж–Ү件дёҠдј еҚіеҸҜ
@RestController
@RequestMapping("/file")
@Slf4j
public class FileController {
// @Value("")
// String folder = System.getProperty("user.dir")+File.separator+"upload"+File.separator;
/**
* еңЁй…ҚзҪ®ж–Ү件дёӯй…ҚзҪ®зҡ„ж–Ү件дҝқеӯҳи·Ҝеҫ„
*/
@Value("${img.location}")
private String folder;
@PostMapping
public FileInfo upload(HttpServletRequest request, @RequestParam(value = "editormd-image-file", required = false) MultipartFile file) throws Exception {
log.info("гҖҗFileControllerгҖ‘ fileName={},fileOrginNmae={},fileSize={}", file.getName(), file.getOriginalFilename(), file.getSize());
log.info(request.getContextPath());
String fileName = file.getOriginalFilename();
String suffix = fileName.substring(fileName.lastIndexOf(".") + 1);
String newFileName = new Date().getTime() + "." + suffix;
File localFile = new File(folder, newFileName);
file.transferTo(localFile);
log.info(localFile.getAbsolutePath());
return new FileInfo(1, "дёҠдј жҲҗеҠҹ", request.getRequestURL().substring(0,request.getRequestURL().lastIndexOf("/"))+"/upload/"+newFileName);
}
@GetMapping("/{id}")
public void downLoad(@PathVariable String id, HttpServletRequest request, HttpServletResponse response) {
try (InputStream inputStream = new FileInputStream(new File(folder, id + ".txt"));
OutputStream outputStream = response.getOutputStream();) {
response.setContentType("application/x-download");
response.setHeader("Content-Disposition", "attachment;filename=test.txt");
IOUtils.copy(inputStream, outputStream);
outputStream.flush();
} catch (Exception e) {
}
}
}ж–Ү件预и§Ҳ
иЎЁеҚ•POSTжҸҗдәӨж—¶пјҢeditor.mdе°ҶжҲ‘们зҡ„markdownиҜӯжі•ж–ҮжЎЈзҝ»иҜ‘жҲҗдәҶHTMLиҜӯиЁҖпјҢ并е°Ҷhtmlеӯ—з¬ҰдёІжҸҗдәӨз»ҷдәҶжҲ‘们зҡ„еҗҺеҸ°пјҢеҗҺеҸ°е°ҶиҝҷдәӣHTMLеӯ—з¬ҰдёІжҢҒд№…еҢ–еҲ°ж•°жҚ®еә“дёӯгҖӮе…·дҪ“еңЁйЎөйқўжҳҫзӨәеҒҡжі•еҰӮдёӢпјҡ
<!DOCTYPE html>
<html lang="zh">
<head>
<meta charset="utf-8"/>
<title>Editor.md examples</title>
<link rel="stylesheet" href="${re.contextPath}/editor/css/editormd.preview.min.css" rel="external nofollow" />
<link rel="stylesheet" href="${re.contextPath}/editor/css/editormd.css" rel="external nofollow" rel="external nofollow" />
</head>
<body>
<!-- еӣ дёәжҲ‘们дҪҝз”ЁдәҶdarkдё»йўҳпјҢжүҖд»ҘеңЁе®№еҷЁdivдёҠеҠ дёҠdarkзҡ„дё»йўҳзұ»пјҢе®һзҺ°жҲ‘们иҮӘе®ҡд№үзҡ„д»Јз Ғж ·ејҸ -->
<div class="content editormd-preview-theme" id="content">${editor.content!''}</div>
<script src="${re.contextPath}/jquery.min.js"></script>
<script src="${re.contextPath}/editor/lib/marked.min.js"></script>
<script src="${re.contextPath}/editor/lib/prettify.min.js"></script>
<script src="${re.contextPath}/editor/editormd.min.js"></script>
<script type="text/javascript">
editormd.markdownToHTML("content");
</script>
</body>
</html>зңӢе®ҢдёҠиҝ°еҶ…е®№пјҢдҪ 们жҺҢжҸЎжҖҺд№ҲеңЁSpringBootдёӯдҪҝз”ЁEditor.mdжһ„е»әдёҖдёӘMarkdownеҜҢж–Үжң¬зј–иҫ‘еҷЁзҡ„ж–№жі•дәҶеҗ—пјҹеҰӮжһңиҝҳжғіеӯҰеҲ°жӣҙеӨҡжҠҖиғҪжҲ–жғідәҶи§ЈжӣҙеӨҡзӣёе…іеҶ…е®№пјҢж¬ўиҝҺе…іжіЁдәҝйҖҹдә‘иЎҢдёҡиө„и®Ҝйў‘йҒ“пјҢж„ҹи°ўеҗ„дҪҚзҡ„йҳ…иҜ»пјҒ
е…ҚиҙЈеЈ°жҳҺпјҡжң¬з«ҷеҸ‘еёғзҡ„еҶ…е®№пјҲеӣҫзүҮгҖҒи§Ҷйў‘е’Ңж–Үеӯ—пјүд»ҘеҺҹеҲӣгҖҒиҪ¬иҪҪе’ҢеҲҶдә«дёәдё»пјҢж–Үз« и§ӮзӮ№дёҚд»ЈиЎЁжң¬зҪ‘з«ҷз«ӢеңәпјҢеҰӮжһңж¶үеҸҠдҫөжқғиҜ·иҒ”зі»з«ҷй•ҝйӮ®з®ұпјҡis@yisu.comиҝӣиЎҢдёҫжҠҘпјҢ并жҸҗдҫӣзӣёе…іиҜҒжҚ®пјҢдёҖз»ҸжҹҘе®һпјҢе°Ҷз«ӢеҲ»еҲ йҷӨж¶үе«ҢдҫөжқғеҶ…е®№гҖӮ
жӮЁеҘҪпјҢзҷ»еҪ•еҗҺжүҚиғҪдёӢи®ўеҚ•е“ҰпјҒ