жӮЁеҘҪпјҢзҷ»еҪ•еҗҺжүҚиғҪдёӢи®ўеҚ•е“ҰпјҒ
иҝҷзҜҮж–Үз« дё»иҰҒдёәеӨ§е®¶еұ•зӨәдәҶвҖңAndroidеҰӮдҪ•е®һзҺ°д»ҝж”Ҝд»ҳе®қиҮӘе®ҡд№үеҜҶз Ғиҫ“е…ҘжЎҶеҸҠе®үе…Ёй”®зӣҳвҖқпјҢеҶ…е®№з®ҖиҖҢжҳ“жҮӮпјҢжқЎзҗҶжё…жҷ°пјҢеёҢжңӣиғҪеӨҹеё®еҠ©еӨ§е®¶и§ЈеҶіз–‘жғ‘пјҢдёӢйқўи®©е°Ҹзј–еёҰйўҶеӨ§е®¶дёҖиө·з ”究并еӯҰд№ дёҖдёӢвҖңAndroidеҰӮдҪ•е®һзҺ°д»ҝж”Ҝд»ҳе®қиҮӘе®ҡд№үеҜҶз Ғиҫ“е…ҘжЎҶеҸҠе®үе…Ёй”®зӣҳвҖқиҝҷзҜҮж–Үз« еҗ§гҖӮ
д№ӢеүҚеҒҡиҝҮзҡ„йЎ№зӣ®йҮҢжңүиҝҗз”ЁеҲ°дёҖдёӘж”Ҝд»ҳеңәжҷҜпјҡз”ЁжҲ·еҠһзҗҶдёҡеҠЎж—¶йңҖиҰҒиҫ“е…ҘдәӨжҳ“еҜҶз ҒпјҢ并且еҸҜж №жҚ®е№іеҸ°дёӢеҸ‘зҡ„ж”Ҝд»ҳж–№ејҸиҝӣиЎҢйҖүжӢ©гҖӮиҝҷдёҺж”Ҝд»ҳе®қзҡ„еҜҶз Ғиҫ“е…Ҙж–№ејҸеҚҒеҲҶзӣёдјјпјҢеҰӮжһңдҪҝз”ЁAndroidзі»з»ҹжҲ–иҖ…第дёүж–№иҪҜ件зҡ„й”®зӣҳпјҢдјҡжңүеҜҶз Ғжі„йңІзҡ„йЈҺйҷ©гҖӮеӣ жӯӨпјҢеӨ§еӨҡж•°зҡ„еә”з”ЁиҪҜ件дҪҝз”Ёзҡ„жҳҜиҮӘе®ҡд№үзҡ„еҜҶз Ғиҫ“е…ҘжЎҶеҸҠе®үе…Ёй”®зӣҳгҖӮ
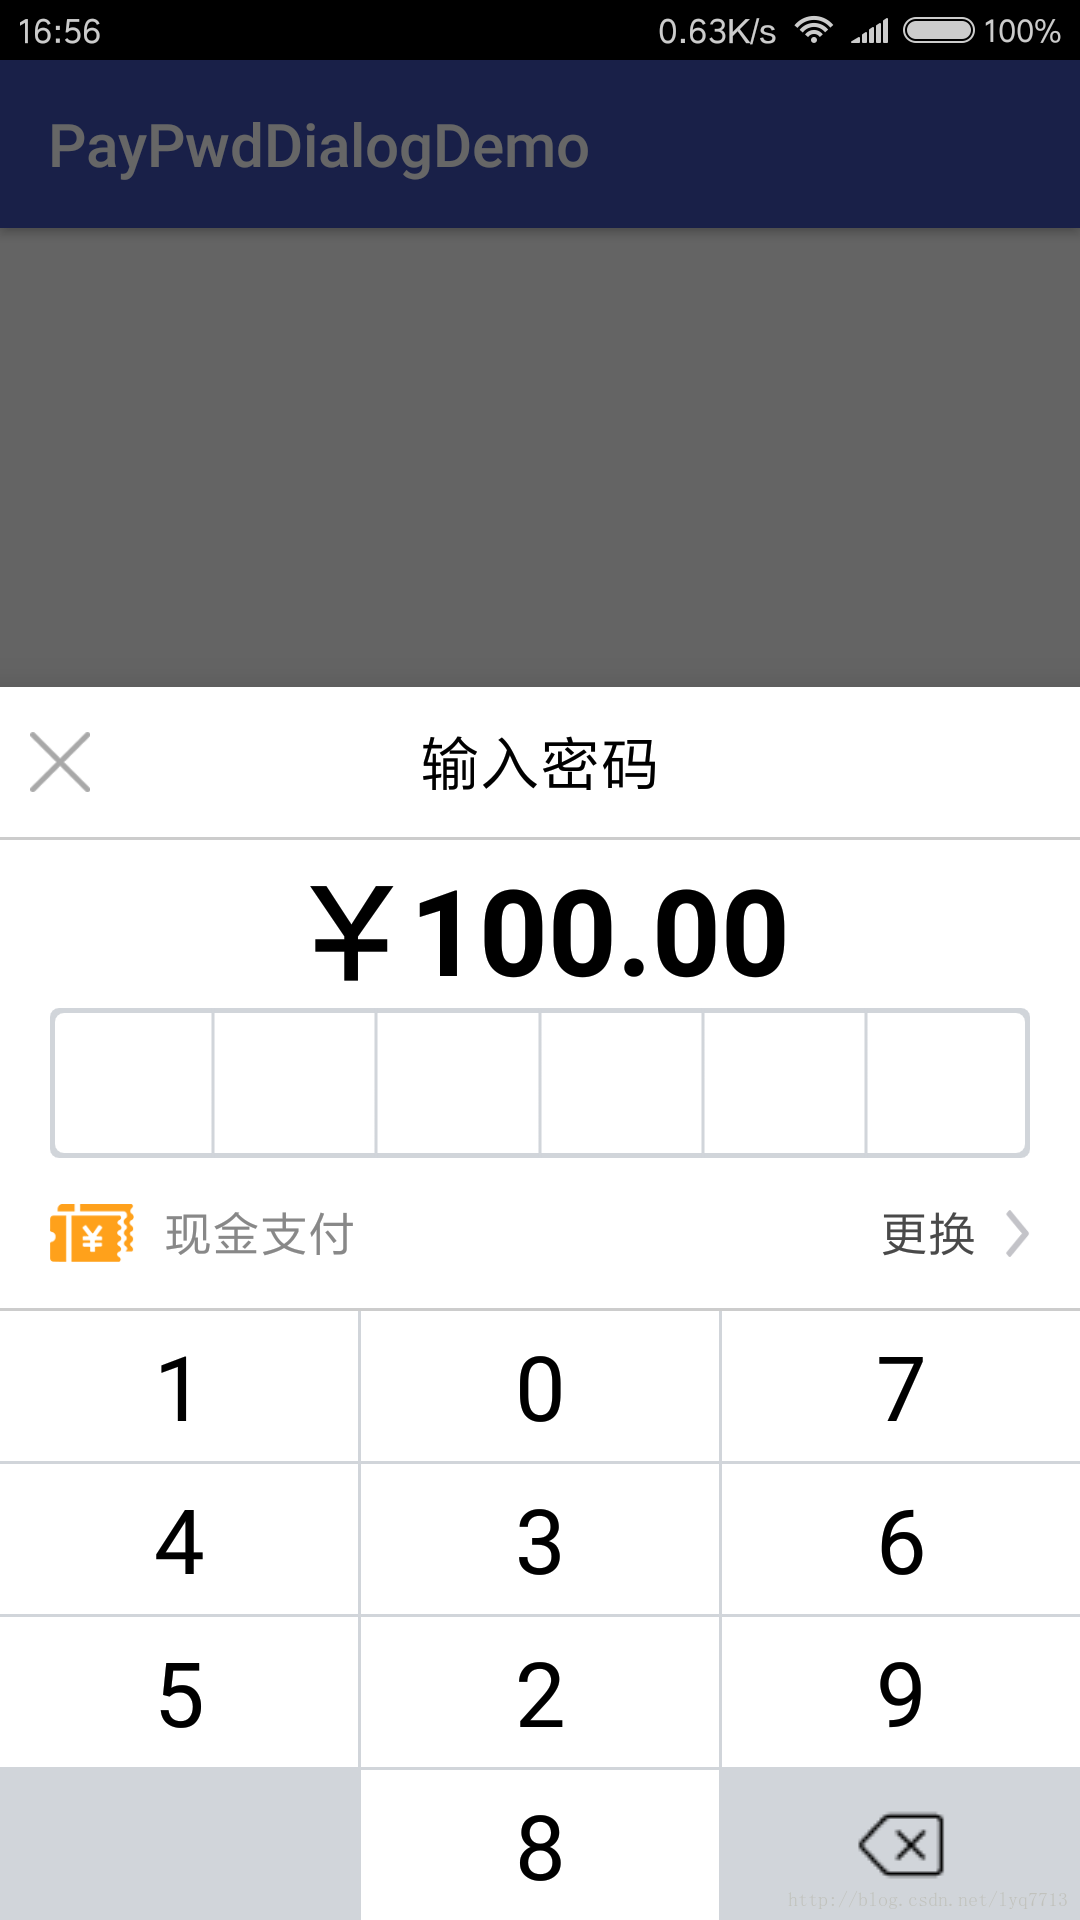
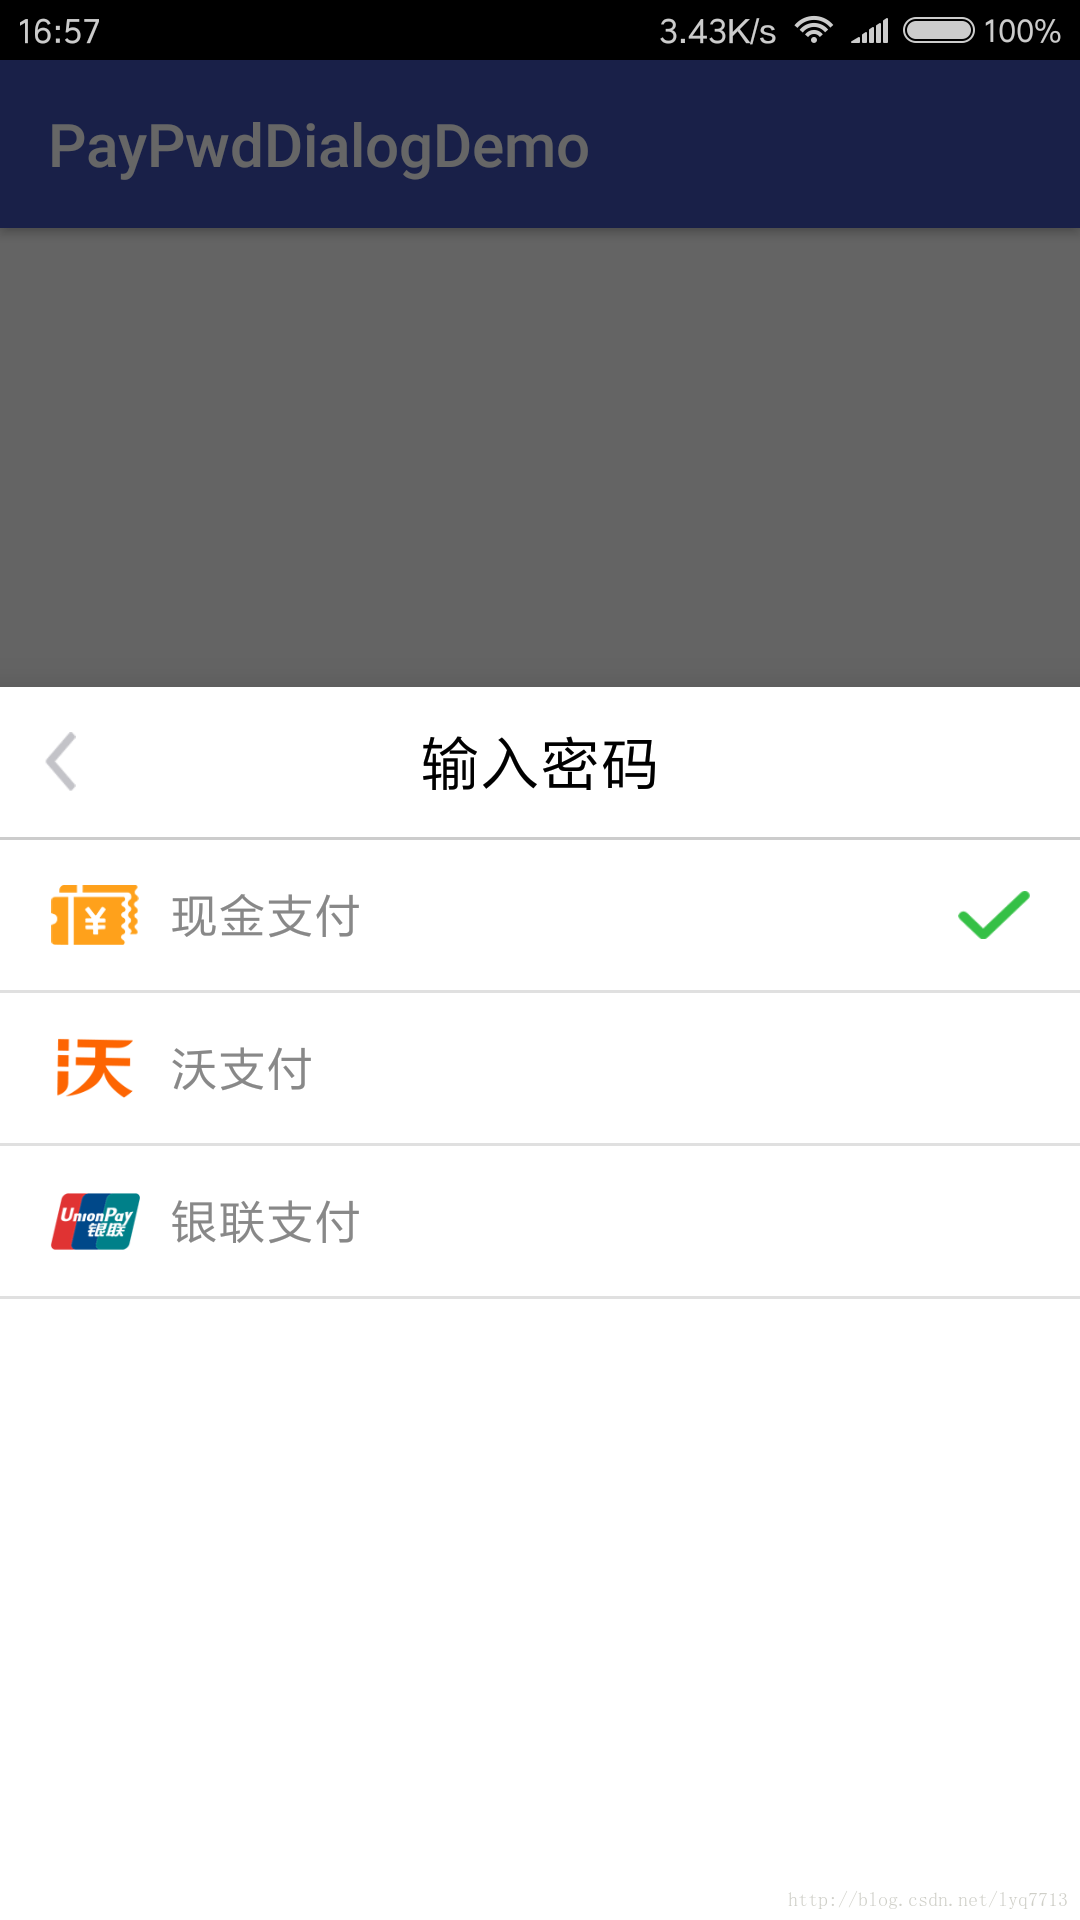
з”ұдәҺеҜҶз Ғиҫ“е…Ҙж–№ејҸйңҖиҰҒе®һзҺ°дёҖдёӘд»Һеә•йғЁеј№еҮәзҡ„ж•ҲжһңпјҢеӣ жӯӨжҖ»дҪ“дёҠеҶіе®ҡйҮҮз”ЁBottomSheetDialogжқҘиҝӣиЎҢе°ҒиЈ…пјҢеҗҢж—¶дёәдәҶжҸҗй«ҳе®үе…ЁжҖ§пјҢиҝҳеә”иҜҘйҡҸжңәз”ҹжҲҗй”®зӣҳдёҠзҡ„ж•°еӯ—пјҢз•ҢйқўеҰӮдёӢеӣҫжүҖзӨәпјҡ


йҰ–е…Ҳж–°е»әдёҖдёӘPasswordInputViewзұ»пјҢе°ҶйңҖиҰҒдҪҝз”ЁеҲ°зҡ„ContextеҜ№иұЎгҖҒж”Ҝд»ҳйҮ‘йўқгҖҒеҸҜж”ҜжҢҒзҡ„ж”Ҝд»ҳж–№ејҸзӯүж•°жҚ®пјҢдҪңдёәиҜҘзұ»жһ„йҖ ж–№жі•зҡ„еҸӮж•°иҝӣиЎҢдј йҖ’гҖӮдёӢж–Үиҝҳе°ҶжҸҗеҲ°иҜҘзұ»жңүдёҖдёӘеӣһи°ғж–№жі•пјҢеҪ“з”ЁжҲ·иҫ“е…Ҙзҡ„еҜҶз Ғж»Ўи¶іе…ӯдҪҚж—¶пјҢеҸҜд»ҘеңЁеӣһи°ғж–№жі•дёӯиҺ·еҸ–еҜҶз Ғ并жҳҫзӨәеҮәжқҘгҖӮPasswordInputViewзұ»зҡ„жһ„йҖ ж–№жі•еҰӮдёӢжүҖзӨәпјҡ
public PasswordInputView(Context context, String payMoney, List<String> payWayList) {
this.context = context;
this.payMoney = payMoney;
this.payWayList = payWayList;
payPwdDialog = new BottomSheetDialog(context);
View view = LayoutInflater.from(context).inflate(R.layout.dialog_pay_pwd, null, false);
initStep1(view);
initStep2(view);
llyPwdInputView = (LinearLayout) view.findViewById(R.id.lly_pwd_input_view);
llyPayWaySelect = (LinearLayout) view.findViewById(R.id.lly_pay_way_select);
showStep1(); // жҳҫзӨә第дёҖйЎө
}еӣ дёәдёҚиғҪжҳҺж–ҮжҳҫзӨәиҫ“е…Ҙзҡ„еҜҶз ҒпјҢжүҖд»ҘдҪҝз”ЁвҖңв—ҸвҖқжқҘд»ЈжӣҝжҜҸдҪҚеҜҶз ҒгҖӮиҮӘе®ҡд№үеҜҶз Ғиҫ“е…ҘжЎҶж¶үеҸҠеҲ°зҡ„иҮӘе®ҡд№үеұһжҖ§пјҢдё»иҰҒеҢ…жӢ¬пјҡиҫ“е…ҘжЎҶзҡ„еӨ§е°ҸгҖҒйўңиүІгҖҒеңҶи§’еҚҠеҫ„д»ҘеҸҠеҜҶз ҒеңҶзӮ№зҡ„еӨ§е°ҸгҖҒйўңиүІгҖҒеҚҠеҫ„гҖӮеӣ жӯӨпјҢиҮӘе®ҡд№үеұһжҖ§attrs.xmlж–Ү件еҰӮдёӢжүҖзӨәпјҡ
<?xml version="1.0" encoding="utf-8"?>
<resources>
 <declare-styleable name="PasswordEditText">
  <attr name="borderWidth" format="dimension"/>
  <attr name="borderColor" format="color"/>
  <attr name="borderRadius" format="dimension"/>
  <attr name="passwordLength" format="integer"/>
  <attr name="passwordWidth" format="dimension"/>
  <attr name="passwordColor" format="color"/>
  <attr name="passwordRadius" format="dimension"/>
 </declare-styleable>
</resources>
жҺҘдёӢжқҘе°ұйңҖиҰҒеҺ»з»ҳеҲ¶иҮӘе®ҡд№үжҺ§д»¶дәҶгҖӮйҰ–е…ҲиҺ·еҸ–иҮӘе®ҡд№үеұһжҖ§пјҢ然еҗҺеңЁonDraw()дёӯиҝӣиЎҢз»ҳеҲ¶пјҢд»Јз ҒеҰӮдёӢжүҖзӨәпјҡ
package com.syd.paypwddialogdemo;
import static android.graphics.Paint.ANTI_ALIAS_FLAG;
import android.content.Context;
import android.content.res.Resources;
import android.content.res.TypedArray;
import android.graphics.Canvas;
import android.graphics.Color;
import android.graphics.Paint;
import android.graphics.RectF;
import android.support.v7.widget.AppCompatEditText;
import android.util.AttributeSet;
/**
* иҮӘе®ҡд№үеҜҶз Ғиҫ“е…ҘжЎҶ
*/
public class PasswordEditText extends AppCompatEditText {
private int textLength;
private int borderColor;
private float borderWidth;
private float borderRadius;
private int passwordLength;
private int passwordColor;
private float passwordWidth;
private float passwordRadius;
private Paint passwordPaint = new Paint(ANTI_ALIAS_FLAG);
private Paint borderPaint = new Paint(ANTI_ALIAS_FLAG);
private final int defaultContMargin = 5;
private final int defaultSplitLineWidth = 3;
public PasswordEditText(Context context, AttributeSet attrs) {
super(context, attrs);
final Resources res = getResources();
final int defaultBorderColor = res.getColor(R.color.colorGray);
final float defaultBorderWidth = res.getDimension(R.dimen.default_ev_border_width);
final float defaultBorderRadius = res.getDimension(R.dimen.default_ev_border_radius);
final int defaultPasswordLength = res.getInteger(R.integer.default_ev_password_length);
final int defaultPasswordColor = res.getColor(R.color.colorBlack);
final float defaultPasswordWidth = res.getDimension(R.dimen.default_ev_password_width);
final float defaultPasswordRadius = res.getDimension(R.dimen.default_ev_password_radius);
TypedArray a = context.getTheme().obtainStyledAttributes(attrs, R.styleable.PasswordEditText, 0, 0);
try {
borderColor = a.getColor(R.styleable.PasswordEditText_borderColor, defaultBorderColor);
borderWidth = a.getDimension(R.styleable.PasswordEditText_borderWidth, defaultBorderWidth);
borderRadius = a.getDimension(R.styleable.PasswordEditText_borderRadius, defaultBorderRadius);
passwordLength = a.getInt(R.styleable.PasswordEditText_passwordLength, defaultPasswordLength);
passwordColor = a.getColor(R.styleable.PasswordEditText_passwordColor, defaultPasswordColor);
passwordWidth = a.getDimension(R.styleable.PasswordEditText_passwordWidth, defaultPasswordWidth);
passwordRadius = a.getDimension(R.styleable.PasswordEditText_passwordRadius, defaultPasswordRadius);
} finally {
a.recycle();
}
borderPaint.setStrokeWidth(borderWidth);
borderPaint.setColor(borderColor);
passwordPaint.setStrokeWidth(passwordWidth);
passwordPaint.setStyle(Paint.Style.FILL);
passwordPaint.setColor(passwordColor);
}
@Override
protected void onDraw(Canvas canvas) {
int width = getWidth();
int height = getHeight();
RectF rect = new RectF(0, 0, width, height);
borderPaint.setColor(borderColor);
canvas.drawRoundRect(rect, borderRadius, borderRadius, borderPaint);
RectF rectIn = new RectF(rect.left + defaultContMargin, rect.top + defaultContMargin,
rect.right - defaultContMargin, rect.bottom - defaultContMargin);
borderPaint.setColor(Color.WHITE);
canvas.drawRoundRect(rectIn, borderRadius, borderRadius, borderPaint);
borderPaint.setColor(borderColor);
borderPaint.setStrokeWidth(defaultSplitLineWidth);
for (int i = 1; i < passwordLength; i++) {
float x = width * i / passwordLength;
canvas.drawLine(x, 0, x, height, borderPaint);
}
float cx, cy = height / 2;
float half = width / passwordLength / 2;
for (int i = 0; i < textLength; i++) {
cx = width * i / passwordLength + half;
canvas.drawCircle(cx, cy, passwordWidth, passwordPaint);
}
}
@Override
protected void onTextChanged(CharSequence text, int start, int lengthBefore, int lengthAfter) {
super.onTextChanged(text, start, lengthBefore, lengthAfter);
this.textLength = text.toString().length();
invalidate();
}
public int getBorderColor() {
return borderColor;
}
public void setBorderColor(int borderColor) {
this.borderColor = borderColor;
borderPaint.setColor(borderColor);
invalidate();
}
public float getBorderWidth() {
return borderWidth;
}
public void setBorderWidth(float borderWidth) {
this.borderWidth = borderWidth;
borderPaint.setStrokeWidth(borderWidth);
invalidate();
}
public float getBorderRadius() {
return borderRadius;
}
public void setBorderRadius(float borderRadius) {
this.borderRadius = borderRadius;
invalidate();
}
public int getPasswordLength() {
return passwordLength;
}
public void setPasswordLength(int passwordLength) {
this.passwordLength = passwordLength;
invalidate();
}
public int getPasswordColor() {
return passwordColor;
}
public void setPasswordColor(int passwordColor) {
this.passwordColor = passwordColor;
passwordPaint.setColor(passwordColor);
invalidate();
}
public float getPasswordWidth() {
return passwordWidth;
}
public void setPasswordWidth(float passwordWidth) {
this.passwordWidth = passwordWidth;
passwordPaint.setStrokeWidth(passwordWidth);
invalidate();
}
public float getPasswordRadius() {
return passwordRadius;
}
public void setPasswordRadius(float passwordRadius) {
this.passwordRadius = passwordRadius;
invalidate();
}
}е®үе…Ёй”®зӣҳдё»иҰҒжҳҜйҖҡиҝҮGridViewжқҘе®һзҺ°пјҢдёҠж–ҮжҸҗеҲ°дёәдәҶдҝқиҜҒе®үе…ЁжҖ§пјҢеңЁе®үе…Ёй”®зӣҳеҲқе§ӢеҢ–зҡ„ж—¶еҖҷпјҢеә”иҜҘйҡҸжңәз”ҹжҲҗй”®зӣҳдёҠзҡ„ж•°еӯ—пјҢд»Јз ҒеҰӮдёӢжүҖзӨәпјҡ
/**
* еҲқе§ӢеҢ–еҜҶз Ғй”®зӣҳ
*/
private void initKeyboard() {
final int number = 10;
int[] keys = new int[number];
for (int i = 0; i < 10; i++) {
keys[i] = i;
}
// йҡҸжңәз”ҹжҲҗй”®зӣҳж•°еӯ—
Random random = new Random();
for (int i = 0; i < number; i++) {
int p = random.nextInt(number);
int tmp = keys[i];
keys[i] = keys[p];
keys[p] = tmp;
}
numList = new ArrayList<>();
for (int i = 0; i < 12; i++) {
Map<String, String> map = new HashMap<>();
if (i < 9) {
map.put("num", String.valueOf(keys[i]));
} else if (i == 9) {
map.put("num", "");
} else if (i == 10) {
map.put("num", String.valueOf(keys[9]));
} else if (i == 11) {
map.put("num", "");
}
numList.add(map);
}
KeyAdapter keyAdapter = new KeyAdapter(context, numList, handler);
gvKeyboard.setAdapter(keyAdapter);
}е®үе…Ёй”®зӣҳзӮ№еҮ»дәӢ件зҡ„еӨ„зҗҶпјҢжҳҜеңЁйҖӮй…ҚеҷЁKeyAdapterзҡ„жһ„йҖ ж–№жі•дёӯдј е…ҘHandlerеҜ№иұЎпјҢйҖҡиҝҮ收еҸ‘ж¶ҲжҒҜзҡ„ж–№ејҸеңЁPasswordInputViewзұ»дёӯеӨ„зҗҶзҡ„пјҢд»Јз ҒеҰӮдёӢжүҖзӨәпјҡ
holder.btnKey.setOnClickListener(new View.OnClickListener() {
 @Override
 public void onClick(View v) {
  Message msg = new Message();
  msg.what = Constants.KEYBOARD_INPUT;
  msg.obj = position;
  handler.sendMessage(msg);
 }
});HandlerеҜ№иұЎеңЁPasswordInputViewзұ»дёӯе®ҡд№үпјҢдё»иҰҒз”ЁдәҺеӨ„зҗҶе®үе…Ёй”®зӣҳзҡ„зӮ№еҮ»дәӢ件пјҢд»Јз ҒеҰӮдёӢжүҖзӨәпјҡ
Handler handler = new Handler() {
@Override
public void dispatchMessage(Message msg) {
switch (msg.what) {
case Constants.KEYBOARD_INPUT:
int position = (int) msg.obj;
if (position < 11 && position != 9) {
// зӮ№еҮ»0-9жҢүй”®
password = etPwd.getText().append(numList.get(position).get("num")).toString();
etPwd.setText(password);
} else {
if (position == 11) {
// зӮ№еҮ»йҖҖж јй”®
if (!TextUtils.isEmpty(password) && !password.equals("")) {
password = etPwd.getText().delete(password.length() - 1, password.length()).toString();
etPwd.setText(password);
}
}
}
break;
}
}
};дёәдәҶж–№дҫҝеӨ–йғЁиҺ·еҸ–еҲ°з”ЁжҲ·иҫ“е…Ҙзҡ„еҜҶз ҒпјҢи®ҫи®ЎдёҖдёӘеӣһи°ғжҺҘеҸЈOnPwdInputListenerпјҢ并еңЁPasswordInputViewзұ»дёӯдёәеӣһи°ғжҺҘеҸЈеҲӣе»әдёҖдёӘsetж–№жі•пјҢд»Јз ҒеҰӮдёӢжүҖзӨәпјҡ
package com.syd.paypwddialogdemo;
public interface OnPwdInputListener {
 void onPwdInput(String password);
}еҪ“PasswordEditTextжҺ§д»¶зҡ„TextWatcherеҜ№иұЎзӣ‘еҗ¬еҲ°иҫ“е…Ҙзҡ„еҜҶз Ғж»Ўи¶іе…ӯдҪҚж—¶пјҢи°ғз”Ёеӣһи°ғж–№жі•пјҢе°ҶеҜҶз ҒдҪңдёәеҸӮж•°иҝӣиЎҢдј йҖ’пјҢд»Јз ҒеҰӮдёӢжүҖзӨәпјҡ
textWatcher = new TextWatcher() {
 @Override
 public void afterTextChanged(Editable s) {
  if (etPwd.getText().length() == 6) {
   onPwdInputListener.onPwdInput(etPwd.getText().toString());
  }
 }
};
etPwd.addTextChangedListener(textWatcher);еңЁеӨ–йғЁи°ғз”Ёsetж–№жі•пјҢеҲӣе»әOnPwdInputListenerеҜ№иұЎпјҢйҮҚеҶҷеӣһи°ғж–№жі•пјҢеҚіеҸҜиҺ·еҸ–еҲ°з”ЁжҲ·иҫ“е…Ҙзҡ„еҜҶз ҒпјҢд»Јз ҒеҰӮдёӢжүҖзӨәпјҡ
pwdInputView.setOnPwdInputListener(new OnPwdInputListener() {
 @Override
 public void onPwdInput(String password) {
  Toast.makeText(MainActivity.this, password, Toast.LENGTH_SHORT).show();
 }
});д»ҘдёҠжҳҜвҖңAndroidеҰӮдҪ•е®һзҺ°д»ҝж”Ҝд»ҳе®қиҮӘе®ҡд№үеҜҶз Ғиҫ“е…ҘжЎҶеҸҠе®үе…Ёй”®зӣҳвҖқиҝҷзҜҮж–Үз« зҡ„жүҖжңүеҶ…е®№пјҢж„ҹи°ўеҗ„дҪҚзҡ„йҳ…иҜ»пјҒзӣёдҝЎеӨ§е®¶йғҪжңүдәҶдёҖе®ҡзҡ„дәҶи§ЈпјҢеёҢжңӣеҲҶдә«зҡ„еҶ…е®№еҜ№еӨ§е®¶жңүжүҖеё®еҠ©пјҢеҰӮжһңиҝҳжғіеӯҰд№ жӣҙеӨҡзҹҘиҜҶпјҢж¬ўиҝҺе…іжіЁдәҝйҖҹдә‘иЎҢдёҡиө„и®Ҝйў‘йҒ“пјҒ
е…ҚиҙЈеЈ°жҳҺпјҡжң¬з«ҷеҸ‘еёғзҡ„еҶ…е®№пјҲеӣҫзүҮгҖҒи§Ҷйў‘е’Ңж–Үеӯ—пјүд»ҘеҺҹеҲӣгҖҒиҪ¬иҪҪе’ҢеҲҶдә«дёәдё»пјҢж–Үз« и§ӮзӮ№дёҚд»ЈиЎЁжң¬зҪ‘з«ҷз«ӢеңәпјҢеҰӮжһңж¶үеҸҠдҫөжқғиҜ·иҒ”зі»з«ҷй•ҝйӮ®з®ұпјҡis@yisu.comиҝӣиЎҢдёҫжҠҘпјҢ并жҸҗдҫӣзӣёе…іиҜҒжҚ®пјҢдёҖз»ҸжҹҘе®һпјҢе°Ҷз«ӢеҲ»еҲ йҷӨж¶үе«ҢдҫөжқғеҶ…е®№гҖӮ
жӮЁеҘҪпјҢзҷ»еҪ•еҗҺжүҚиғҪдёӢи®ўеҚ•е“ҰпјҒ