您好,登录后才能下订单哦!
密码登录
登录注册
点击 登录注册 即表示同意《亿速云用户服务条款》
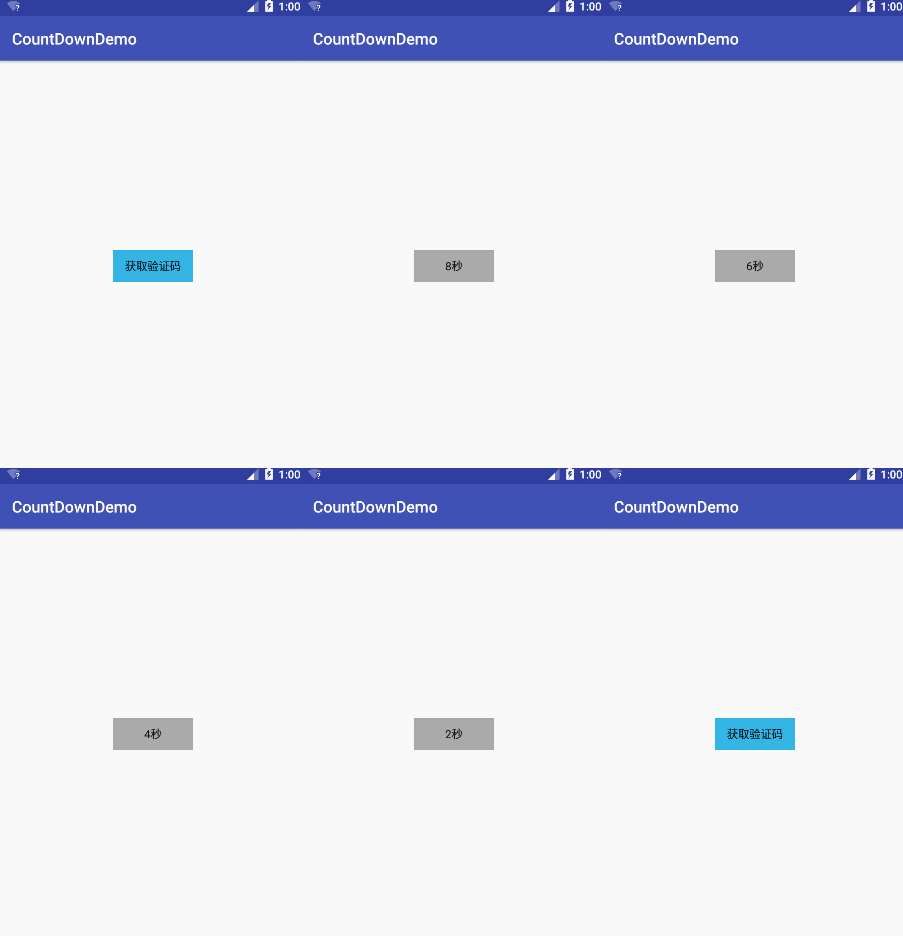
效果如下图所示:

如图所示的效果相信大家都不陌生,我们可以使用很多种方法去实现此效果,这里自己采用 CountDownTimer 定时器简单封装下此效果,方便我们随时调用。
首页先在 attrs.xml 中定义下所需的几个属性:
<resources>
 <declare-styleable name="CountDownButton">
  <attr name="millisinfuture" format="integer"/>
  <attr name="countdowninterva" format="integer"/>
  <attr name="normalColor" format="color"/>
  <attr name="countDownColor" format="color"/>
 </declare-styleable>
</resources>
下面是实现的具体代码,很简单的一种方式,通俗易懂:
/**
 * Created by xiaolong on 2018/1/12.
 */
@SuppressLint("AppCompatCustomView")
public class CountDownButton extends Button{
 //总时长
 private long millisinfuture;
 //间隔时长
 private long countdowninterva;
 //默认背景颜色
 private int normalColor;
 //倒计时 背景颜色
 private int countDownColor;
 //是否结束
 private boolean isFinish;
 //定时器
 private CountDownTimer countDownTimer;
 public CountDownButton(Context context) {
  this(context,null);
 }
 public CountDownButton(Context context, AttributeSet attrs) {
  this(context, attrs,0);
 }
 public CountDownButton(Context context, AttributeSet attrs, int defStyleAttr) {
  super(context, attrs, defStyleAttr);
  TypedArray typedArray = context.getTheme().obtainStyledAttributes(attrs, R.styleable.CountDownButton,defStyleAttr,0);
  //设置默认时长
  millisinfuture = (long) typedArray.getInt(R.styleable.CountDownButton_millisinfuture,60000);
  //设置默认间隔时长
  countdowninterva = (long)typedArray.getInt(R.styleable.CountDownButton_countdowninterva,1000);
  //设置默认背景色
  normalColor = typedArray.getColor(R.styleable.CountDownButton_normalColor,android.R.color.holo_blue_light);
  //设置默认倒计时 背景色
  countDownColor = typedArray.getColor(R.styleable.CountDownButton_countDownColor,android.R.color.darker_gray);
  typedArray.recycle();
  //默认为已结束状态
  isFinish = true;
  //字体居中
  setGravity(Gravity.CENTER);
  //默认文字和背景色
  normalBackground();
  //设置定时器
  countDownTimer = new CountDownTimer(millisinfuture, countdowninterva) {
   @Override
   public void onTick(long millisUntilFinished) {
    //未结束
    isFinish = false;
    setText((Math.round((double) millisUntilFinished / 1000) - 1) + "秒");
    setBackgroundResource(countDownColor);
   }
   @Override
   public void onFinish() {
    //结束
    isFinish = true;
    normalBackground();
   }
  };
 }
 private void normalBackground(){
  setText("获取验证码");
  setBackgroundResource(normalColor);
 }
 public boolean isFinish() {
  return isFinish;
 }
 public void cancel(){
  countDownTimer.cancel();
 }
 public void start(){
  countDownTimer.start();
 }
}
一个简单的调用方式:
public class MainActivity extends AppCompatActivity {
 private CountDownButton countDownButton;
 @Override
 protected void onCreate(Bundle savedInstanceState) {
  super.onCreate(savedInstanceState);
  setContentView(R.layout.activity_main);
  countDownButton = ((CountDownButton) findViewById(R.id.countDownButton));
  countDownButton.setOnClickListener(new View.OnClickListener() {
   @Override
   public void onClick(View view) {
    //这里判断是否倒计时结束,避免在倒计时时多次点击导致重复请求接口
    if (countDownButton.isFinish()) {
     //发送验证码请求成功后调用
     countDownButton.start();
    }
   }
  });
 }
 @Override
 protected void onDestroy() {
  super.onDestroy();
  if (!countDownButton.isFinish()) {
   countDownButton.cancel();
  }
 }
}
这样一个简单的封装就结束了,过程很简单。这里主要是对 CountDownTimer 的使用练习,之前工作中一直没有接触过这个类。顺便贴上源码吧!
总结
以上所述是小编给大家介绍的Android 简单封装获取验证码倒计时功能,希望对大家有所帮助,如果大家有任何疑问请给我留言,小编会及时回复大家的。在此也非常感谢大家对亿速云网站的支持!
免责声明:本站发布的内容(图片、视频和文字)以原创、转载和分享为主,文章观点不代表本网站立场,如果涉及侵权请联系站长邮箱:is@yisu.com进行举报,并提供相关证据,一经查实,将立刻删除涉嫌侵权内容。