жӮЁеҘҪпјҢзҷ»еҪ•еҗҺжүҚиғҪдёӢи®ўеҚ•е“ҰпјҒ
еҜҶз Ғзҷ»еҪ•
зҷ»еҪ•жіЁеҶҢ
зӮ№еҮ» зҷ»еҪ•жіЁеҶҢ еҚіиЎЁзӨәеҗҢж„ҸгҖҠдәҝйҖҹдә‘з”ЁжҲ·жңҚеҠЎжқЎж¬ҫгҖӢ
spring boot дҪҝз”Ё starter и§ЈеҶідәҶеҫҲеӨҡй…ҚзҪ®й—®йўҳ, дҪҶжҳҜ, д»–жҳҜжҖҺд№ҲжқҘи§ЈеҶіиҝҷдәӣй—®йўҳзҡ„е‘ў?
иҝҷйҮҢйҖҡиҝҮдёҖдёӘз®ҖеҚ•зҡ„дҫӢеӯҗ, жқҘзңӢдёҖдёӢ, starterжҳҜжҖҺд№ҲжқҘи®ҫзҪ®й»ҳи®Өй…ҚзҪ®зҡ„.
дёҖ. е»ә starter йЎ№зӣ®
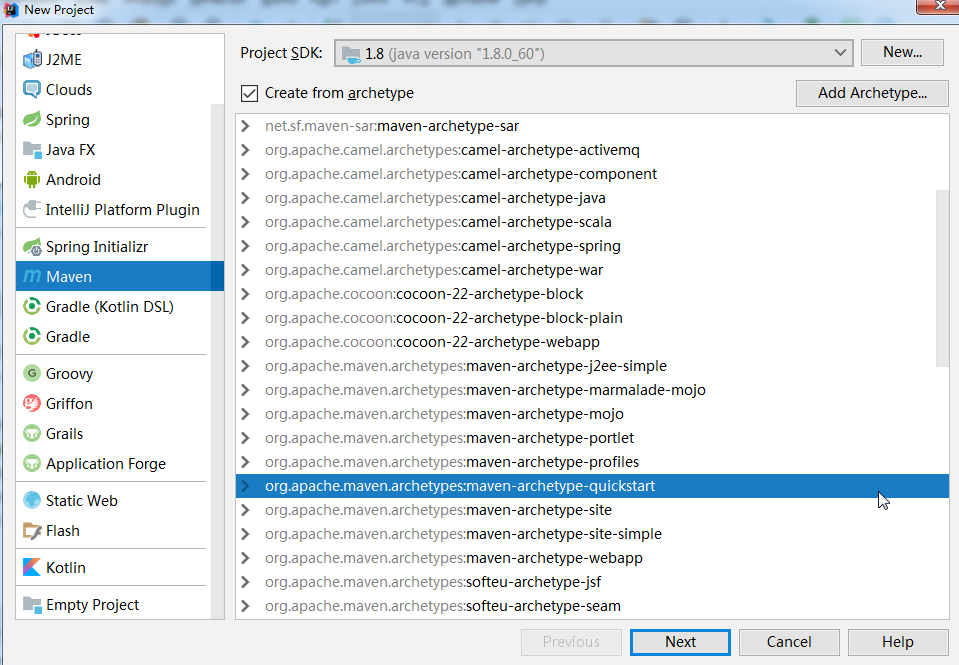
иҮӘе®ҡд№үзҡ„starter, йЎ№зӣ®е‘ҪеҗҚ规иҢғжҳҜпјҡ иҮӘе®ҡд№үеҗҚ-spring-boot-starter
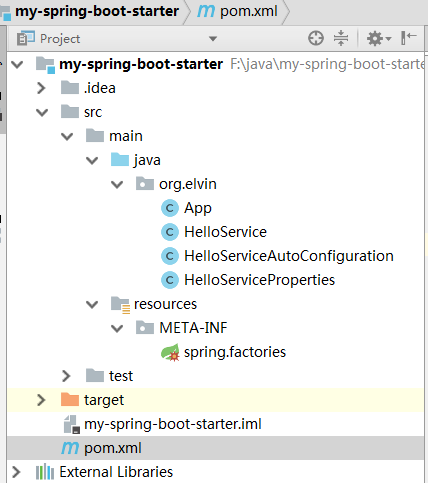
е…ҲжқҘзңӢдёҖдёӢ, жҲ‘жңҖеҗҺзҡ„зӣ®еҪ•з»“жһ„
1. дҝ®ж”№pom.xmlж–Ү件
<project xmlns="http://maven.apache.org/POM/4.0.0" xmlns:xsi="http://www.w3.org/2001/XMLSchema-instance"
 xsi:schemaLocation="http://maven.apache.org/POM/4.0.0 http://maven.apache.org/xsd/maven-4.0.0.xsd">
 <modelVersion>4.0.0</modelVersion>
 <groupId>org.elvin</groupId>
 <artifactId>my-spring-boot-starter</artifactId>
 <version>1.0-SNAPSHOT</version>
 <packaging>jar</packaging>
 <name>my-spring-boot-starter</name>
 <url>http://maven.apache.org</url>
 <properties>
 <project.build.sourceEncoding>UTF-8</project.build.sourceEncoding>
 </properties>
 <dependencies>
 <dependency>
 <groupId>org.springframework.boot</groupId>
 <artifactId>spring-boot-autoconfigure</artifactId>
 <version>1.5.9.RELEASE</version>
 </dependency>
 <dependency>
 <groupId>junit</groupId>
 <artifactId>junit</artifactId>
 <version>3.8.1</version>
 <scope>test</scope>
 </dependency>
 </dependencies>
 <build>
 <plugins>
 <plugin>
 <groupId>org.apache.maven.plugins</groupId>
 <artifactId>maven-compiler-plugin</artifactId>
 <version>2.3.2</version>
 <configuration>
  <source>1.8</source>
  <target>1.8</target>
 </configuration>
 </plugin>
 </plugins>
 </build>
</project>
е…¶е®һеҸӘжҳҜеҠ е…ҘдәҶ spring-boot-autoconfigure
Appж–Ү件дёӯзҡ„mainж–№жі•, жҲ‘жіЁйҮҠжҺүдәҶ, иҝҷдёӘеңЁиҝҷйҮҢжІЎжңүз”ЁеҲ°
2. й…ҚзҪ®еұһжҖ§еҜ№еә”зҡ„жҺҘ收ж–Ү件
package org.elvin;
import org.springframework.boot.context.properties.ConfigurationProperties;/**
* author: Elvin
* Date: 2017/12/12 14:51
* Description:
*/
@ConfigurationProperties(prefix = "hello")
public class HelloServiceProperties {
//й»ҳи®Өй…ҚзҪ®еҶ…е®№
private static final String MSG = "world";
private String msg = MSG;
public String getMsg() {
return msg;
}
public void setMsg(String msg) {
this.msg = msg;
}
}
3. еҜ№еӨ–Service
package org.elvin;
/**
 * author: Elvin
 * Date: 2017/12/12 14:55
 * Description:
 */
public class HelloService {
 private String msg;
 public String sayHello(){
 return "Hello " + msg;
 }
 public String getMsg() {
 return msg;
 }
 public void setMsg(String msg) {
 this.msg = msg;
 }
}
4. еҜ№еӨ–serviceдёҺй…ҚзҪ®еҜ№еә”ж–Ү件关иҒ”
package org.elvin;
import org.springframework.beans.factory.annotation.Autowired;
import org.springframework.boot.autoconfigure.condition.ConditionalOnClass;
import org.springframework.boot.autoconfigure.condition.ConditionalOnMissingBean;
import org.springframework.boot.autoconfigure.condition.ConditionalOnProperty;
import org.springframework.boot.context.properties.EnableConfigurationProperties;
import org.springframework.context.annotation.Bean;
import org.springframework.context.annotation.Configuration;
/**
 * author: Elvin
 * Date: 2017/12/12 14:59
 * Description:
 */
@Configuration
@EnableConfigurationProperties(HelloServiceProperties.class)
@ConditionalOnClass(HelloService.class)
@ConditionalOnProperty(prefix = "hello", value="enabled", matchIfMissing =true )
public class HelloServiceAutoConfiguration {
 @Autowired
 private HelloServiceProperties helloServiceProperties;
 @Bean
 @ConditionalOnMissingBean(HelloService.class)
 public HelloService helloService(){
 HelloService helloService = new HelloService();
 helloService.setMsg(helloServiceProperties.getMsg());
 return helloService;
 }
}
5. starterй…ҚзҪ® : spring.factories
org.springframework.boot.autoconfigure.EnableAutoConfiguration=org.elvin.HelloServiceAutoConfiguration
еҒҡе®Ңиҝҷдәӣд№ӢеҗҺ, йҖҡиҝҮ mvn clean install , жү“еҢ…еҲ°mavenеә“йҮҢйқў
дәҢ. spring boot йЎ№зӣ®дҪҝз”Ё
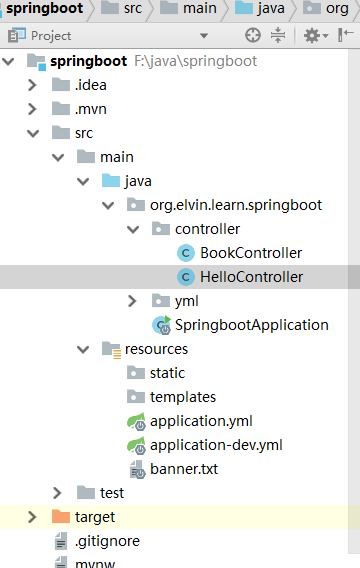
ж–°е»әдёҖдёӘspring boot йЎ№зӣ®, йҖүжӢ©webеҚіеҸҜ.
зӣ®еҪ•з»“жһ„пјҡ
е…ҲзңӢдёҖдёӢеј•з”Ёpom.xml
<dependency>
   <groupId>org.elvin</groupId>
   <artifactId>my-spring-boot-starter</artifactId>
   <version>1.0-SNAPSHOT</version>
  </dependency>
еҶҚзңӢдёҖдёӢHelloController
package org.elvin.learn.springboot.controller;
import org.springframework.beans.factory.annotation.Autowired;
import org.springframework.web.bind.annotation.RequestMapping;
import org.springframework.web.bind.annotation.RestController;
import org.elvin.*;
/**
* author: Elvin
* Date: 2017/12/12 15:34
* Description:
*/
@RestController
@RequestMapping("hello")
public class HelloController {
@Autowired
private HelloService helloService;
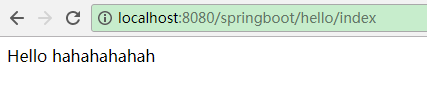
@RequestMapping("index")
public String index(){
return helloService.sayHello();
}
}
иҝҷйҮҢзҡ„ HelloService е°ұжҳҜ еүҚйқўиҮӘе®ҡд№ү starter йҮҢйқўзҡ„.
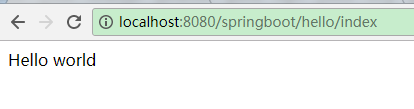
1. з»“жһң: жңӘй…ҚзҪ®жғ…еҶөдёӢ, еә”иҜҘжҳҜиҫ“еҮә hello world
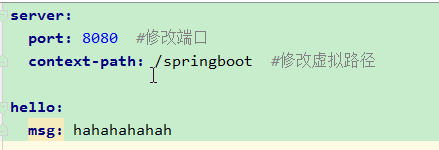
2. еңЁй…ҚзҪ®ж–Ү件дёӯ, еҠ е…Ҙ hello.msg=hahahahahah
иҝҷдёӘдҫӢеӯҗеҫҲз®ҖеҚ•, еҸӘжҳҜжҳҫзӨәдёҖдёӢдё»иҰҒзҡ„иҝҮзЁӢ, еҲ«зҡ„йғҪжҳҜеҗ„жҸ’件иҮӘе·ұзҡ„йҖ»иҫ‘еҲӨж–ӯдәҶ.
еҸӮиҖғиө„ж–ҷпјҡ
JavaEEејҖеҸ‘зҡ„йў иҰҶиҖ… Spring Bootе®һжҲҳ
д»ҘдёҠиҝҷзҜҮspring boot иҮӘе®ҡд№үstarterзҡ„е®һзҺ°ж•ҷзЁӢе°ұжҳҜе°Ҹзј–еҲҶдә«з»ҷеӨ§е®¶зҡ„е…ЁйғЁеҶ…е®№дәҶпјҢеёҢжңӣиғҪз»ҷеӨ§е®¶дёҖдёӘеҸӮиҖғпјҢд№ҹеёҢжңӣеӨ§е®¶еӨҡеӨҡж”ҜжҢҒдәҝйҖҹдә‘гҖӮ
е…ҚиҙЈеЈ°жҳҺпјҡжң¬з«ҷеҸ‘еёғзҡ„еҶ…е®№пјҲеӣҫзүҮгҖҒи§Ҷйў‘е’Ңж–Үеӯ—пјүд»ҘеҺҹеҲӣгҖҒиҪ¬иҪҪе’ҢеҲҶдә«дёәдё»пјҢж–Үз« и§ӮзӮ№дёҚд»ЈиЎЁжң¬зҪ‘з«ҷз«ӢеңәпјҢеҰӮжһңж¶үеҸҠдҫөжқғиҜ·иҒ”зі»з«ҷй•ҝйӮ®з®ұпјҡis@yisu.comиҝӣиЎҢдёҫжҠҘпјҢ并жҸҗдҫӣзӣёе…іиҜҒжҚ®пјҢдёҖз»ҸжҹҘе®һпјҢе°Ҷз«ӢеҲ»еҲ йҷӨж¶үе«ҢдҫөжқғеҶ…е®№гҖӮ
жӮЁеҘҪпјҢзҷ»еҪ•еҗҺжүҚиғҪдёӢи®ўеҚ•е“ҰпјҒ