您好,登录后才能下订单哦!
密码登录
登录注册
点击 登录注册 即表示同意《亿速云用户服务条款》
小编给大家分享一下SpringBoot+LayIM+t-io如何实现好友申请通知,相信大部分人都还不怎么了解,因此分享这篇文章给大家参考一下,希望大家阅读完这篇文章后大有收获,下面让我们一起去了解一下吧!
简介
加好友,大家用过QQ都知道,无非是发起好友申请,对方收到消息通知,然后处理。不过,本篇只讲前半部分,消息通知的处理留到下一篇去讲。因为内容有点多,怕是一时半会消化不了。在介绍主体流程之前,先给大家介绍一下准备工作。
准备工作
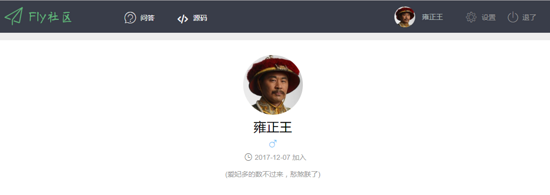
首先,为了让数据更贴近实战,所以我用了比较“真实”的用户数据。结合fly模板,完善了用户中心头部的用户信息的数据绑定。数据绑定部分判断了是否已经是好友,来决定是否出现“加为好友”的按钮。示例如下,当用户自己看到自己的主页时,是这样的:
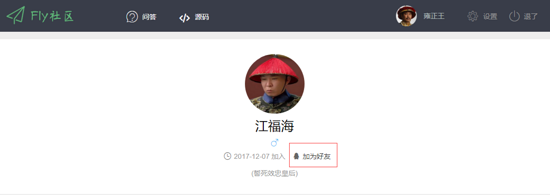
看到非好友的用户主页,是这样的:
绑定数据部分,简单给大家介绍一下,就是用thymleaf模板绑定。后台访问页面的时候,将 Model 赋值即可。
/**
 * 属性赋值
 * */
 private void setModel(User user,Model model){
 long currentUserId = getUserId();
 long visitUserId = user.getId();
 //是否是自己
 boolean isSelf = currentUserId == visitUserId;
 //两个用户是否已经是好友
 boolean isFriend = groupService.isFriend(currentUserId,visitUserId);
 Map<String,Object> userMap = new HashMap<>(8);
 userMap.put("avatar",user.getAvatar());
 userMap.put("name",user.getUserName());
 userMap.put("addtime", TimeUtil.formatDate(user.getCreateAt())+" 加入");
 if(user.getSign()==null ||user.getSign().length()==0) {
  userMap.put("sign", "");
 }else {
  userMap.put("sign", "(" + user.getSign() + ")");
 }
 userMap.put("uid",user.getId());
 userMap.put("self",isSelf || isFriend);
 model.addAttribute("user",userMap);
 }
然后页面上,将model中的数据取出来。
<div class="fly-home" >
 <input type="hidden" th:value="${user.uid}" id="visitUid"/>
 <img src="" th:src="${user.avatar}" th:alt="${user.name}"/>
 <h2>
  <p th:text="${user.name}"></p>
  <i class="iconfont icon-nan"></i>
 </h2>
 <p class="fly-home-info">
  <!--<i class="iconfont icon-zuichun" title="飞吻"></i><span >67206飞吻</span>-->
  <i class="iconfont icon-shijian"></i><span th:text="${user.addtime}"></span>
  <!--<i class="iconfont icon-chengshi"></i><span>来自杭州</span>-->
  <i class="iconfont icon-qq" th:if="${user.self==false}"></i><a lay-event="addFriend" href="#" rel="external nofollow" title="添加TA为好友" th:if="${user.self==false}">加为好友</a>
 </p>
 <p class="fly-home-sign" th:text="${user.sign}"></p>
 </div>
ok,以上就是简单的准备工作。想了解详情代码的可以去文末的github地址去搜寻。
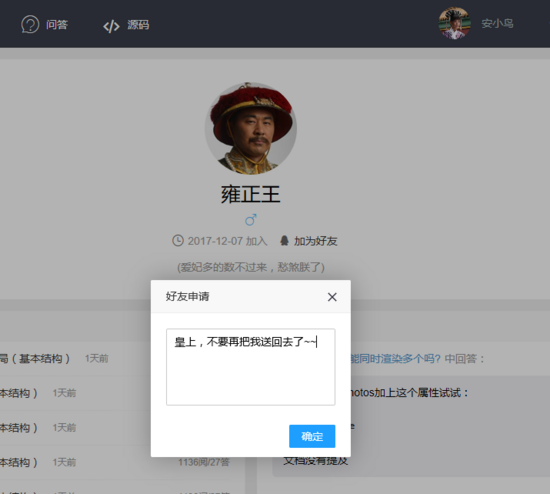
发起好友申请
我们先根据layim的业务分析。首先,要知道我们要加谁(toId)为好友。然后在加上一个备注(remark)。这些东西交给后台就OK了。为了避免连表查询,对于系统消息的存储我做了用户名和用户头像的冗余。表主要包含字段:用户ID,用户头像,用户名,被申请用户ID,申请时间,申请类型,备注,已读等其他属性。
所以,发起好友申请就很简单了。就是一个添加功能,前端传的就是被申请人用户ID和申请备注,后端组织数据插入到数据库,代码如下:
/**
 * 提交好友申请
 * */
 public JsonResult saveFriendApply(long toId,String remark){
 remark = HtmlUtils.htmlEscape(remark);
 ContextUser user = ShiroUtil.getCurrentUser();
 long userId = Long.parseLong(user.getUserid());
 int record = applyRepository.countByToidAndUidAndTypeAndResult(toId,userId,ApplyType.friend,0);
 if(record > 0){
  return JsonResult.fail("已经申请过");
 }
 Apply apply = new Apply();
 apply.setType(ApplyType.friend);
 apply.setToid(toId);
 apply.setRemark(remark);
 apply.setUid(userId);
 apply.setAvatar(user.getAvatar());
 apply.setName(user.getUsername());
 apply.setRead(false);
 apply.setResult(0);
 return saveApply(apply);
 }
OK,申请完了,下面我们要做啥?没错,通知对方,喂,我向你发送了申请,快快处理。在这里呢我遇到了一个问题。由于springboot程序占用端口 8080,而t-io占用端口8888,也就是说,如果我想在8080端口的业务中主动调用8888的服务推送,我不知道如何获取相应的channelContext。不过经过询问作者之后,一句话解决了我的问题。
拿到 ServerGroupContext ,问题迎刃而解。
在之前的程序启动的时候注册了 LayimWebsocketStarter 这个bean。所以,在8080业务端如果能拿到它的话就没问题了。
得到 LayimWebsocketStarter ,就能得到 ServerGroupContext, 然后就能在服务端做主动推送了。
当然可能没有开发过这个东西,对于上文中的问题不是很理解,没关系,其实我就想说明,如果从服务端主动向客户端推送消息的话,使用ServerGroupContext即可。
服务端主动推送
以下代码在 com.fyp.layim.im.common.util.PushUtil 中
OK,接上文,我们按照步骤来。
第一步,获取 LayimWebsocketStarter 。
/**
 * 获取starter
*/
private static LayimWebsocketStarter getStarter(){
 return (LayimWebsocketStarter)SpringUtil.getBean("layimWebsocketStarter");
 }
第二步,获取 ServerGroupContext
private static ServerGroupContext getServerGroupContext(){
 return getStarter().getServerGroupContext();
 }
第三步,获取 ChannelContext。
/**
 * 获取channelContext
 * */
 private static ChannelContext getChannelContext(String toId) {
 ServerGroupContext context = getServerGroupContext();
 //找到用户
 ChannelContext channelContext = context.users.find(context, toId);
 return channelContext;
 }
第四步,发射,这里的代码就和聊天中的那部分代码差不多了。核心部分就是,获取ChannelContext,然后给他发送消息。如果不在线就不用管。
/**
 * 服务端主动推送消息
 * */
 public static void pushApplyMessage(String toId) {
 logger.info("执行到了发送方法:pushApplyMessage");
 LayimToClientNoticeMsgBody body = new LayimToClientNoticeMsgBody();
 ChannelContext channelContext = getChannelContext(toId);
 //先判断是否在线,再去查询数据库,减少查询次数
 if (channelContext != null && !channelContext.isClosed()) {
  int count = getApplyService().getUnreadMsgCount(Long.parseLong(toId));
  body.setCount(count);
  push(channelContext, body);
 }
 }
/**
 * 服务端主动推送消息
 * */
 private static void push(ChannelContext channelContext,Object msg) {
 try {
  WsResponse response = BodyConvert.getInstance().convertToTextResponse(msg);
  Aio.send(channelContext, response);
 }catch (IOException ex){
 }
 }
现在推送已经搞定了,那么什么时候推送呢?由于这个系统消息的推送可以不用那么即时,于是我看了下,springboot里面有类似的事件机制,于是乎 ApplyEvent 就诞生了。
public class ApplyEvent extends ApplicationEvent {
 public ApplyEvent(Object source) {
 super(source);
 }
 private long toid;
 public long getToId(){
 return toid;
 }
 public ApplyEvent(Object source, long toId) {
 super(source);
 this.toid = toId;
 }
}
在创建一个Listener,监听事件。
public class ApplyListener implements ApplicationListener<ApplyEvent> {
 private Logger logger = LoggerFactory.getLogger(ApplyListener.class);
 @Override
 public void onApplicationEvent(ApplyEvent applyEvent) {
 new Thread(){
  public void run(){
  Long toId = applyEvent.getToId();
  //这里就要调用上文中的推送了
  PushUtil.pushApplyMessage(toId.toString());
  }
 }.start();
 }
}
不过我有个疑问,发现listener中执行的时候是同步的。后来加了@Async 和@EnableAsync 也没用,于是我就用了new Thread().start()实现异步,确保不影响主要申请流程。(这是个疑问,自己没搞明白的地方)
最后,别忘了在Application启动的时候把listener加上。
public static void main(String[] args) {
 SpringApplication springApplication = new SpringApplication(LayimApplication.class);
 /**
  * 这里监听增加listener,listener才会触发
  * ApplyListener 是监听好友申请的事件
  * */
 springApplication.addListeners(new ApplyListener());
 springApplication.run(args);
 }
功能拼接
马上就要成功了,我们在把事件串起来,在好友申请成功之后,发布事件。
/**
 * 好友申请
 * */
 @PostMapping(value = "/apply-friend")
 public JsonResult apply(@RequestParam("toid") Long toId,@RequestParam("remark") String remark){
 JsonResult result = applyService.saveFriendApply(toId, remark);
 //申请成功,发布申请事件,通知 toId处理消息,如果不在线,不会进行处理
 if(result.isSuccess()){
  applicationContext.publishEvent(new ApplyEvent("apply",toId));
 }
 return result;
 }
功能演示
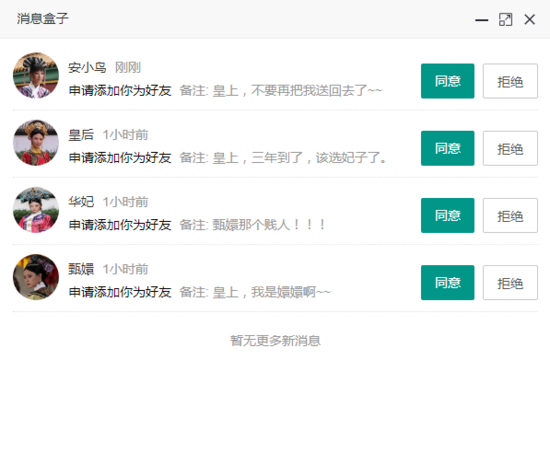
讲了那么多,给大家看一下成品效果。(用户场景:安小鸟加皇上为好友,皇上接收消息并查看)
皇上收到消息,系统弹出左下角的小数字4。(调用 layim.msgbox(msgCount) 方法)
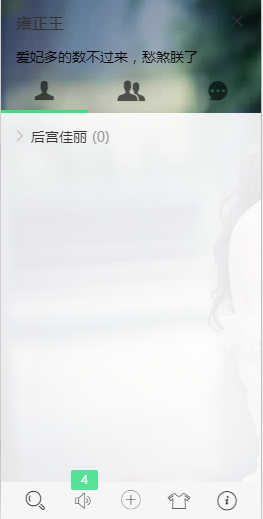
皇上点开消息盒子:
以上是“SpringBoot+LayIM+t-io如何实现好友申请通知”这篇文章的所有内容,感谢各位的阅读!相信大家都有了一定的了解,希望分享的内容对大家有所帮助,如果还想学习更多知识,欢迎关注亿速云行业资讯频道!
免责声明:本站发布的内容(图片、视频和文字)以原创、转载和分享为主,文章观点不代表本网站立场,如果涉及侵权请联系站长邮箱:is@yisu.com进行举报,并提供相关证据,一经查实,将立刻删除涉嫌侵权内容。