您好,登录后才能下订单哦!
这篇文章主要介绍“spring boot+thymeleaf+bootstrap怎么编写后台管理系统界面”,在日常操作中,相信很多人在spring boot+thymeleaf+bootstrap怎么编写后台管理系统界面问题上存在疑惑,小编查阅了各式资料,整理出简单好用的操作方法,希望对大家解答”spring boot+thymeleaf+bootstrap怎么编写后台管理系统界面”的疑惑有所帮助!接下来,请跟着小编一起来学习吧!
Bootstrap是目前最受欢迎的前端框架,它是基于 HTML、CSS、JAVASCRIPT 的,它简洁灵活,使得 Web 开发更加快捷,它还有一个响应最好的Grid系统,并且能够在手机端通用,而Bootstrap是使用许多可重用的CSS和JavaScript组件,可以帮助实现需要的几乎任何类型的网站的功能,此外,所有这些组件都是响应式的。
最近在学spring boot ,学习一个框架无非也就是使用它来做以前做的事情,两者比较才有不同,说一下自己使用的体会。
先来说下spring boot ,微框架。快速开发,相当于零配置,从一个大神那看来的说:spring boot 相当于框架的框架 ,就是集成了很多,用哪个添加哪个的依赖就行,这样的话自己看不到配置,对于习惯了使用配置刚使用spring boot的开发者来说可能还有点不习惯,什么都不用配,看不到配置感觉对项目整体架构有点陌生,再说在spring boot 中使用 thymeleaf 。就拿个最简单的例子来说明 jsp显示helloworld , thymeleaf显示helloworld,两者也就pom文件引入依赖和属性文件配置不同,在你使用jsp的时候不要引入thymeleaf的依赖,当然在使用thymeleaf的时候也不要引入jsp的依赖 有可能会产生冲突,spring boot 官方是推荐使用thymeleaf 我个人感觉也不错,开始项目吧!
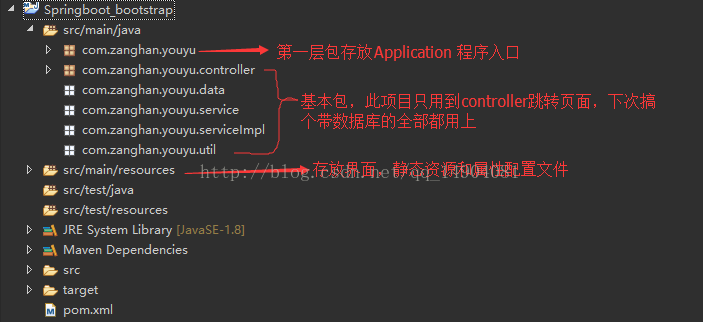
1 、首先 建一个meaven项目 看一下建好的项目整体结构

建好项目结构弄pom.xml ,这个demo只用到thymeleaf,没有数据库方面的依赖,所需依赖很少
<project xmlns="http://maven.apache.org/POM/4.0.0" xmlns:xsi="http://www.w3.org/2001/XMLSchema-instance" xsi:schemaLocation="http://maven.apache.org/POM/4.0.0 http://maven.apache.org/xsd/maven-4.0.0.xsd">
 <modelVersion>4.0.0</modelVersion>
 <groupId>Springboot_bootstrap</groupId>
 <artifactId>Springboot_bootstrap</artifactId>
 <version>0.0.1-SNAPSHOT</version>
 <parent>
 <groupId>org.springframework.boot</groupId>
 <artifactId>spring-boot-starter-parent</artifactId>
 <version>1.4.7.RELEASE</version>
 <relativePath/> <!-- lookup parent from repository -->
 </parent>

 <properties>
 <project.build.sourceEncoding>UTF-8</project.build.sourceEncoding>
 <project.reporting.outputEncoding>UTF-8</project.reporting.outputEncoding>
 <java.version>1.8</java.version>
 </properties>

 <dependencies>
 <dependency>
 <groupId>org.springframework.boot</groupId>
 <artifactId>spring-boot-starter</artifactId>
 </dependency>

 <dependency>
 <groupId>org.springframework.boot</groupId>
 <artifactId>spring-boot-starter-web</artifactId>
 </dependency>

 <!-- thymeleaf -->

 <dependency>
 <groupId>org.springframework.boot</groupId>
 <artifactId>spring-boot-starter-thymeleaf</artifactId>
 </dependency>

 </dependencies>

 <build>
 <plugins>
 <plugin>
 <groupId>org.springframework.boot</groupId>
 <artifactId>spring-boot-maven-plugin</artifactId>
 </plugin>
 </plugins>
 </build>
</project>
在src /main/resource 建立 application.properties文件
server.port=8080
server.session.timeout=10
server.tomcat.uri-encoding=UTF-8

spring.thymeleaf.prefix=classpath:/views/
spring.thymeleaf.suffix=.html
spring.thymeleaf.mode=HTML5
spring.thymeleaf.encoding=UTF-8
spring.thymeleaf.content-type=text/html
spring.thymeleaf.cache=false
写入口程序
package com.zanghan.youyu;

import org.springframework.boot.SpringApplication;
import org.springframework.boot.autoconfigure.SpringBootApplication;

@SpringBootApplication
public class YouYuApplication {

 public static void main(String[] args) {
 SpringApplication.run(YouYuApplication.class, args);
 }
}
控制器跳转bootstrap界面
package com.zanghan.youyu.controller;

import org.springframework.stereotype.Controller;
import org.springframework.web.bind.annotation.RequestMapping;

@Controller
public class LoginController {
 @RequestMapping("/")
 public String index(){
 return "/index";
 }
}
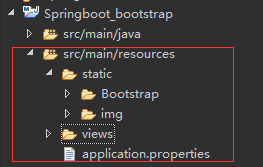
引入bootstrap js css 放在哪里?放在static文件夹里,views中放的是页面

index.html界面存放在 src/main/resource 下的views 文件夹里,为啥不是tepmlates 因为在属性配置文件中写的是views ,thymeleaf 的前缀和后缀都可以改变的
<!DOCTYPE html>
<html xmlns="http://www.w3.org/1999/xhtml" xmlns:th="http://www.thymeleaf.org"
 xmlns:sec="http://www.thymeleaf.org/thymeleaf-extras-springsecurity3">
<head>
 <meta charset="utf-8" />
 <meta http-equiv="X-UA-Compatible" content="IE=edge"/>
 <meta name="viewport" content="width=device-width, initial-scale=1"/>
 <title>MES平台</title>
 <!--Bootstrap-->
 <link th:href="@{Bootstrap/bootstrap/css/bootstrap.min.css}" rel="stylesheet" />
 <!-- Font Awesome -->
 <link th:href="@{Bootstrap/font-awesome/css/font-awesome.min.css}" rel="stylesheet" />
 <!--[if IE 7]>
 <link href="/Content/font-awesome/css/font-awesome-ie7.min.css" rel="stylesheet" />
 <![endif]-->
 <link th:href="@{Bootstrap/sidebar-menu/sidebar-menu.css}" rel="stylesheet" />
 <link th:href="@{Bootstrap/ace/css/ace-rtl.min.css}" rel="stylesheet" />
 <link th:href="@{Bootstrap/ace/css/ace-skins.min.css}" rel="stylesheet" />
 <link th:href="@{Bootstrap/toastr/toastr.min.css}" rel="stylesheet" />

 <script th:src="@{Bootstrap/jquery-1.9.1.min.js}"></script>
 <script th:src="@{Bootstrap/bootstrap/js/bootstrap.min.js}"></script>
 <script th:src="@{Bootstrap/sidebar-menu/sidebar-menu.js}"></script>
 <script th:src="@{Bootstrap/bootstrap/js/bootstrap-tab.js}"></script>
 <!--[if lt IE 9]>
 <script src="/Scripts/html5shiv.js"></script>
 <script src="/Scripts/respond.min.js"></script>
 <![endif]-->
 <style type="text/css">
 body {
 font-size: 12px;
 }

 .nav > li > a {
 padding: 5px 10px;
 }

 .tab-content {
 padding-top: 3px;
 }
 </style>
</head>
<body>
 <div class="navbar navbar-default" id="navbar">

 <ul class="navbar-header pull-left">

  <a class="fa fa-list-ul menu-toggler" id="menu-toggler" href="#">
  <i class="icon-reorder" ></i>
  </a>

 <a href="#" class="navbar-brand">
  <small>

  Primaopto
  </small>
 </a>
 </ul>
 <div class="navbar-header pull-right" role="navigation">
 <ul class="nav ace-nav">

 <li class="light-blue" >

  <a data-toggle="dropdown" href="#" class="dropdown-toggle">
  <img class="nav-user-photo" src="Content/ace/avatars/avatar2.png" alt="Admin's Photo" />
  <span class="user-info">
  <small>欢迎光临,</small>
  1310177
  </span>

  <i class="icon-caret-down"></i>
  </a>
  <ul class="user-menu pull-right dropdown-menu dropdown-yellow dropdown-caret dropdown-close">
  <li>
  <a href="#">
  <i class="icon-cog"></i>
  设置
  </a>
  </li>
  <li>
  <a href="#">
  <i class="icon-user"></i>
  个人资料
  </a>
  </li>
  <li class="divider"></li>
  <li>
  <a href="/Home/Logout">
  <i class="icon-off"></i>
  退出
  </a>
  </li>
  </ul>
 </li>
 </ul>
 </div>
 </div>

 <div class="main-container" id="main-container">
 <div class="main-container-inner">

 <div class="sidebar" id="sidebar">
  <div class="sidebar-collapse" id="sidebar-collapse" >
  <i class="icon-double-angle-left" data-icon1="icon-double-angle-left" data-icon2="icon-double-angle-right"></i>
 </div>
 <ul class="nav nav-list" id="menu"></ul>

 </div>
 <div class="main-content">
 <div class="page-content">
  <div class="row">
  <div class="col-xs-12" >
  <ul class="nav nav-tabs" role="tablist">
  <li class="active"><a href="#Index" role="tab" data-toggle="tab">系统首页</a></li>
  </ul>
  <div class="tab-content" >
  <div role="tabpanel" class="tab-pane active" id="Index" >
  <h3>欢迎进入后台管理系统</h3>
  </div>
  </div>
  </div>
  </div>
 </div>
 </div>

 </div>

 </div>
 <script type="text/javascript">
 //toastr.options.positionClass = 'toast-bottom-right';
 $(function () {
 $('#menu').sidebarMenu({
 data: [{
  id: '1',
  text: '系统设置',
  icon: 'icon-cog',
  url: '',
  menus: [{
  id: '2',
  text: '编码管理1',
  icon: 'icon-glass',
  url: '',
  menus: [{
  id: '3',
  text: '编码管理2',
  icon: 'icon-glass',
  url: '',
  menus: [{
  id: '2',
  text: '编码管理1',
  icon: 'icon-glass',
  url: '',

  },
  {
  id: '3',
  text: '编码管理2',
  icon: 'icon-glass',
  url: '',

  },{
  id: '4',
  text: '编码管理3',
  icon: 'icon-glass',
  url: '',

  }]
  }]
  }]


 }]
 });

 $("#menu-toggler").click(function () {
 var children = $("#sidebar-collapse").children("i");
 if ($(children).hasClass("icon-double-angle-left")) {
  $(children).removeClass("icon-double-angle-left").addClass("icon-double-angle-right");
  $("#sidebar").attr("class", "sidebar menu-min display");
 }
 else {
  $(children).removeClass("icon-double-angle-right").addClass("icon-double-angle-left");
  $("#sidebar").attr("class", "sidebar display");
 }
 });
 });
 </script>
 <script th:src="@{Bootstrap/ace/js/ace-extra.min.js}"></script>
 <script th:src="@{Bootstrap/ace/js/ace.min.js}"></script>
</body>
</html>
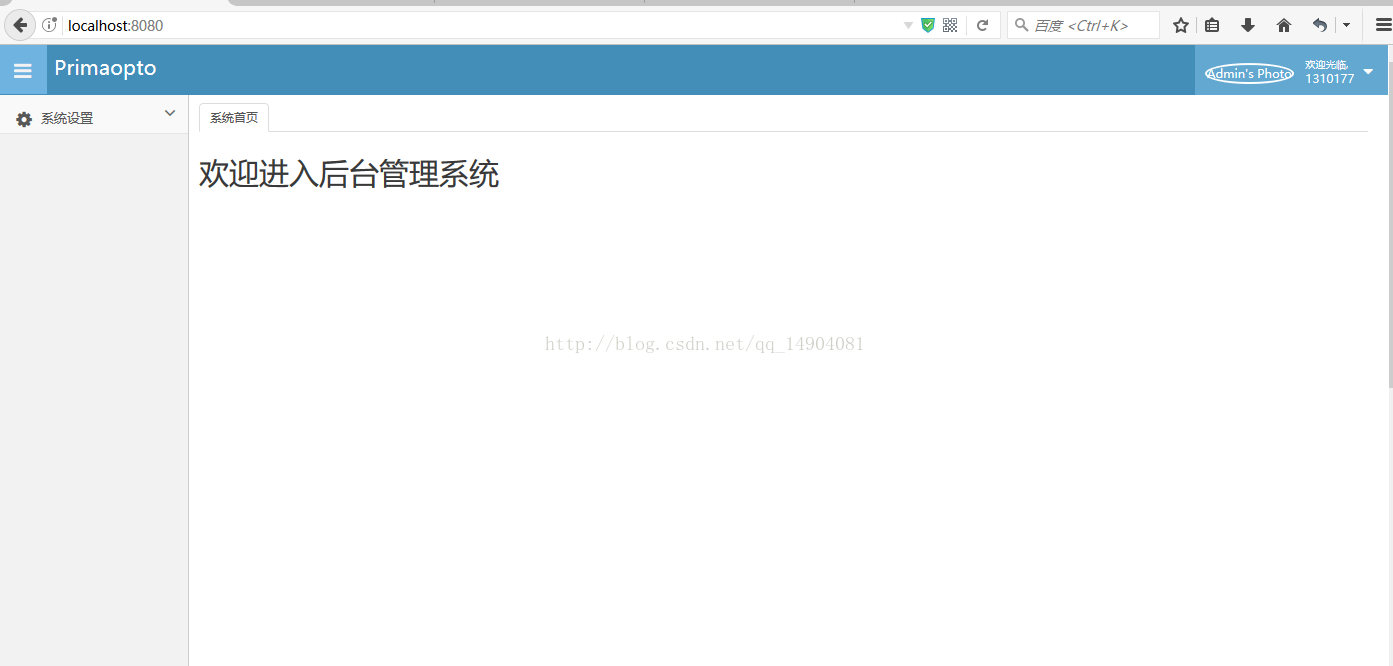
搞定,运行application 输入localhost:8080

到此,关于“spring boot+thymeleaf+bootstrap怎么编写后台管理系统界面”的学习就结束了,希望能够解决大家的疑惑。理论与实践的搭配能更好的帮助大家学习,快去试试吧!若想继续学习更多相关知识,请继续关注亿速云网站,小编会继续努力为大家带来更多实用的文章!
免责声明:本站发布的内容(图片、视频和文字)以原创、转载和分享为主,文章观点不代表本网站立场,如果涉及侵权请联系站长邮箱:is@yisu.com进行举报,并提供相关证据,一经查实,将立刻删除涉嫌侵权内容。