您好,登录后才能下订单哦!
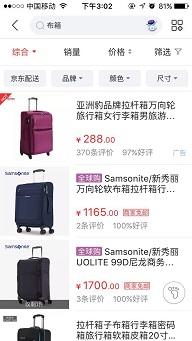
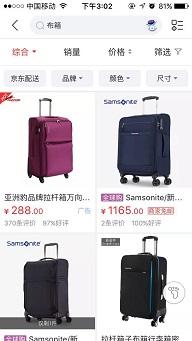
电商项目中经常有这样的需求:在商品列表页面中,切换列表的展现形式,一般分为列表形式和表格形式。
如京东:


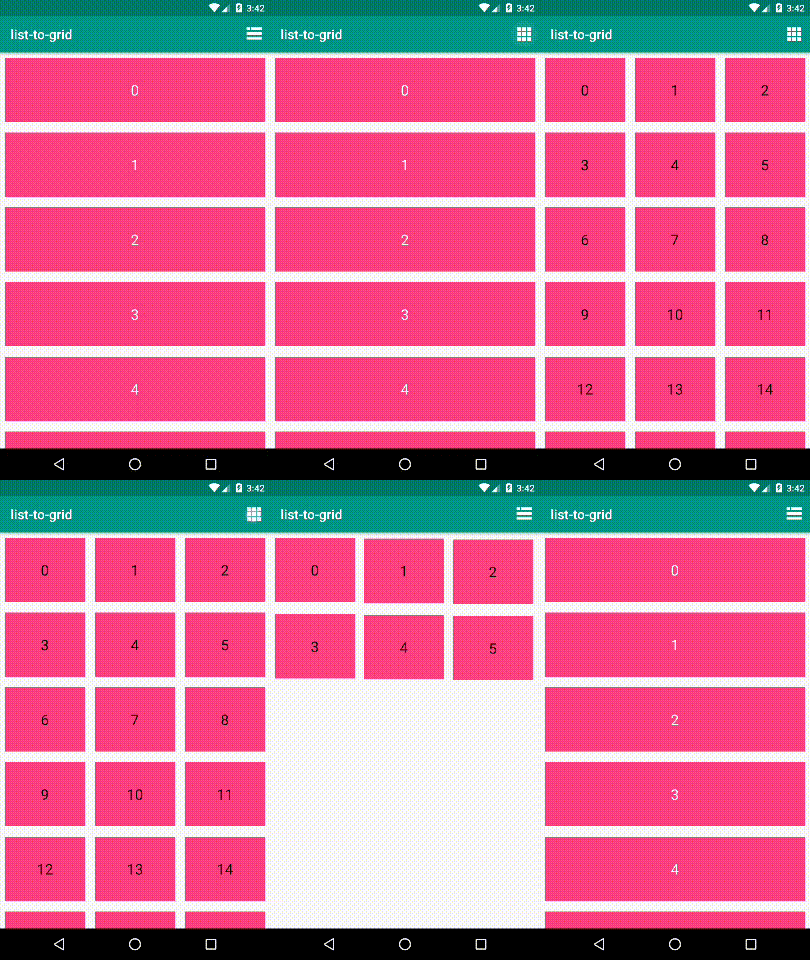
本文最终实现的效果:

关键词:RecyclerView
主布局文件:activity_main.xml
<?xml version="1.0" encoding="utf-8"?>
<LinearLayout xmlns:android="http://schemas.android.com/apk/res/android"
  android:layout_width="match_parent"
  android:layout_height="match_parent">

  <android.support.v7.widget.RecyclerView
    android:id="@+id/recycler_view"
    android:layout_width="match_parent"
    android:layout_height="wrap_content" />

</LinearLayout>
列表形式布局文件:item_list.xml
<?xml version="1.0" encoding="utf-8"?>
<RelativeLayout xmlns:android="http://schemas.android.com/apk/res/android"
  xmlns:tools="http://schemas.android.com/tools"
  android:layout_width="match_parent"
  android:layout_height="98dp"
  android:layout_margin="8dp"
  android:background="@color/colorAccent">

  <TextView
    android:id="@+id/text"
    android:layout_width="wrap_content"
    android:layout_height="wrap_content"
    android:textAppearance="@style/TextAppearance.AppCompat.Large.Inverse"
    android:layout_centerInParent="true"
    tools:text="1" />

</RelativeLayout>
表格形式布局文件:item_grid.xml
<?xml version="1.0" encoding="utf-8"?>
<RelativeLayout xmlns:android="http://schemas.android.com/apk/res/android"
  xmlns:tools="http://schemas.android.com/tools"
  android:layout_width="match_parent"
  android:layout_height="98dp"
  android:layout_margin="8dp"
  android:background="@color/colorAccent">

  <TextView
    android:id="@+id/text"
    android:layout_width="wrap_content"
    android:layout_height="wrap_content"
    android:textAppearance="@style/TextAppearance.AppCompat.Large"
    android:layout_centerInParent="true"
    tools:text="1" />

</RelativeLayout>
实现原理:使用 RecyclerView 的 GridLayoutManager,列表形式指定列数为1,表格形式指定列数为具体列值。
默认为列表形式,指定列数为1:
recyclerView = (RecyclerView) findViewById(R.id.recycler_view);
// 指定列数为1
gridLayoutManager = new GridLayoutManager(this, COLUMN_ONE);
recyclerView.setLayoutManager(gridLayoutManager);
列表形式和表格形式之间的切换:
  @Override
  public boolean onOptionsItemSelected(MenuItem item) {
    int id = item.getItemId();
    if (id == R.id.action_toggle) {
      if (gridLayoutManager.getSpanCount() == COLUMN_ONE) {
        gridLayoutManager.setSpanCount(COLUMN_THREE);
        item.setIcon(ContextCompat.getDrawable(this, R.drawable.ic_grid));
      } else {
        gridLayoutManager.setSpanCount(COLUMN_ONE);
        item.setIcon(ContextCompat.getDrawable(this, R.drawable.ic_list));
      }
      simpleAdapter.notifyItemRangeChanged(0, simpleAdapter.getItemCount());
      return true;
    }
    return super.onOptionsItemSelected(item);
  }
通过 gridLayoutManager.setSpanCount(int cloumn) 设置列数,最后不要忘记 simpleAdapter.notifyItemRangeChanged(0, simpleAdapter.getItemCount()) 刷新数据。
Adapter的处理:
定义两种 view 类型:VIEW_TYPE_LIST 和 VIEW_TYPE_GRID
根据不同的 view 类型加载相应的布局文件,如下:
  @Override
  public SimpleViewHolder onCreateViewHolder(ViewGroup parent, int viewType) {
    View itemView;
    if (viewType == VIEW_TYPE_LIST) {
      itemView = LayoutInflater.from(parent.getContext())
          .inflate(R.layout.item_list, parent, false);
    } else {
      itemView = LayoutInflater.from(parent.getContext())
          .inflate(R.layout.item_grid, parent, false);
    }
    return new SimpleViewHolder(itemView, viewType);
  }
获取 view 类型:列数为1时,view 类型为 VIEW_TYPE_LIST,列数为3时, view类型为 VIEW_TYPE_GRID
  @Override
  public int getItemViewType(int position) {
    final int viewType;
    int column = layoutManager.getSpanCount();
    switch (column) {
      case COLUMN_ONE:
        viewType = VIEW_TYPE_LIST;
        break;
      case COLUMN_THREE:
        viewType = VIEW_TYPE_GRID;
        break;
      default:
        throw new RuntimeException("wtf?");
    }
    return viewType;
完整代码:https://github.com/wangshouquan/list-to-grid
以上就是本文的全部内容,希望对大家的学习有所帮助,也希望大家多多支持亿速云。
免责声明:本站发布的内容(图片、视频和文字)以原创、转载和分享为主,文章观点不代表本网站立场,如果涉及侵权请联系站长邮箱:is@yisu.com进行举报,并提供相关证据,一经查实,将立刻删除涉嫌侵权内容。