您好,登录后才能下订单哦!
这篇文章主要介绍了Android怎么实现在ServiceManager中加入自定义服务的方法,具有一定借鉴价值,感兴趣的朋友可以参考下,希望大家阅读完这篇文章之后大有收获,下面让小编带着大家一起了解一下。
具体如下:
当我们要使用android的系统服务时,一般都是使用Context.getSystemService方法。例如我们要获取AudioManager,我们可以:
AudioManager am = (AudioManager) getSystemService(Context.AUDIO_SERVICE);
获取的服务,其实是在ServiceManager中注册的Binder服务,然后进行封装后,提供给用户。
可以看ContextImpl.java中的实现:
static {
    ......
    // 将AudioManager加入SYSTEM_SERVICE_MAP中,调用getSystemService时,
    // 就会从SYSTEM_SERVICE_MAP得到AudioManager
    registerService(AUDIO_SERVICE, new ServiceFetcher() {
        public Object createService(ContextImpl ctx) {
          return new AudioManager(ctx);
        }});
    ......
}
AudioManager是对IAudioService的封装,实际操作都是使用IAudioService进行的,看AudioManager中的代码:
private static IAudioService getService()
{
    if (sService != null) {
      return sService;
    }
    // 从ServiceManager中获取Binder
    IBinder b = ServiceManager.getService(Context.AUDIO_SERVICE);
    // 将Binder转化成IAudioService,方便调用
    sService = IAudioService.Stub.asInterface(b);
    return sService;
}
上面是android系统的使用方式。如果我们添加自己的服务,要如何做呢?
我们在eclipse中建3个测试工程:
1)MyServiceLib:这是个lib工程,需要在eclipse中勾选Is Library。后面的两个工程,都需要将MyServiceLib添加到Library中。
2) MyService: 用于在android开机时注册自定义服务进ServiceManager。因为ServiceManager被@hide隐藏了,所以要使用它需要自己手动添加sdk包,添加方式可参考在Eclipse中使用SDK中@hide函数的方法附加说明。另外,添加服务,需要System用户,所以manifest文件中需要加上android:sharedUserId="android.uid.system", 并且要使用platform签名签名apk。
3)MyServiceTest:用于测试上面两个工程。
下面我们就来编码。
先在MyServiceLib工程中创建一个aidl文件,android编译工具会帮我们生成相应的java类,aidl文件如下
package com.test.lib;
interface IMyService {
  void setValue(int val);
  int getValue();
}
定义了两个接口用于测试,setValue和getValue。
android编译工具会帮我们在gen目录下生成一个IMyService的java类。
2. 在MyService工程中创建MyService类, 这个类继承自IMyService.Stub,实现了setValue和getValue接口,这就是一个Service。
package com.test.myservice;
import android.os.RemoteException;
import com.test.lib.IMyService;
public class MyService extends IMyService.Stub {
  private int value;
  @Override
  public void setValue(int val) throws RemoteException {
    this.value = val;
  }
  @Override
  public int getValue() throws RemoteException {
    return value;
  }
}
下面我们将把它加入至ServiceManager中。
3. 在MyService工程中创建MyServiceApplication类
package com.test.myservice;
import android.app.Application;
import android.os.ServiceManager;
public class MyServiceApplication extends Application{
  @Override
  public void onCreate() {
    super.onCreate();
    ServiceManager.addService("MYSERVICE", new MyService());
  }
}
这是一个Application,我们希望android系统启动时,就创建这个Application,在onCreate方法中,创建MyService类,并加入到ServiceManager中。因此,我需要修改下manifest文件
<application
    android:name=".MyServiceApplication"  //指定Application为我们创建的MyServiceApplication
    android:allowBackup="true"
    android:icon="@drawable/ic_launcher"
    android:persistent="true"       // 加上persistent=ture,ActivityManager创建的时候,就会创建该应用的进程,并调用MyServiceApplication的onCreate方法
    android:label="@string/app_name"
    android:theme="@style/AppTheme" >
注意,这个应用需要system用户,并签名才可运行。
这样,服务端就好了,并且开机时,我们的服务就已经在ServiceManager中了。
4. 下面我们提供一个Manager类方便客户端使用。在MyServiceLib中创建MyManager类:
package com.test.lib;
import android.os.RemoteException;
import android.os.ServiceManager;
public class MyManager {
  private static MyManager instance;
  private IMyService myservice;
  public static MyManager getInstance() {
    if (instance == null) {
      instance = new MyManager();
    }
    return instance;
  }
  private MyManager() {
    // 从ServiceManager中获取服务
    myservice = IMyService.Stub.asInterface(ServiceManager.getService("MYSERVICE"));
  }
  public void setValue(int value) throws RemoteException {
    myservice.setValue(value);
  }
  public int getValue() throws RemoteException {
    return myservice.getValue();
  }
}
5. 在MyServiceTest工程中进行测试
通过MyManager.getInstance()可以很方便的获取服务的Manager,对远程服务进行调用。我们创建一个Activity来使用MyManager
package com.test.client;
import java.util.Random;
import android.app.Activity;
import android.content.Context;
import android.media.AudioManager;
import android.os.Bundle;
import android.os.RemoteException;
import android.view.View;
import android.view.View.OnClickListener;
import android.widget.Button;
import android.widget.TextView;
import android.widget.Toast;
import com.test.binder.client.R;
import com.test.lib.MyManager;
public class MainActivity extends Activity implements OnClickListener {
  MyManager myManager;
  Button btnSetValue;
  Button btnGetValue;
  TextView tvValue;
  @Override
  protected void onCreate(Bundle savedInstanceState) {
    super.onCreate(savedInstanceState);
    AudioManager am = (AudioManager) getSystemService(Context.AUDIO_SERVICE);
    setContentView(R.layout.activity_main);
    btnSetValue = (Button) findViewById(R.id.btn_set_value);
    btnGetValue = (Button) findViewById(R.id.btn_get_value);
    tvValue = (TextView) findViewById(R.id.tv_value);
    // 获取MyManager
    myManager = MyManager.getInstance();
  }
  @Override
  public void onClick(View view) {
    switch (view.getId()) {
    case R.id.btn_set_value:
      int value = new Random().nextInt();
      try {
        myManager.setValue(value);
        Toast.makeText(this, "set value to "+value+ " success!", 0).show();
      } catch (RemoteException e) {
        e.printStackTrace();
        Toast.makeText(this, "set value fail!", 0).show();
      }
      break;
    case R.id.btn_get_value:
      try {
        tvValue.setText("value:"+myManager.getValue());
      } catch (RemoteException e) {
        // TODO Auto-generated catch block
        e.printStackTrace();
      }
      break;
    default:
      break;
    }
  }
}
附:在Eclipse中使用SDK中@hide函数的方法
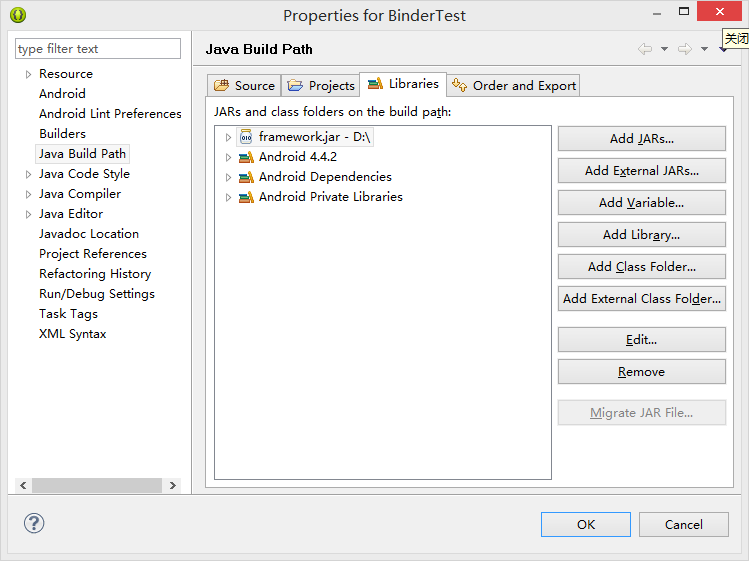
我们使用Eclipse进行android开发时,使用的是ADT中提供的SDK,里面是不包含@hide函数和变量的。因为android为了兼容、安全等原因,在提供SDK时,把这些函数给隐藏了。但是,很多时候,我们又需要使用这些函数,因此我们需要手动添加android SDK。例如,当我们使用AudioManager时,当需要看某种streamType是否mute时,可以调用isStreamMute(int streamType)这个方法,但是因为它是@hide的,所以我们就需要引入自己的sdk,才能编译通过。
1. android系统编译时,当编译“include $(BUILD_JAVA_LIBRARY)”时,会在$ANDROID_SOURCE_BASE/out/target/common/obj/JAVA_LIBRARIES生成中间文件,当我们需要使用某些类库时,可以从这里面找。
isStreamMute(int streamType)在framework.jar中,我们从out/target/common/obj/JAVA_LIBRARIES/framework_intermediates中,将classes.jar拷贝到本地,并重命名为framework.jar。
2. 在eclipse中右键工程->Properties->Java Build Path->Libraries->Add External JAR

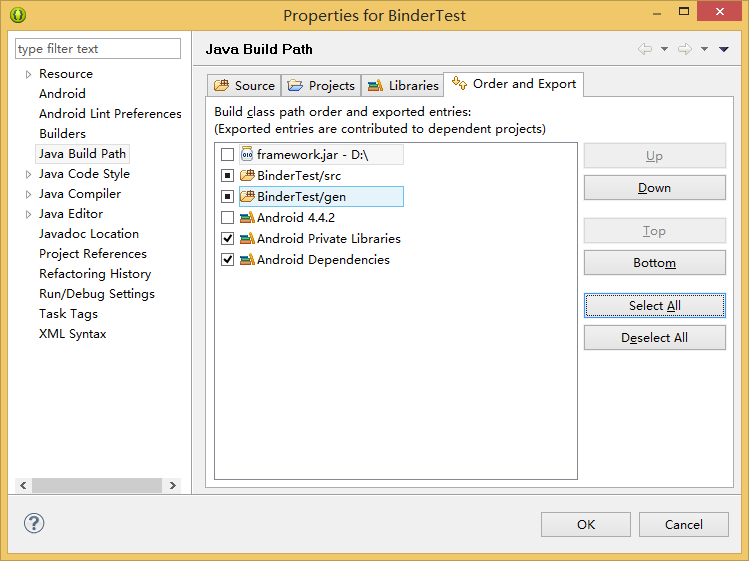
3. 点击Order and Export,将framework.jar 置顶

4. 现在,我们就可以使用AudioManager中的isStreamMute(int streamType)方法了

感谢你能够认真阅读完这篇文章,希望小编分享的“Android怎么实现在ServiceManager中加入自定义服务的方法”这篇文章对大家有帮助,同时也希望大家多多支持亿速云,关注亿速云行业资讯频道,更多相关知识等着你来学习!
免责声明:本站发布的内容(图片、视频和文字)以原创、转载和分享为主,文章观点不代表本网站立场,如果涉及侵权请联系站长邮箱:is@yisu.com进行举报,并提供相关证据,一经查实,将立刻删除涉嫌侵权内容。