您好,登录后才能下订单哦!
这篇文章将为大家详细讲解有关如何使用SpringCloud搭建一个微服务框架,文章内容质量较高,因此小编分享给大家做个参考,希望大家阅读完这篇文章后对相关知识有一定的了解。
Spring Cloud是一个基于Spring Boot实现的云应用开发工具,它为基于JVM的云应用开发中的配置管理、服务发现、断路器、智能路由、微代理、控制总线、全局锁、决策竞选、分布式会话和集群状态管理等操作提供了一种简单的开发方式。
Spring Cloud包含了多个子项目(针对分布式系统中涉及的多个不同开源产品),比如:Spring Cloud Config、Spring Cloud Netflix、Spring Cloud CloudFoundry、Spring Cloud AWS、Spring Cloud Security、Spring Cloud Commons、Spring Cloud Zookeeper、Spring Cloud CLI等项目。
1.微服务
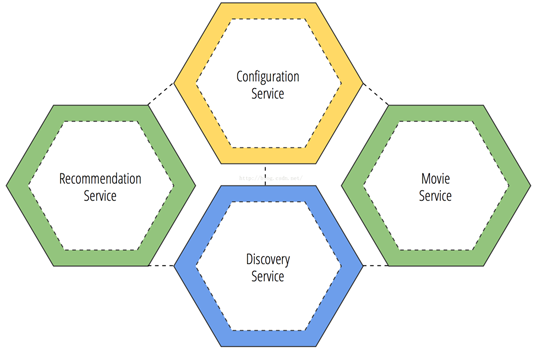
微服务主要包含服务注册,服务发现,服务路由,服务配置,服务熔断,服务降级等一系列的服务,而Spring Cloud为我们提供了个一整套的服务;

本例子为你提供了最简单的一个服务发现例子,包含服务注册发现spingCloudEurekaServer、服务配置中心spingCloudConfServer、以及一个app应用springCloudApp
2.服务注册与发现
spingCloudEurekaServer
pom.xml
<project xmlns="http://maven.apache.org/POM/4.0.0" xmlns:xsi="http://www.w3.org/2001/XMLSchema-instance" xsi:schemaLocation="http://maven.apache.org/POM/4.0.0 http://maven.apache.org/xsd/maven-4.0.0.xsd">
 <modelVersion>4.0.0</modelVersion>
 <groupId>com.caicongyang</groupId>
 <artifactId>spingCloudEurekaServer</artifactId>
 <version>0.0.1-SNAPSHOT</version>
 <parent>
  <groupId>org.springframework.cloud</groupId>
  <artifactId>spring-cloud-starter-parent</artifactId>
  <version>Angel.SR6</version>
 </parent>
 <dependencies>
  <dependency>
   <groupId>org.springframework.cloud</groupId>
   <artifactId>spring-cloud-starter-eureka-server</artifactId>
  </dependency>
 </dependencies>
 <build>
  <plugins>
   <plugin>
    <groupId>org.springframework.boot</groupId>
    <artifactId>spring-boot-maven-plugin</artifactId>
   </plugin>
  </plugins>
 </build>
</project>
Application.java
package com.caicongyang.eureka;

import org.springframework.boot.SpringApplication;
import org.springframework.boot.autoconfigure.SpringBootApplication;
import org.springframework.cloud.netflix.eureka.server.EnableEurekaServer;

/**
 * Spring could EurekaServer程序主入口
 *
 * @author Administrator
 *
 */
@SpringBootApplication
@EnableEurekaServer
public class Application {
 public static void main(String[] args) {
  SpringApplication.run(Application.class, args);
 }
}
application.yml (可用properties替代)
server:
  port: 9999
eureka:
  instance:
   hostname: 127.0.0.1
  client:
   registerWithEureka: false
   fetchRegistry: false
   serviceUrl:
      defaultZone: http://${eureka.instance.hostname}:${server.port}/eureka/
3.服务配置(全局配置中心)
pom.xml
<project xmlns="http://maven.apache.org/POM/4.0.0" xmlns:xsi="http://www.w3.org/2001/XMLSchema-instance"
 xsi:schemaLocation="http://maven.apache.org/POM/4.0.0 http://maven.apache.org/xsd/maven-4.0.0.xsd">
 <modelVersion>4.0.0</modelVersion>
 <groupId>com.caicongyang</groupId>
 <artifactId>spingCloudConfServer</artifactId>
 <version>0.0.1-SNAPSHOT</version>

 <parent>
  <groupId>org.springframework.cloud</groupId>
  <artifactId>spring-cloud-starter-parent</artifactId>
  <version>Angel.SR6</version>
 </parent>
 <dependencies>
  <dependency>
   <groupId>org.springframework.cloud</groupId>
   <artifactId>spring-cloud-config-server</artifactId>
  </dependency>
  <!-- sping cloud 注册服务 -->
  <dependency>
   <groupId>org.springframework.cloud</groupId>
   <artifactId>spring-cloud-starter-eureka</artifactId>
  </dependency>
  <dependency>
   <groupId>org.springframework.boot</groupId>
   <artifactId>spring-boot-starter-test</artifactId>
   <scope>test</scope>
  </dependency>
 </dependencies>

 <build>
  <plugins>
   <plugin>
    <groupId>org.springframework.boot</groupId>
    <artifactId>spring-boot-maven-plugin</artifactId>
   </plugin>
  </plugins>
  <defaultGoal>compile</defaultGoal>
 </build>
</project>
application.java
package com.caiconyang.conf;

import org.springframework.boot.SpringApplication;
import org.springframework.boot.autoconfigure.SpringBootApplication;
import org.springframework.cloud.config.server.EnableConfigServer;

/**
 * Spring could conf程序主入口
 * @author Administrator
 *
 */
@SpringBootApplication
@EnableConfigServer
public class Application {
 public static void main(String[] args) {
  SpringApplication.run(Application.class,args);
 }
}
application.properties
server.port=8888
## App配置文件所在git地址
spring.cloud.config.server.git.uri=https://git.oschina.net/caicongyang/springCloudConfigRepo.git
spring.cloud.config.server.git.searchPaths=repo
spring.application.name=spingCloudConfServer
4.App
pom.xml
<project xmlns="http://maven.apache.org/POM/4.0.0" xmlns:xsi="http://www.w3.org/2001/XMLSchema-instance" xsi:schemaLocation="http://maven.apache.org/POM/4.0.0 http://maven.apache.org/xsd/maven-4.0.0.xsd">
 <modelVersion>4.0.0</modelVersion>
 <groupId>com.caicongyang</groupId>
 <artifactId>springCloudApp</artifactId>
 <version>0.0.1-SNAPSHOT</version>

 <parent>
  <groupId>org.springframework.cloud</groupId>
  <artifactId>spring-cloud-starter-parent</artifactId>
  <version>Angel.SR6</version>
 </parent>
 <properties>
  <project.build.sourceEncoding>UTF-8</project.build.sourceEncoding>
  <java.version>1.7</java.version>
  <java.encoding>UTF-8</java.encoding>
  <springfox.swagger.version>2.2.2</springfox.swagger.version>
 </properties>
 <dependencies>
  <dependency>
   <groupId>org.springframework.boot</groupId>
   <artifactId>spring-boot-starter-web</artifactId>
  </dependency>
  <!-- sping cloud 监控 http://localhost:8080/health -->
  <dependency>
   <groupId>org.springframework.boot</groupId>
   <artifactId>spring-boot-starter-actuator</artifactId>
  </dependency>
  <dependency>
   <groupId>org.springframework.cloud</groupId>
   <artifactId>spring-cloud-starter-config</artifactId>
  </dependency>
  <!-- sping cloud 注册服务 -->
  <dependency>
   <groupId>org.springframework.cloud</groupId>
   <artifactId>spring-cloud-starter-eureka</artifactId>
  </dependency>
   <!-- sping cloud 路由 -->
  <dependency>
   <groupId>org.springframework.cloud</groupId>
   <artifactId>spring-cloud-starter-hystrix</artifactId>
  </dependency>

  <dependency>
   <groupId>org.springframework.boot</groupId>
   <artifactId>spring-boot-starter-test</artifactId>
   <scope>test</scope>
  </dependency>
  <dependency>
   <groupId>io.springfox</groupId>
   <artifactId>springfox-swagger2</artifactId>
   <version>${springfox.swagger.version}</version>
  </dependency>
  <dependency>
   <groupId>io.springfox</groupId>
   <artifactId>springfox-swagger-ui</artifactId>
   <version>${springfox.swagger.version}</version>
  </dependency>
 </dependencies>


 <build>
  <finalName>spingcould</finalName>
  <plugins>
   <plugin>
    <groupId>org.apache.maven.plugins</groupId>
    <artifactId>maven-compiler-plugin</artifactId>
    <configuration>
     <source>${java.version}</source>
     <target>${java.version}</target>
     <encoding>${java.encoding}</encoding>
     <showWarnings>true</showWarnings>
    </configuration>
   </plugin>
  </plugins>
 </build>


</project>
Application.java
package com.caicongyang.springCloudApp.main;

import org.springframework.boot.SpringApplication;
import org.springframework.boot.autoconfigure.EnableAutoConfiguration;
import org.springframework.cloud.client.discovery.EnableDiscoveryClient;
import org.springframework.context.annotation.ComponentScan;
import org.springframework.context.annotation.Configuration;

/**
 * Spring could web程序主入口
 * @author Administrator
 *
 */
@Configuration//配置控制
@EnableAutoConfiguration//启用自动配置
@ComponentScan(value={"com.caicongyang.springCloudApp"})//组件扫描
@EnableDiscoveryClient
public class Application {
 public static void main(String[] args) {
  //第一个简单的应用,
  SpringApplication.run(Application.class,args);
 }
}
SwaggerConfig.java
package com.caicongyang.springCloudApp.conf;

import org.springframework.beans.factory.annotation.Value;
import org.springframework.context.annotation.Bean;
import org.springframework.context.annotation.Configuration;

import springfox.documentation.service.ApiInfo;
import springfox.documentation.spi.DocumentationType;
import springfox.documentation.spring.web.plugins.Docket;
import springfox.documentation.swagger2.annotations.EnableSwagger2;

/**
 *
 * @author caicongyang1
 * @version id: SwaggerConfig, v 0.1 16/4/22 下午4:12 caicongyang1 Exp $$
 */
@Configuration
@EnableSwagger2
public class SwaggerConfig {

 @Value("${swagger.ui.enable}") //该配置项在配置中心管理
 private boolean environmentSpecificBooleanFlag;

 @Bean
 public Docket docketFactory() {
  return new Docket(DocumentationType.SWAGGER_2).apiInfo(
   new ApiInfo("接口文档", "SpingCloud web接口列表", "1.0", "", "", "", "")).enable(environmentSpecificBooleanFlag);
 }
}
application.properties
server.port=8080
spring.cloud.config.uri=http://127.0.0.1:8888
spring.cloud.config.name=springCloudApp
spring.cloud.config.profile=${config.profile:dev}
#service discovery url
eureka.client.serviceUrl.defaultZone=http://localhost:9999/eureka/
#service name
spring.application.name=springCloudApp
5.测试与验证
顺序启动服务注册发现spingCloudEurekaServer、服务配置中心spingCloudConfServer、以及一个app应用springCloudApp
测试与验证
1.访问http://localhost:9999/eureka/ app是否已经注册上来
2.访问 http://localhost:8080/swagger-ui.html 是否正常访问,如果正常访问说明争取读取到config配置中心的swagger.ui.enable配置项
关于如何使用SpringCloud搭建一个微服务框架就分享到这里了,希望以上内容可以对大家有一定的帮助,可以学到更多知识。如果觉得文章不错,可以把它分享出去让更多的人看到。
免责声明:本站发布的内容(图片、视频和文字)以原创、转载和分享为主,文章观点不代表本网站立场,如果涉及侵权请联系站长邮箱:is@yisu.com进行举报,并提供相关证据,一经查实,将立刻删除涉嫌侵权内容。