您好,登录后才能下订单哦!
密码登录
登录注册
点击 登录注册 即表示同意《亿速云用户服务条款》

更多文章请访问 乌龟运维 wuguiyunwei.com
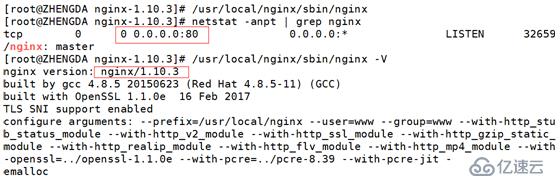
已经上线六个个多月 现在非常稳定 这是现在的整理
Nginx 下载
wget http://nginx.org/download/nginx-1.10.3.tar.gz
Openssl 下载
Wget https://www.openssl.org/source/openssl-1.1.0e.tar.gz
Pcre 下载
wget ftp://ftp.csx.cam.ac.uk/pub/software/programming/pcre/pcre-8.39.tar.gz
下载 jemalloc
wget https://github.com/jemalloc/jemalloc/releases/download/4.5.0/jemalloc-4.5.0.tar.bz2

jemalloc是一个通用的malloc(3),实现强调碎片回避和可扩展并发支持。jemalloc首先在2005年被用作FreeBSD libc分配器,从那时起它已经发现了许多依赖于其可预测的行为的应用程序。2010年,jemalloc开发工作扩展到包括开发者支持功能,例如堆分析和广泛的监视/调整挂钩。现代的jemalloc版本继续被集成回FreeBSD,因此通用性仍然至关重要。持续的开发努力趋向于使jemalloc成为用于广泛的苛刻应用的最佳分配器,并消除/减轻对现实世界应用具有实际影响的弱点。


安装一些依赖 yum -y install zlib-devel gcc gcc-c++
创建用户 useradd -M -s /sbin/nologin www
./configure --prefix=/usr/local/nginx --user=www --group=www --with-http_stub_status_module --with-http_v2_module --with-http_ssl_module --with-http_gzip_static_module --with-http_realip_module --with-http_flv_module --with-http_mp4_module --with-openssl=../openssl-1.1.0e --with-pcre=../pcre-8.39 --with-pcre-jit --with-ld-opt=-ljemalloc
–with-http_stub_status_module //Nginx状态监控模块
–with-http_v2_module //配置Nginx支持HTTP2.0
–with-http_ssl_module //配置Nginx 支持HTTPS
–with-http_gzip_static_module //开启Gzip静态压缩
–with-http_realip_module //获取客户端真是ip
–with-http_flv_module //为Flash视频(FLV)文件提供伪流服务器端支持
–with-http_mp4_module //为MP4文件提供伪流服务器端支持。以.mp4,.m4v或.m4a文件扩展名
–with-openssl=../openssl-1.1.0e //指定Nginx ssl模块依赖的ssl库
–with-pcre=../pcre-8.39 //指定Nginx pcre模块依赖的pcre库
–with-pcre-jit //构建具有“即时编译”支持的PCRE库
–with-ld-opt= //传递给C链接器的其他参数


安装工具 yum -y install coreutils
安装daemontools daemontools是用于管理UNIX服务的工具的集合
以下安装方法来自官网 http://cr.yp.to/daemontools/install.html
mkdir -p /package
chmod 1755 /packagecd /package
下载 wget http://cr.yp.to/daemontools/daemontools-0.76.tar.gz
gunzip daemontools-0.76.tar
tar -xpf daemontools-0.76.tar
rm -f daemontools-0.76.tar
cd admin/daemontools-0.76
安装
sed -i ‘s/extern int errno;/#include <errno.h>/1’ ./src/error.h
package/install
vim /etc/init.d/nginx
chmode +x /etc/init.d/nginx


#!/bin/sh
# chkconfig:   - 86 16
# http://goyun.org
. /etc/rc.d/init.d/functions

. /etc/sysconfig/network

[ "$NETWORKING" = "no" ] && exit 0

nginx="/usr/local/nginx/sbin/nginx"
prog=$(basename $nginx)

NGINX_CONF_FILE="/usr/local/nginx/conf/nginx.conf"

[ -f /etc/sysconfig/nginx ] && . /etc/sysconfig/nginx

lockfile=/var/lock/subsys/nginx

make_dirs() {  if [ -z "`grep $user /etc/passwd`" ]; then
    useradd -M -s /bin/nologin $user
  fi
  options=`$nginx -V 2>&1 | grep 'configure arguments:'`
  for opt in $options; do
    if [ `echo $opt | grep '.*-temp-path'` ]; then
      value=`echo $opt | cut -d "=" -f 2`
      if [ ! -d "$value" ]; then
        # echo "creating" $value
        mkdir -p $value && chown -R $user $value
      fi
    fi
  done
}

start() {
  [ -x $nginx ] || exit 5
  [ -f $NGINX_CONF_FILE ] || exit 6
  make_dirs
  echo -n $"Starting $prog: "
  daemon $nginx -c $NGINX_CONF_FILE
  retval=$?
  echo
  [ $retval -eq 0 ] && touch $lockfile
  return $retval
}

stop() {
  echo -n $"Stopping $prog: "
  $nginx -s stop
  retval=$?
  echo
  [ $retval -eq 0 ] && rm -f $lockfile
  return $retval
}

restart() {
  configtest || return $?
  stop
  sleep 3
  start
}

reload() {
  configtest || return $?
  echo -n $"Reloading $prog: "
  $nginx -s reload
  RETVAL=$?
  echo
}

force_reload() {
  restart
}

configtest() {
  $nginx -t -c $NGINX_CONF_FILE
}

rh_status() {
  status $prog
}

rh_status_q() {
  rh_status >/dev/null 2>&1
}

case "$1" in
  start)
    rh_status_q && exit 0
  stop)
    rh_status_q || exit 0
    $1
    ;;
  restart|configtest)
    $1
    ;;
  reload)
    rh_status_q || exit 7
    $1
    ;;
  force-reload)
    force_reload
    ;;
  status)
    rh_status
    ;;
  condrestart|try-restart)
    rh_status_q || exit 0
    ;;
  *)
    echo $"Usage: $0 {start|stop|status|restart|condrestart|try-restart|reload|force-reload|configtest}"
    exit 2
esac
免责声明:本站发布的内容(图片、视频和文字)以原创、转载和分享为主,文章观点不代表本网站立场,如果涉及侵权请联系站长邮箱:is@yisu.com进行举报,并提供相关证据,一经查实,将立刻删除涉嫌侵权内容。